


Quick Start Guide
MIO R-1 AUDIO Tango Distributed Audio Remote Control
Overview
The MIO R-1 AUDIO (FG147-04) remote provides custom control features, contained
in an elegant handheld device, designed specifically for use with Matrix Distributed
Audio Systems using Metreau DAS-MET-6SRC keypads.
The MIO R-1 AUDIO controls up to 8 different devices or Sources.
Specifications
Installing Custom Buttons
1. Flip and turn the MIO R-1 AUDIO so that the buttons are facing away from you
and the device is upside down.
2. Holding the device in both hands, place your thumbs on the battery door and
push up to slide the battery door free.
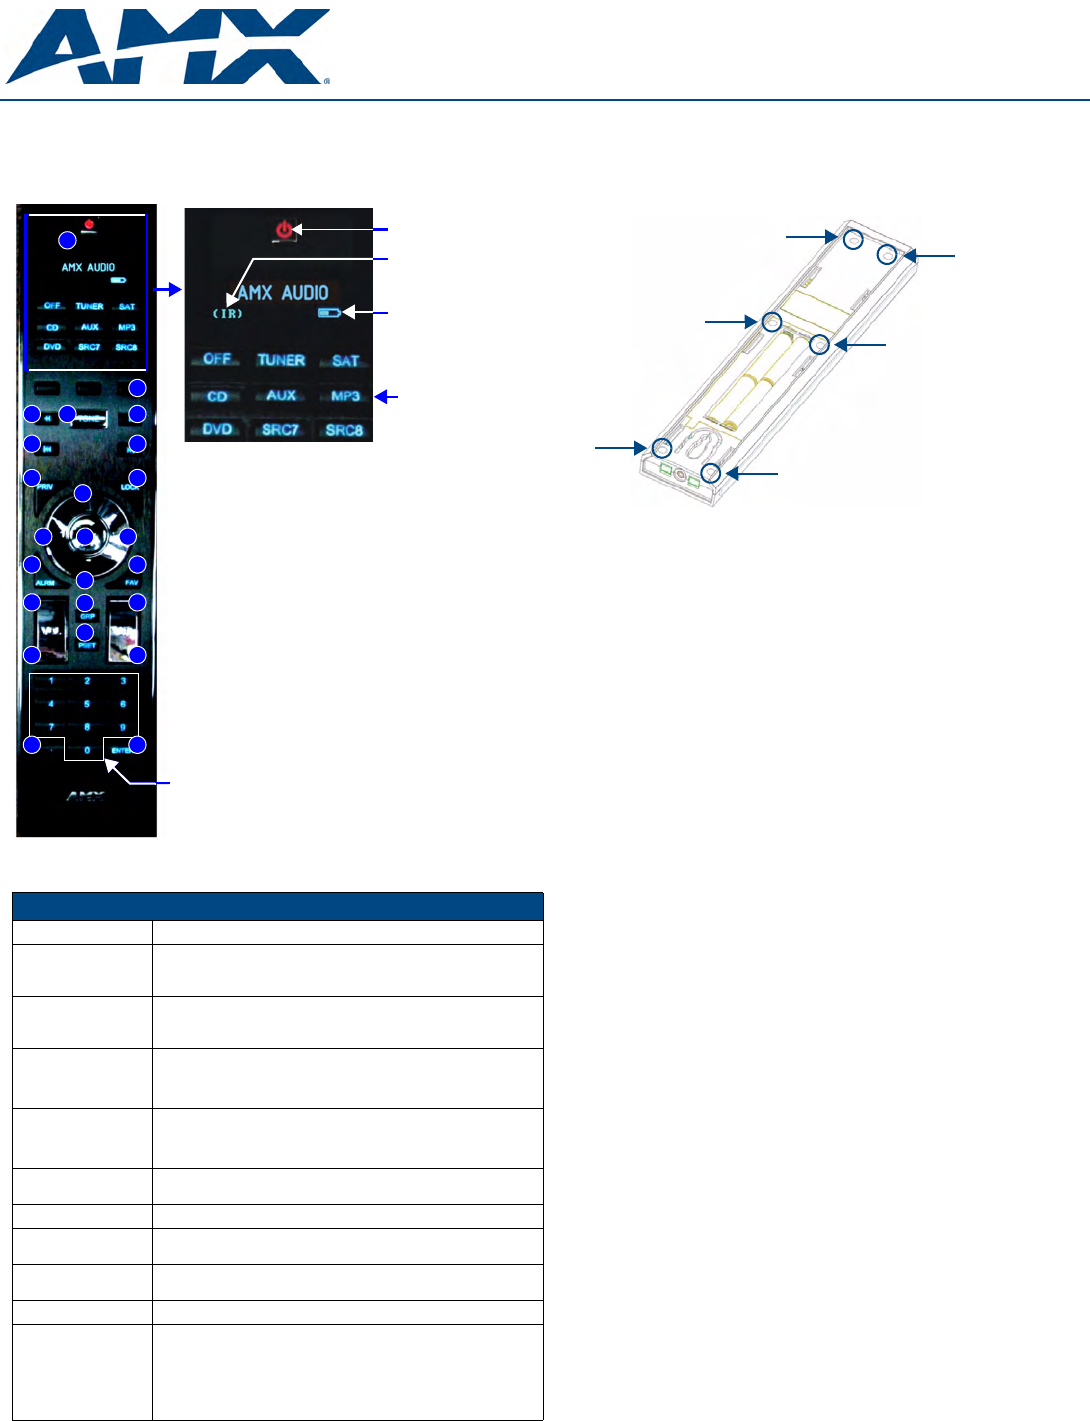
3. Unscrew the 6 screw points indicated in FIG. 2.
4. Turn the unit over so the buttons are facing you.
5. Lift the top assembly away from the PCB.
6. If necessary, push out the standard buttons from the front of the top assembly.
7. Drop on your custom button pad and verify the alignment with the guide posts on
the PCB.
8. Place the top assembly back down on the PCB and return the unit over, expos-
ing the 6 screw points.
9. Tighten the 6 screw points.
10. Place the battery door back on the device, slide to lock it in place.
Inserting Batteries into The MIO R-1 AUDIO
To install your 4 AAA batteries into the MIO R-1 AUDIO:
1. Flip and turn the MIO R-1 AUDIO so that the buttons are facing away from you
and the device is upside down.
2. Holding the device in both hands, place your thumbs on the battery door and
slide the battery door free.
3. Insert the batteries as indicated inside the battery compartment.
4. Place the battery door back on the device, slide to lock it in place.
Battery Low Indicator
When the battery charge level is too low to sustain continuous operation, the LCD
flashes, "Battery Low" and the device shuts down.
Programming The MIO R-1 AUDIO Using KeypadBuilder
The MIO R-1 AUDIO comes pre-customized with appropriate labels, which in most
cases should not be changed. However, if in your installation you intend to use the
MIO R-1 AUDIO with a NetLinx Controller and Metreau AxLink keypads (for more than
just Audio), you could customize your buttons in the KeypadBuilder application. The
application and documentation are available from www.amx.com.
There are a select number of Serial Commands the MIO R-1 AUDIO recognizes. For a
full list and descriptions, consult the MIO R-1 AUDIO Operation/Reference Guide.
The Programming Jack is used for communication between the device and
KeypadBuilder. The programming jack uses a three-wire, 2.5 mm stereo jack, you can
order the programming cable (FG10-817) from AMX if you do not currently possess
one. While loading your configuration file make sure the device is situated as such that
the batteries will not fall out. The load will fail if your batteries fall out during the
process. The MIO communicates at 115200 baud rate.
Refer to the MIO R-1 AUDIO Operation/Reference Guide for instructions on using the
Programming Jack to load configuration files on the MIO R-1 AUDIO.
Tone Control & SRS Setting
To access the Tone Control and SRS settings, press the TONE button. This enables
the Tone Control Mode with BASS as the first mode selected. There are 3 Tone
Control Modes available for adjustment, and 4 SRS options, as follows:
• BASS: Increase / Decrease from -10dB to +10dB (Up/Down NAV buttons)
• Treble: Increase / Decrease from -10dB to +10dB (Up/Down NAV buttons)
• Balance: Left / Right (Up NAV button = right, Down NAV button = left)
• SRS options: BASS Boost, Focus, 3D, WOW
The Source buttons on the Metreau keypad provides visual feedback as to which
mode it is currently in. The following sources will light based on the current mode:
• Source 1 = BASS
• Source 2 = Treble
• Source 3 = Balance
• Source 4 = SRS
When first entering Tone Control Mode, BASS mode is active (Source 1 LED is lit). To
move from mode to mode, select the Center NAV button. This saves the setting and
moves to the next mode.
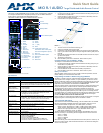
FIG. 1
MIO R-1 AUDIO remote controller
MIO R-1 AUDIO Specifications
Power Requirements: 4 AAA Alkaline Batteries (included) - approx. 5 hours battery life
Transmission
Frequencies
AMX 38 KHz/455 KHz IR
Note: The Metreau MET-6N keypads only support 38 KHz. When used
with MET-6N keypads, the MIO R-1 AUDIO must be set to 38 KHz.
Transmission
Range (distance)
with MIO IR Receiver
• 100 feet at 38KHz
• 50 feet at 455KHz
Transmission
Range (angle)
• 140 degrees (+/-70° from perpendicular) horizontally from an axis
extending from the end of the remote.
• 40 degrees (+/-20° from perpendicular) vertically from an axis
extending from the end of the remote.
Top Components • LED - blue backlit buttons indicate device is awake
• Display (OLED) - 128 x 32 pixels, active area is 29.42mm x 7.98mm
• Pushbuttons - the power button is red backlit; the rest are blue backlit
buttons. 45 buttons; 9 custom buttons (3 macro and 6 device).
Rear Component • Programming Port - 2.5 mm stereo female conductor jack
• Battery Door
Dimensions (HWD) 9.50 x 2.00 x .74 (241.3 mm x 50.8 mm x 18.80 mm)
Weight • .45 lbs (20 kg) without batteries
• .55 lbs (25 kg) with batteries
Operating Environment: • Operating Temperature: 0° to 50° C (32° to 122° F)
• Storage Temperature: -10° to 70° C (14° to 158° F)
Included Accessories: • 4 AAA Batteries
Other AMX Equipment • DB-9 extension cable (FG10-727)
• Programming Cable - a 3 wire, 2.5 mm stereo jack (FG10-817)
• Custom engraving (FG147-01)
• MIO-RCC Kit (FG147-03K)
• MIO-RCC Charging Base (FG147-02)
• MIO-RBP Rechargeable Lithium Ion Battery (FG147-10)
• MIO Modero IR Receiver (FG5797-01xx; xx indicates color)
Power
IR Transmitting
Battery Meter
Source Select Options
1
2
3
4
5
6
7
8
9
10
11
12
13
14
15
16
26
28
41
42
43
44 45
Numeral Keypad
1 - Power
2 - Alarm
3 - Favorite
4 - Privacy
5 - Lock
6 - NAV Up
7 - NAV Down
8 - NAV Left
9 - NAV Right
10 - NAV Center
11 - Volume Up
12 - Volume Down
13 - NAV Up
14 - NAV Down
15 - Group
16 - Preset
26 - “ • “ (dot)
28 - Enter
41 - NAV Left
42 - Tone Controls/SRS options
43 - NAV Right
44 - NAV Up
45 - NAV Down
38 - Configuration (press and
hold with the “Dot” button (#26)
to access Configuration options)
38
FIG. 2 6 screwpoints (battery compartment cover removed)
1
2
3
4
5
6