


Bosch Security Systems
Divar | Installation Manual | Menu system EN | 5-11
Auto-protect
• Four inputs can be used to trigger automatic protection of video
clips.
• Select the inputs you want to use for each of these triggers. Set to
None if you do not want automatic protection.
• Select the length of time (1 to 60 minutes) that you want protected
before and after the event. These values are valid for all four inputs.
• Select the percentage of hard disk space you want to reserve for
auto-protected recordings and the behaviour of the Divar if this
percentage is reached (warn only, stop auto-protect recording or
overwrite the oldest auto-protected clips).
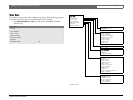
>>> Motion Setup
• Using motion detection outdoors may cause false alarms because of
varying light conditions.
• To restore the default motion settings select the Clear Motion
Settings item.
• Select the Display Monitor submenu to set up the view mode and
cameras to be activated on the monitor for each motion event. The
Motion Area submenu sets the area and sensitivity for each camera.
• Select the number of the output relay that is activated when motion
is detected.
• Enable the beeper to activate it when any motion is detected.
Display mon A
• Select the camera number that generates the motion event.
• If you have controllable cameras, set a camera number and a pre-
position number. The specified camera goes to this position when
motion is detected by the selected camera (not necessarily the
controllable camera).
• Select a view mode. Only view modes that are enabled can be
selected.
• If you have selected the full-screen or quad view mode, select the
cameras to be displayed.
Display mon B
• Select the camera number that generates the motion event.
• If you have controllable cameras, set a camera number and a pre-
position number. The specified camera goes to this position when
motion is detected by the selected camera (not necessarily the
controllable camera).
• Select up to four cameras to be displayed in sequence.
Motion area
• Select a camera number.
•The motion indicator shows the maximum level of camera motion
that has been detected for the defined area. Press F2 to clear it if
you want to re-test the level of motion detection.
• Use the arrow keys to adjust the Trigger level slider to just below
the indicated motion level.
• A motion detection signal is generated when the level of motion
reaches the trigger level set.
Edit area
•Select Motion Area to define the picture area where motion is
detected.
• Use the arrow keys to move around the grid. Press F1 to insert a
motion detection area and use the arrow keys to enlarge it. Press F1
again to save the area. Press the escape key to cancel and return to
grid square selection.
• Press the select key to leave the grid. F2 clears all motion detection
areas.
>>> Video loss Setup
• Select the monitor on which the camera with the video loss is
displayed.
• Select the number of the output relay that is activated when video
loss occurs.
• Enable the beeper to activate it when any video loss occurs.
>> HISTORY LOG SETUP
•Select Yes for those events that you want to log in the history file.