


34
H
D
H
D
*
*
D
M
T
W
T
F
S
D
*
*
*
*
A
O
U
E
H
R
A
A
D
*
*
*
Y
N
E
D
U
I
T
Y
A
*
*
*
0
0
0
–
–
–
–
–
I
*
[
S
1
–
–
–
–
–
–
–
L
–
P
T
0
–
–
–
–
–
–
–
Y
–
R
A
:
:
:
:
:
:
:
:
*
–
O
R
0
–
–
–
–
–
–
–
S
*
G
T
0
–
–
–
–
–
–
–
E
W
R
*
:
:
:
:
:
:
:
:
T
E
A
S
1
–
–
–
–
–
–
–
*
D
M
T
7
–
–
–
–
–
–
–
*
*
*
O
:
:
:
:
:
:
:
:
*
–
T
P
0
–
–
–
–
–
–
–
*
–
I
*
0
–
–
–
–
–
–
–
*
–
M
*
*
*
*
*
*
*
*
*
*
*
E
S
–
–
–
–
–
–
–
–
S
–
R
P
–
–
–
–
–
–
–
–
U
–
]
D
4
–
–
–
–
–
–
–
N
–
*
*
8
–
–
–
–
–
–
–
*
*
*
*
1
6
5
–
–
–
–
–
M
S
*
P
–
–
–
–
–
–
–
–
O
A
*
G
O
–
–
–
–
–
–
–
N
T
*
M
N
–
–
–
–
–
–
–
*
*
*
*
S
M
T
W
T
F
S
D
*
*
*
*
U
O
U
E
H
R
A
A
D
*
*
*
N
N
E
D
U
I
T
Y
A
*
*
*
0
0
0
–
–
–
–
–
I
*
[
S
–
–
–
–
–
–
–
–
L
T
P
T
–
–
–
–
–
–
–
–
Y
U
R
A
:
:
:
:
:
:
:
:
*
E
O
R
–
–
–
–
–
–
–
–
S
*
G
T
–
–
–
–
–
–
–
–
E
W
R
*
:
:
:
:
:
:
:
:
T
E
A
S
–
–
–
–
–
–
–
–
*
D
M
T
–
–
–
–
–
–
–
–
*
*
*
O
:
:
:
:
:
:
:
:
*
T
T
P
–
–
–
–
–
–
–
–
*
H
I
*
–
–
–
–
–
–
–
–
*
U
M
*
*
*
*
*
*
*
*
*
*
*
E
S
–
–
–
–
–
–
–
–
S
F
R
P
–
–
–
–
–
–
–
–
U
R
]
D
–
–
–
–
–
–
–
–
N
I
*
*
–
–
–
–
–
–
–
–
*
*
*
*
1
6
5
–
–
–
–
–
M
S
*
P
–
–
–
–
–
–
–
–
O
A
*
G
–
–
–
–
–
–
–
–
N
T
*
M
–
–
–
–
–
–
–
–
*
*
*
*
D
M
T
W
T
F
S
D
*
*
*
*
A
O
U
E
H
R
A
A
D
*
*
*
Y
N
E
D
U
I
T
Y
A
*
*
*
0
0
0
–
–
–
–
–
I
*
[
S
1
–
–
–
–
–
–
–
L
T
P
T
0
–
–
–
–
–
–
–
Y
U
R
A
:
:
:
:
:
:
:
:
*
E
O
R
0
–
–
–
–
–
–
–
S
*
G
T
0
–
–
–
–
–
–
–
E
W
R
*
:
:
:
:
:
:
:
:
T
E
A
S
1
–
–
–
–
–
–
–
*
D
M
T
7
–
–
–
–
–
–
–
*
*
*
O
:
:
:
:
:
:
:
:
*
T
T
P
0
–
–
–
–
–
–
–
*
H
I
*
0
–
–
–
–
–
–
–
*
U
M
*
*
*
*
*
*
*
*
*
*
*
E
S
–
–
–
–
–
–
–
–
S
F
R
P
–
–
–
–
–
–
–
–
U
R
]
D
4
–
–
–
–
–
–
–
N
I
*
*
8
–
–
–
–
–
–
–
*
*
*
*
1
6
5
–
–
–
–
–
M
S
*
P
*
–
–
–
–
–
–
–
O
A
*
G
O
–
–
–
–
–
–
–
N
T
*
M
N
–
–
–
–
–
–
–
*
*
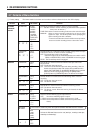
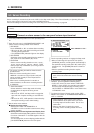
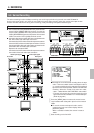
6-3 Timer Recording
5 Programming timer recording for more than one day
(every day)
This programming is to timer-record at the same time on
specified days of the week.
(Example)
HDR is performed in the 48-hour mode from 10:00 a.m. to
5:00 p.m. on Monday, Wednesday and Saturday.
1 Repeat steps 1 to 5 in “Timer Recording Program
Setting” on pages 31 and 32.
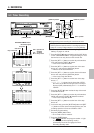
2 Set the day of the week on <PROGRAM TIMER> to
“DAY” with the [SET +/–] button.
3 Press the [SHIFT f] button so that the “hour” for the
start time blinks and set “hour” to “10” with the [SET +/–]
button.
4 Press the [SHIFT f] button so that the “minute” for the
start time blinks and set “minute” to “00” with the [SET +/
–] button.
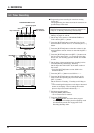
5 Press the [SHIFT f] button and [SET +/–] button to set
the hour of the stop time to “17”, the minute of the stop
time to “00”, the recording speed to “H/D48” and “PGM”
to “ON”.
6 Set the days of the week when timer recording is to be
executed (Monday, Wednesday, Saturday).
Set the days with “DAILY SET” at the lower section of
the screen.
• Press the [SHIFT 7] button so that “SUN” in the
lowest line blinks.
7 Press the [SET +/–] button to set “SUN” to “– –”.
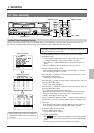
8 Press the [SHIFT f] button to select the day of the
week and set the operating day of the week with the
[SET +/–] button.
Set the items for “Tuesday”, “Thursday” and “Friday” to
“– –”.
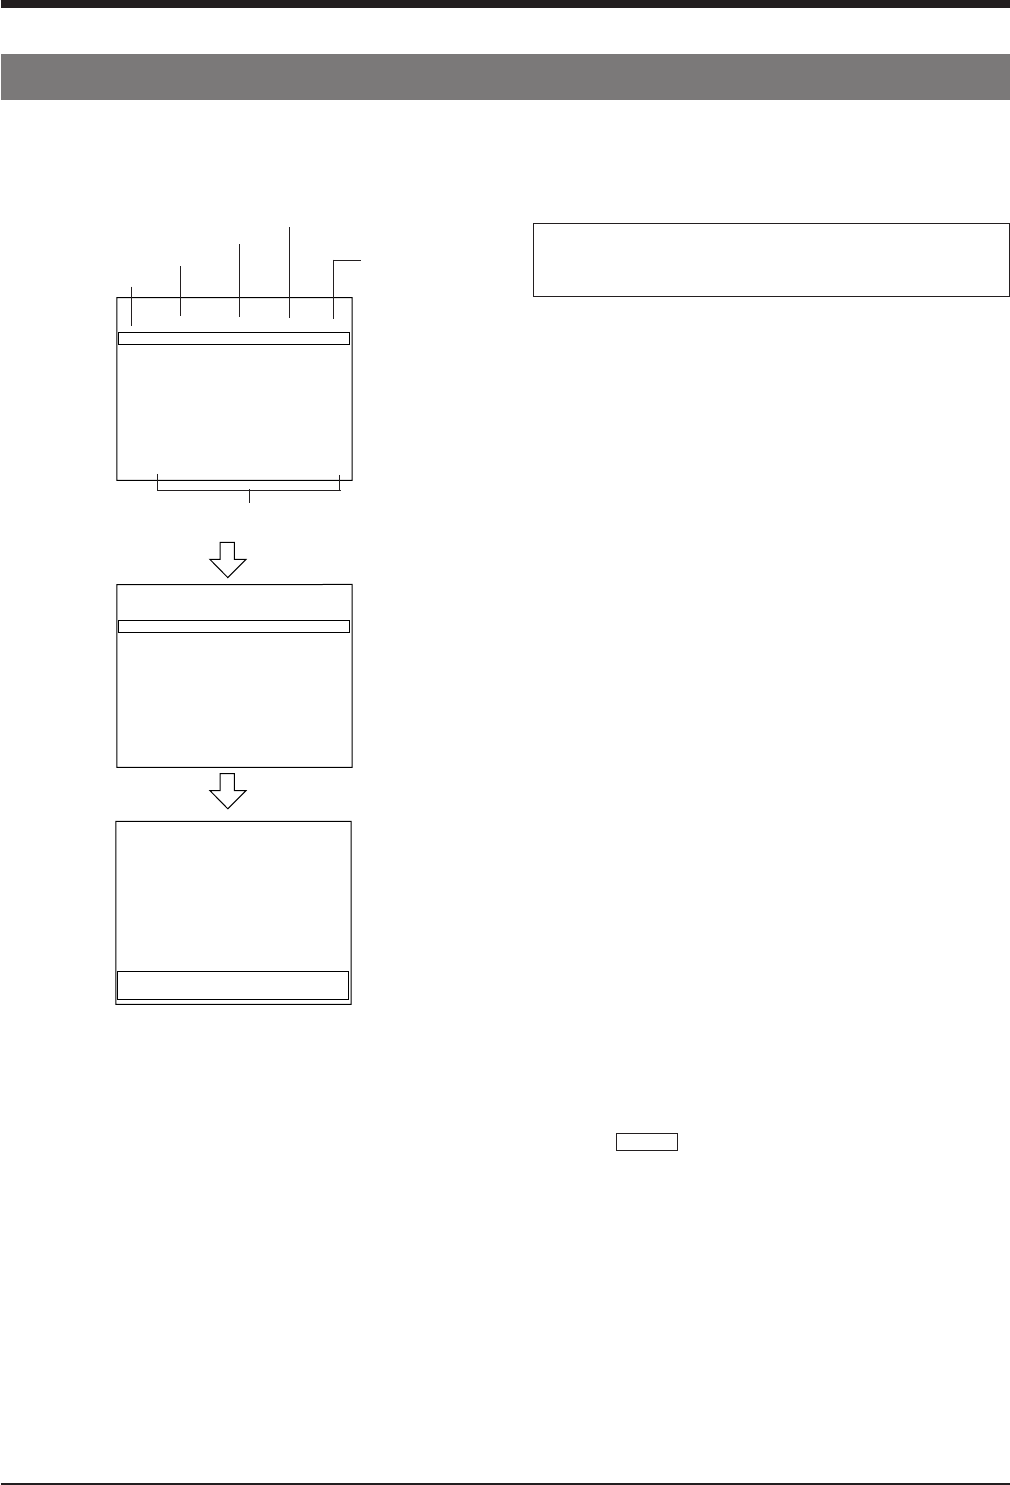
• Timer recording will take place on the days of the week
shown on the display. Timer recording will not take
place on days of the week indicated by “– –”.
9 End timer program setting.
Press the [MENU] button twice.
[The normal screen is restored.
0 Press the [TIMER] button.
[The TIMER indication and active timer program
numbers light on the display and the operating mode
is automatically turned off to engage the Timer-
Recording Standby mode.
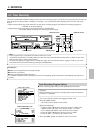
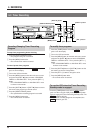
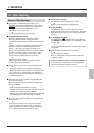
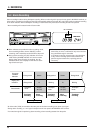
6 RECORDING
ON: Enabled
OFF: Disabled
Recording speed
Stop time
Start time
Day of the week
DAILY SET
PROGRAM
NO.
1
2
3
4
5
6
7
8
PROGRAM TIMER screen