


39
*
1
2
3
*
1
2
3
4
5
6
7
*
.
.
.
*
.
.
.
.
.
.
.
*
S
E
C
[
R
R
D
T
A
R
R
*
R
X
N
A
E
E
U
A
U
E
E
*
I
T
T
L
C
C
R
P
T
P
P
[
/
*
*
A
*
*
A
E
O
E
E
S
E
R
T
R
M
S
T
*
*
A
A
R
X
E
A
M
O
P
I
E
R
T
E
I
T
C
P
/
D
E
O
N
E
*
*
/
*
*
E
S
E
E
N
D
W
P
R
E
*
E
S
E
*
D
*
*
*
L
E
X
*
N
E
N
*
*
*
M
*
A
C
T
*
D
N
S
*
*
*
O
*
Y
*
*
*
*
D
O
*
*
*
D
*
*
*
M
*
*
*
R
*
*
*
E
*
*
*
O
*
*
*
*
*
*
*
*
*
*
*
D
*
*
*
M
*
*
*
*
*
*
*
E
*
*
*
O
*
*
*
*
*
*
*
]
*
N
*
D
*
*
1
*
*
*
*
*
*
O
*
E
A
*
8
*
*
*
*
*
*
R
*
]
L
*
0
*
*
*
*
*
O
M
O
*
A
*
S
O
O
O
O
*
F
A
F
*
R
2
E
F
F
F
F
*
F
L
F
*
M
H
C
F
F
F
F
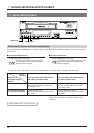
6-4 Alarm Recording
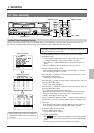
4 Select the timelapse recording mode with the [TIME
MODE +/–] button on the front panel.
[The selected recording speed mode is shown on the
VCR’s display and on the monitor.
5 Follow the procedure described in “Recording Basic
Operation” on page 30.
6 When an alarm signal is input to the rear panel’s
[ALARM IN] terminal, alarm recording is executed in
accordance with the specified settings.
7 To stop alarm recording and clear the [ALARM]
indication, press the [RESET/CANCEL] button.
• If the [RESET/CANCEL] button is pressed when the
[AL] indication is lit (during alarm recording), alarm
recording stops, the [AL] indication goes out, and
timelapse recording is restored. If the alarm buzzer is
on, the buzzer sound also stops.
• If the [AL] indication blinks and the [RESET/CANCEL]
button is pressed, the [AL] indication goes out.
8 The alarm input data can be checked in the main
menu’s <OTHER> menu (refer to page 21).
Display the alarm list screen and press the [RESET/
CANCEL] button to reset the alarm input data.
* There may be some picture distortion at the start
or end of an alarm recording. This is not a
malfunction.
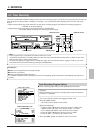
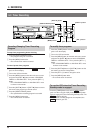
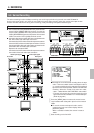
Connect an alarm sensor to the rear panel’s alarm input terminal.
Preparation
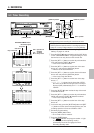
1 Press the [OPERATE] button to turn the operating mode
on.
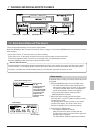
2 Open the main menu’s <ALARM/SENSOR MODE> and
set the alarm recording-related menu switches.
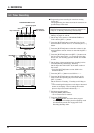
1 REC MODE
Set to “ALARM” or “ALL” to activate alarm recording.
• When set to “ALL”, both alarm recording and sensor
recording will be performed.
• The [ALARM] indication lights on the display.
2 REC SPEED
Select the alarm recording speed from the 2H (SP)
mode or the 6H (EP) mode.
3 DURATION
Set the alarm recording duration to 5 sec., 10 sec., 15
sec., 30 sec., 60 sec., 120 sec., 180 sec., TAPE END
(to tape end) or MANUAL (for as long as alarm
signals are input).
* When the alarm recording time is set to “MANUAL”,
the alarm cue signal (index code) will not be
recorded correctly if alarm input lasts for less than 5
seconds.
* When alarm recording duration is set with an
external switcher, set the alarm recording duration to
“MANUAL”.
4 TAPE END MODE
Selects whether or not the Stop mode is forcibly
engaged when the tape ends even if there is an alarm
recording during recording.
• When set to “STOP”, the Stop mode is engaged at
tape end even if repeat recording or auto rewind is
set.
• When set to “OFF”, VCR operation is determined by
the repeat recording or auto rewind setting.
3 Set the other menu switches.
5 Setting the alarm buzzer
Set the menu switch <AL/SENSOR IN> in
<BUZZER> to “ON” to sound the alarm buzzer during
alarm recording.
5 Setting the on-screen brightness and display
items
Select the monitor display setting with the menu
switch.
On-screen information is recorded together with the
video signals.
You can change the on-screen display position with
the [ON SCREEN 7/f] buttons on the front panel.
5 Setting the HDR
To record in the HDR mode during timelapse
recording, set the menu switch <HDR> in <VTR
MODE> to “ON”.
6 RECORDING
Set to “ALARM” or “ALL”.
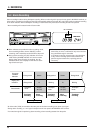
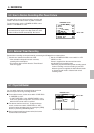
ALARM/SENSOR MODE screen