


Thank you for purchasing the RM832A Radio Controlled Travel Alarm Clock
with HiGlo
TM
backlight! Your RM832A is an always-accurate Radio
Controlled clock combining form and function in a small compact
take-everywhere size.
Your RM832A features a daily alarm, calendar, day-of-the-week display,
electroluminescent HiGlo
TM
backlight, snooze alarm, automatic adjustment
for Daylight Savings Time and ExactSetTM technology.
Radio Controlled clocks receive signals from the U.S. Atomic Clock, one of
the world’s most accurate timepieces.For information about the National
Institute of Standards and Technology and the U.S. Atomic Clock, visit the
NIST website: www.nist.gov.
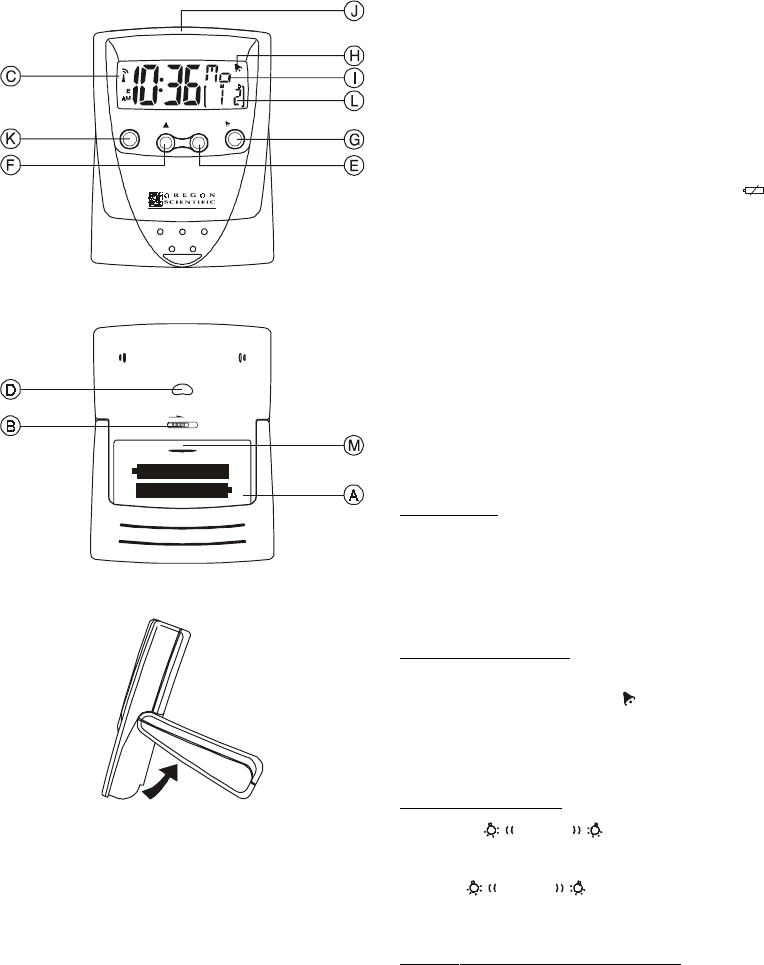
1. ACTIVATING THE CLOCK
The RM832A requires 2 “AAA” size batteries .The RM832A will seek the
signal from the US Atomic Clock once the batteries are activated. (See Signal
Reception) To activate the batteries:
1. To open the battery compartment, A slide the compartment door towards the
bottom of the clock.
2. Remove the two protective plastic strips from the batteries and slide the
battery compartment door back into place over the battery compartment.
3. Slide the B Lock to the unlocked position.
IMPORTANT: To set user-selections and settings the RM832A must be in the
unlocked position. Locking is recommended during transit to prevent settings
from being accidently changed.
NOTE: The RM832A features a low battery warning icon. This icon [ ]
will appear when batteries need replacing.To replace batteries: remove the
battery compartment door, remove the old batteries, insert fresh batteries into
the compartment with the polarities in the direction as shown inside the
compartment, and slide the battery compartment door back into place.
2. SIGNAL RECEPTION ICON AND TIME ZONE
With reception of the US Atomic Clock signal, an icon designating the
C strength of signal reception will be displayed. (See Signal Reception) With
the successful reception of the signal, the RM832A will automatically select
the correct US time zone and the corresponding time and date. To view or
manually select another time zone and corresponding time and date after
initial setting by the US Atomic Clock:
1. Using a single-press method, press D [ZONE] to advance through the
zones. Zones are identified by the letters: “P” Pacific; “M” Mountain; “C”
Central and “E” Eastern.
2. The letter representing the time zone selected will be displayed immediately
under the signal strength icon.
3. ALARM FUNCTIONS
Setting the Alarm:
1. Press and hold E [DATE/ALARM] until the “hour” segment begins to
flash. While the “hour” is flashing, press the F[I] to set the desired hour.
NOTE: There are AM and PM designations.
2. When the desired hour is reached, press E [DATE/ALARM] again, and
the “minutes” segment will begin to flash. Press the F[I] to set the desired
minutes.
3. Press E [DATE/ALARM] once more to exit the alarm setting mode.
Turning the Alarm ON and OFF:
1. Pressing the G [ON/OFF] activates and disables the daily alarm.
2. When the alarm is active, the bell icon H [ ] will be displayed.
3. To turn the alarm off, press the G [ON/OFF]. When the alarm is disabled,
no bell icon will show.
4. To temporarily deactivate the alarm, press E [DATE/ALARM]. The alarm
remain active and will sound again in 24-hours.When this feature is
activated, I [(( • ))] will be displayed.
Snooze and Backlight Features:
1. Pressing J [
TOUCH
] while the alarm is sounding will
activate the 8-minute snooze feature . After 8-minutes the alarm will sound
again.
2. Pressing [
TOUCH
] will also activate the backlight for
5-seconds.
4 USER SELECTIONS
Manually Setting: time, year, month, date & Language
NOTE: It is highly unlikely you should ever have the desire (or need) to
manually set the clock time, year, month or date of RM832A Travel Clock.
However, in the event this becomes necessary please review the following.
Setting the Time
1) Press and hold K [MODE] button for at least three seconds. The “Hour”
segment of the clock time will begin flashing
2) While the “hour” segment is flashing press the E [DATE/ALARM] button
to set the desired hour time (Please note the AM/PM designation)
3) When the desired hour times reached press the K [MODE] button again.
The “Minutes” segment of the clock time will begin flashing.
4) While the “Minuted” segment is flashing press the F [I] button to set the
desired minutes time.
5) When the desired minutes time is reached. Briefly press the K [MODE]
button five more times to exit the clock time set mode.
Important: As soon as any manual change in the clock time is made, there
is a loss of the signal strength indicator from the display.
Setting the Year Month and Date
1) Press and hold K [MODE] button for at least three seconds. The
“Hour”segment of the clock time will begin flashing.
2) Briefly press the MODE button and the “Minutes” segment will begin flashing.
3) Briefly press the K [MODE] button once more. The clock time will disappear
and be replaced by a flashing year (Ex. 1995). This is the year set mode.
Swing-up Table Stand
LOCK
ZONE
RADIO CONTROLLED
M
O
D
E
D
A
T
E
/
A
L
A
R
M
O
N
/
O
F
F
RADIO CONTROLLED
TRAVEL CLOCK WITH Higlo
TM
BACKLIGHT
MODEL : RM832A