


39
4. After finishing the settings, press the [SET UP/ESC] but-
ton to execute the settings and return to the previous
SYSTEM SETUP menu.
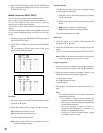
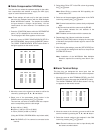
● Multi Sequence (SEQ2, SEQ3)
This item lets you program or edit a Multi Sequence.
Up to 5 steps can be assigned in the table shown below.
You can also enable the auto skip function to skip any
steps where no video signal is present.
The duration of each step is determined by the dwell time
setting.
According to the factory default setting, SEQ2 is displayed
on four screen segments (quad) and SEQ3 on nine seg-
ments.
1. Move the cursor to the SEQUENCE SETUP parameter in
the SYSTEM SETUP menu.
2. Select SEQ2 or SEQ3 and then press the [HOME/SET]
button.
The corresponding SETUP table shown in the figure
appears on the monitor screen.
Auto Skip
1. Move the cursor to the AUTO SKIP parameter by press-
ing the C or D button.
2. Select either ON or OFF by pressing the A or B button.
ON: Enables the auto skip function.
OFF: Disables the auto skip function.
The factory default setting is OFF.
Note: The auto skip function is not available when play-
ing back videotape images.
Camera/Playback
This item lets you select the camera or playback image
to be displayed at each step.
1. Move the cursor to the STEP parameter by pressing
the C or D button.
2. Select either CAM or PLAY by pressing the A or B
button.
CAN: Enables display of camera image.
PLAY: Enables display of playback image.
The factory default setting is CAM.
Dwell Time
1. Move the cursor to the DWELL TIME parameter by
pressing the C or D button.
2. Select the desired dwell time by pressing the A or B
button.
Dwell Time can be selected between 0SEC and 30SEC.
Note: If 0SEC is selected for the dwell time, the step will
not be displayed on the multiscreen monitor.
Image Assignment
1. Move the cursor to the CAM column you want to edit for
the area number by pressing the C, D, A or B button.
2. Select the desired camera or playback channel in the
CAM column by pressing the - or + button.
1 - 16: Camera Channel
P1 - P16: Playback Channel
–: Not Assigned
3. Repeat steps 1 and 2 above to assign other area num-
bers.
Note:
The multiscreen pattern of each step is determined
automatically as follows:
• For example, if several camera channels are
assigned to area numbers, the screen segmen-
tation that will accommodate the highest area
number will be selected.
• Areas not assigned a camera channel, or
assigned a channel to which no camera is con-
nected, are displayed in blackout.
• Pressing the Camera Number button assigns
the camera channel directly.
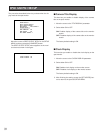
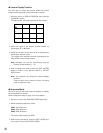
SEQ3(MULTI-SEQUENCE)SETUP 1 OF 5
AUTO SKIP OFF
STEP 1 CAM
DWELL TIME 5SEC
AREA CAM PRE AREA CAM PRE
1 1CH - 9 - -
2 2CH - 10 - -
3 3CH - 11 - -
4 4CH - 12 - -
5 5CH - 13 - -
6 6CH - 14 - -
7 7CH - 15 - -
8 8CH - 16 - -
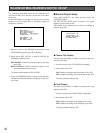
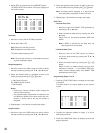
SEQ2(MULTI-SEQUENCE)SETUP 1 OF 5
AUTO SKIP OFF
STEP 1 CAM
DWELL TIME 3SEC
AREA CAM PRE AREA CAM PRE
1 1CH - 9 - -
2 2CH - 10 - -
3 3CH - 11 - -
4 4CH - 12 - -
5 - - 13 - -
6 - - 14 - -
7 - - 15 - -
8 - - 16 - -