C2227M-D (8/07)
PMCL-CMP
Monitor Mount and Telescoping Pole
Important Safety Instructions
1. Read these instructions.
2. Keep these instructions.
3. Heed all warnings.
4. Follow all instructions.
5. Installation should be done only by qualified personnel and conform to all local codes.
6. Only use installation methods and materials capable of supporting four times the maximum specified load.
7. Only use replacement parts recommended by Pelco.
8. This unit is designed for indoor use only, and it must not be installed where exposed to rain or moisture.
Description
The PMCL-CMP is a ceiling mount and pole that can be used to mount any of Pelco’s 200, 300, or 400 Series flat panel LCD monitors. This mount can also
support most sizes of Pelco’s 500 Series LCD monitors, although a PMCL-V100, PMCL-V200, or PMCL-VA adapter plate may be required. The PMCL526
monitor requires the PMCL-V100 adapter and the PMCL532 monitor requires the PMCL-V200 adapter; the adapters are included with the corresponding
monitors. The PMCL537 and PMCL542 require the PMCL-VA adapter (not included).
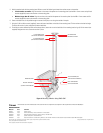
The PMCL-CMP mount can be swiveled 360 degrees to allow you to use your monitor in either landscape or portrait view. The mount also allows you to tilt
the monitor 35 degrees for the best viewing angle. The pole telescopes from 15 to 30 inches. This mount can also be used with Pelco’s MRCA ceiling mount.
The PMCL-CMP is capable of supporting a maximum load of 90 pounds (40.8 kg).
NOTE: If you are installing a mount using a Pelco adapter (PMCL-V100, PMCL-V200, or PMCL-VA), refer to the manual shipped with the adapter for
installation instructions.
Installation
The following parts are supplied:
Qty Description
1 Mounting flange
1 Mounting head
1 Telescoping pole
4 M4 x 10 mm pan head Phillips screws, stainless steel
4 Split lock washers
4 M6 x 12 mm pan head Phillips screws, stainless steel
4Flat washers
1 Allen wrench, 3/16-inch
1 Allen wrench, 3/32-inch
To install the ceiling mount:
NOTE: It is recommended that two people be present when mounting the monitor. One person should hold the monitor, while the second person installs the
screws to secure the monitor to the mount.
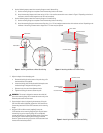
1. Attach the mounting flange to the ceiling. (Mounting hardware is not supplied.)
a. If installing the mount to a wood beam ceiling, the beam must be at least 2 inches x 4 inches with a maximum 0.5-inch thick layer of
plasterboard. Use the following steps to attach the mounting flange to a wood beam ceiling:
(1) Use a stud finder to locate and mark the edges of the wood beam that the mount will be attached to.
(2) Center the mounting flange between the edges of the beam. Use the mounting flange as a template to mark two mounting holes that are
not adjacent to each other.
(3) Attach the mounting flange to the ceiling using two 1/4 x 2-inch wood screws as shown in Figure 1 on page 2.