


IMPORTANT SAFEGUARDS AND WARNINGS
Prior to installation and use of this product, the following WARNINGS should be observed.
1. Installation and servicing should only be done by qualified service personnel and conform
to all local codes.
2. Installation shall be done in accordance with all local and national electrical and mechanical
codes utilizing only approved materials.
3. Use only installation methods and materials capable of supporting four times the maximum
specified load.
The product and/or manual may bear the following marks:
Please thoroughly familiarize yourself with the information in this manual prior to installation and
operation.
C220M-C (7/99)
MR3000/MR3050
Universal Monitor Mount
3500 Pelco Way,
Clovis, CA 93612-5699
USA
In North America & Canada:
Tel (800) 289-9100
FAX (800) 289-9150
International Customers:
Tel (1-559) 292-1981
FAX (1-559) 348-1120
www.pelco.com
®
This symbol indicates that there are impor-
tant operating and maintenance instructions
in the literature accompanying this unit.
CAUTION:
RISK OF ELECTRIC SHOCK.
DO NOT OPEN.
DESCRIPTION
The MR3000 and MR3050 are universal monitor mounts engineered to safely mount a monitor from
either a ceiling or a wall. They are designed for use in security systems, educational institutions,
churches, hospitals, and other applications requiring flexibility in monitor mounting and positioning.
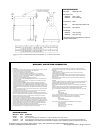
The mounts are adjustable to accommodate various sizes of monitors (refer to the
Specifications
section for dimensions). Two optional adapters are available: the MRWA for wall mounting and
the MRCA for ceiling mounting. An 8-inch (20 cm) length of 1-1/2-inch (3.81 cm) NPT pipe is
provided with the mount.
Recommended Mounts Adapters
MRWA Wall mount, uses six 5/16-inch diameter fasteners (not supplied).
MRCA Ceiling mount, uses four 5/16-inch diameter fasteners (not supplied).
INSTALLATION
MRCA/MRWA Adapter Mounting
1. Determine the mounting location. Remember to allow for adequate clearance on all sides of
the monitor.
2. Use the adapter mount as a template to mark the required mounting holes.
3. Using the necessary fasteners, attach the adapter mount to the chosen surface.
MR3000/MR3050 Installation
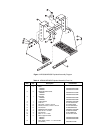
1. Determine the width that the base (item 1, Figure 1) must be positioned to accommodate
the monitor. Allow room for the side brackets (item 2, Figure 1).
2. Attach the two base support brackets (item 13, Figure 1) to the base.
3. Thread the 8-inch (20 cm) pipe supplied into the ceiling/wall adapter.
4. Thread the collar adapter and attached crossbar (already assembled) onto the end of the
8-inch (20 cm) pipe.
5. Slide the side brackets (item 2, Figure 1) onto the crossbar and thread on the 1/4-20 bolts.
Do not tighten bolts yet; you will do so in step 7.
6. Attach the base to the side brackets using the four 3/8-16 bolts supplied. Do not tighten
bolts yet; you will do so in step 10.
7. Tighten the 1/4-20 bolts that attach the side brackets to the crossbar (installed in step 5).
CAUTION:
The
mounting surface must
be capable of support-
ing four times of the weight of the
mount and monitor.