


7. Select Sony DV Device for capture, click Next
8. Name your video, and location to save. Remember to use a drive that has generous amounts of space, as
each minute of video can consume 178 MB of disk space. When working on video editing projects at
Mann Library it is wise to have an external hard drive to copy and move your files to and from. Click
Next.
9. Select Video Setting, click Next.
10. Designate Capture Method (entire tape automatically or just parts), click Next.
If you selected Capture Parts, you can fast forward or rewind (hold button down) to cue, then
click Start and Stop Capture to capture clips desired. When done click Finish.
11. Save Project
You should now see the captured video in your Collections window. This file can be used/shared as is (avi
format), edited or exported. Read the WMM help for more info.
Export Movie to DVD (playable on most standard DVD players)
Full instructions are available at http://www.microsoft.com/windowsxp/using/moviemaker/create/savetodvd.mspx.
Remember if you captured in wmv format at lower size/resolution, the picture quality will not be very high on a
television screen. Here’s a summary:
1. In the Movie Tasks pane, under Finish Movie, click Save to my computer.
2. Provide Name and Location, click Next.
3. Movie Setting page, click Show more choices > Other settings > DV-AVI, Next.
4. You can now use DVD burning software and writer to create a DVD playable in a standard DVD
player. Mann Library has Roxio Easy CD and DVD Creator available on its classroom PCs. Some older
DVD players can have problems playing custom DVDs. DVD-R or DVD+R format discs are compatible
with most players.
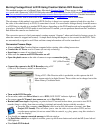
iMovie
As part of the iLife software package installed on Apple computers, iMovie provides basic tools for capturing
video, simple editing, and conversion. A computer with a Firewire port (sometimes referred to as iLink or IEEE
1394) is required to capture video directly to iMovie. If you only have USB as an option, you can transfer video
to the hard drive then drag and drop to import into iMovie. Detailed instructions can be found in the iMovie
help.
Basic Steps for Capturing Video
If you want to do editing before exporting to movie…
1. Start iMovie. Click the iMovie icon on the dock, or from the Finder menu (click anywhere on the
desktop to deselect other application menus and activate Finder), select Go>Applications, then double
click the iMovie icon.
2. Click Create a New Project (Note: When iMovie is launched, it may open the last movie that was
being edited. Before you begin, make sure you aren’t working on a previous project. You can start a new
one from File>New)
3. Name and select a location for your new project. Remember to use a drive that has generous amounts of
space, as each minute of video can consume 178 MB of disk space. When working on video editing
projects at Mann Library it is wise to have an external hard drive to copy and move your files to and
from.
4. Click Create. After a short wait, the empty project is created.
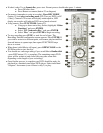
5. Make sure camera is fully powered (AC cord firmly attached or fresh charged battery)
6. Turn camera on and set to Play/Edit mode
7. Insert Tape (rewind if necessary)