


Chapter 4 Time Data and Sub LCD Menu
Chapter 4 Time Data and Sub LCD Menu 67
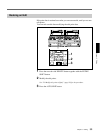
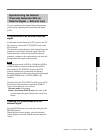
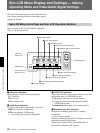
5 Remaining battery power display
Displays the remaining battery power on a scale of
seven levels. When the power is nearly exhausted, the
BATT display flashes. When the power is completely
exhausted, a flashing E (End) appears.
Regarding the remaining battery power indication, also see
the sections “3 BAT-END (battery end) setting” and “4
BAT-NE (battery near end) setting” on page 74.
6 NO EDIT indication
Appears when a tape recorded in DV format is played
back.
You may play back a tape recorded in DV format, but
you cannot record the results of editing on the tape.
This indication appears also when the audio recording
mode set on the unit is different from the audio
recording mode used on the tape.
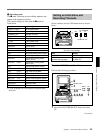
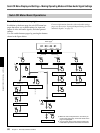
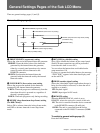
7 Audio settings page selection indication
To select one of the groups of the audio settings pages
(AU-1 to AU-4) or MIX/SWP, press F1 to highlight
this display, then press the UP or DOWN button. The
selected page in the group or the audio settings sub
page appears when you press the PAGE button.
For details, see the next section, “To switch between menu
pages” on the next page.
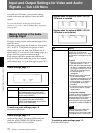
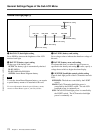
8 Audio recording mode indication
When changing the audio recording mode selection,
use F2 to highlight this indication, then press the UP
button or the DOWN button so that the indication for
the desired mode appears in the sub LCD.
2/48k: Two-channel, 48-kHz mode
4/32k: Four-channel, 32-kHz mode
Pressing first F2 to highlight this indication, then the
PAGE button displays the general settings page (1)
(see page 73).
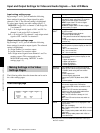
9 Input audio signal indication
When changing the input audio signal selection, use F3
to highlight this indication, then press the UP button or
the DOWN button repeatedly so that the indication for
the desired signal appears in the sub LCD.
When none of the optional DSBK-140, DSBK-150 and
DSBK-160 boards is installed in the unit, ANALOG
is always selected.
ANALOG: Analog signals
i.LINK: i.LINK(DV) signals (DSBK-140)
SDTI: SDTI(QSDI) signals (DSBK-150)
SDI: SDI signals (DSBK-160)
If a signal not connected to the unit is selected, the
indication flashes.
Pressing F3 to highlight this indication, then pressing
the PAGE button displays the general settings page (1)
(see page 73).
!º Input video signal indication
You can select CMPST (composite) or SDI as the
input video signal by pressing F4 to highlight this
display and then pressing the UP or DOWN button.
CMPST: Composite signal
SDI: SDI signal
S VIDEO: S-video signal
i.LINK: i.LINK (DV) signal (DSBK-140)
CMPNT: Component signal (DSBK-170)
SDTI: SDTI (QSDI) signal (DSBK-150)
If you press the PAGE button after highlighting this
display, the video settings page appears, allowing you
to make advanced video settings.
For details, see the section, “To switch between menu
pages” on the next page.
Note
Selecting the i.LINK or SDTI (QSDI) signals for input
audio causes the same to be automatically selected also
for input video.
Selecting the i.LINK or SDTI (QSDI) signals for input
video causes the same to be automatically selected also
for input audio.