


63
Menu Contents
Chapter 6 Menu Setting
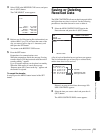
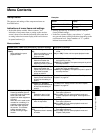
PLAY START [> PLAY start]: Set the timing for switching from stop
mode to playback mode.
In an editing system including an editing control unit such as the
PVE-500, you can adjust this setting so that the delay before
switching to playback mode is the same on all the decks of the
editing system. It is then no longer necessary to synchronize the
decks for editing, and the preroll time can be shortened.
16 FRAME DELAY [>> 16 delay] to 4 FRAME DELAY
[>> 4 delay]:
The larger the numerical value, the longer the delay.
Factory default setting: 5 FRAME DELAY [>> 5 delay]
(for DSR-DR1000A) or 4 FRAME DELAY [>> 4 delay]
(for DSR-DR1000AP)
a) F.FWD: PLAY button and NEXT button pressed at same time
REW: PLAY button and PREV button pressed at same time
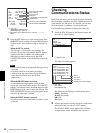
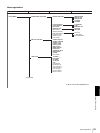
DISPLAY CONTROL [Display]: Settings related to
indications on the monitor and the unit
Description of settings
CHARA. DISPLAY [> Chara disp]: Determine whether or not
to output text (such as time code values) from the SUPER
connector.
OFF [>> OFF]: Do not output text. (In spite of this setting,
pressing the MENU button causes menu text to be
output.)
*ON [>> ON]: Output text.
CHARA. POSITION [> Chara pos]: Set the position of text
superimposed on output from the SUPER connector to the
monitor.
Use the cursor/clip operation buttons in the menu control
section to adjust the text position while watching the monitor
screen.
To return to level 1 of the setup menu, press the MENU button.
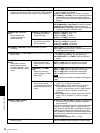
CHARA. TYPE [> Chara type]: Set the type of characters in
text superimposed on output from the SUPER connector
to the monitor.
Make the following settings while watching the monitor screen.
*WHITE (WITH BKGD) [>> White]: White characters on black
background
BLACK (WITH BKGD) [>> Black]: Black characters on white
background
WHITE/OUTLINE [>> W/outline]: White characters with black
outline
BLACK/OUTLINE [>> B/outline]: Black characters with white
outline
CHARA. VSIZE [> Chara size]: Determine the vertical size of
characters such as time code output from the SUPER
connector for superimposed display on the monitor.
Make the selection while watching the monitor screen.
*X1 [>> X1]: Standard size
X2 [>> X2]: 2 times standard size
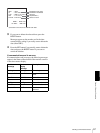
DISPLAY INFO [> DISP info]: Select information
superimposed on output from the SUPER connector to the
monitor.
*TIME DATA & STATUS [>> Time&STA]: Time data and
operating mode indications
TIME DATA & UB [>> Time&UB]: Time data selected using
the COUNTER SELECT button, and user bit data (When
user bit data is selected using the COUNTER SELECT
button, user bit data and time code are shown.)
TIME DATA & CNT [>> Time&CNT]: Time data selected
using the COUNTER SELECT button, and CNT value
(When CNT is selected using the COUNTER SELECT
button, CNT value and time code are shown.)
TIME DATA & TIME[>> Time&Time]: Time data and VITC
TIME DATA ONLY [>> Time]: Time data only
REC DATE & TIME [>> REC Date]: The time data selected
with the COUNTER SELECT button is shown in the time
counter display, and the date and time of recording are
shown on the monitor screen.
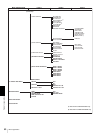
OPERATIONAL FUNCTION [Operational]: Operation settings Description of settings
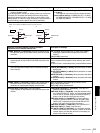
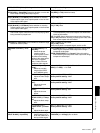
+3
-3
FWD
FWD
RVS
RVS
+3
+1
-1
-3
FWD
FWD
RVS
RVS
b) c)
Speed Speed
(reverse) (reverse)
Rotation rate Rotation rate
TYPE 2
TYPE 3