


79
HDD/DV Camcorder Dubbing
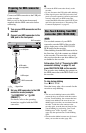
2 Press REC MODE on the remote
repeatedly to select the recording
mode.
To change the recording mode, press
INPUT to switch the input source to
analogue broadcasting or the external
input beforehand.
For details about the recording mode,
see page 109.
3 Set the “DV Input” setting in the
“Audio In” setup (page 94).
You are ready to start dubbing. Select
one of the dubbing methods on the
following pages.
b
• You cannot connect more than one piece of
digital video equipment to the recorder.
• You cannot control the recorder using another
device or another recorder of the same model.
• You cannot dub date, time, or the contents of the
cassette memory onto the HDD.
• If you dub from a DV/Digital8 format tape that
is recorded in multiple sound tracks, such as a
tape with multiple sampling frequencies
(48 kHz, 44.1 kHz, or 32 kHz), no sound or an
unnatural sound will be output when playing
back the sampling frequency switch point on the
disc.
• The recorded picture may be momentarily
affected or the start and end points of a title may
be different from what you have set if the source
DV/Digital8 format tape is in any of the
following conditions. In this case, connect your
DV camcorder to the LINE IN jack and follow
the instructions of “Recording from Connected
Equipment” (page 45):
– There is a blank space in the recorded portion
of the tape.
– The tape’s time code is not sequential.
– If the picture size or the recording mode on the
tape being dubbed changes.
• A blank or black coloured screen will be dubbed
when the recorder is set to a different colour
system from the DV tape contents’ system. Set
“Input Colour System” in the “Video In/Out”
setup to the same colour system as the DV tape
contents’ system (page 92).
• When dubbing bilingual titles on the DV/
Digital8 format tape, set “Bilingual Recording”
to either “A/L” (default) or “B/R” in the “Audio
In” setup (page 94).
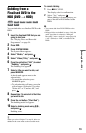
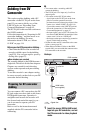
You can dub the entire contents of a DV/
Digital8 format tape to the HDD with a
single press of the ONE-TOUCH DUB
button on the recorder. The recorder controls
the DV camcorder for the whole process,
and completes the dubbing.
Follow steps 1 to 3 of “Preparing for DV
camcorder dubbing” on page 78, and
press ONE-TOUCH DUB on the recorder.
The recorder rewinds the tape and then starts
dubbing the tape contents.
After the dubbing is finished, the recorder
rewinds the tape to the beginning.
To stop during dubbing
Press SYSTEM MENU.
Note that it may take a few seconds for the
recorder to stop dubbing.
b
• The recorder will pause dubbing when there is a
blank space or an image containing copy
protection signals or signals in a different colour
system from that of the recorder on the tape. The
recorder will resume dubbing automatically
when receiving a recordable signal within
5 minutes. Otherwise, DV One-Touch Dubbing
ends automatically.
• DV One-Touch Dubbing ends automatically
when the recorder cannot receive a recordable
signal for 12 seconds at the beginning of the
tape.
• If the HDD camcorder is also connected to the
USB jack, dubbing from the HDD camcorder
starts when you press the ONE-TOUCH DUB
button. Disconnect the HDD camcorder from the
USB jack to dub from the DV camcorder.
• When Timer recording is about to start during
DV One-Touch Dubbing, a message appears.
Follow the on-screen instructions.
One-Touch dubbing from DV
camcorder (ONE-TOUCH DUB)
HDD
,continued