


Chapter 2 Names and Functions of Parts
14
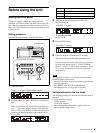
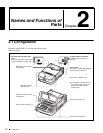
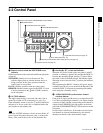
2-2 Control Panel
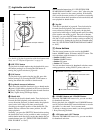
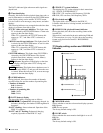
1 Jog/shuttle control block
For details of playback operations with these buttons and
dials, see 4-2 “Playback Operation” on page 34.
a SHUTTLE button
To play back in shuttle mode using the shuttle dial, press
this button, turning it on. Pressing the JOG button or
turning the jog dial switches to jog mode.
b JOG button
To play back in jog mode using the jog dial, press this
button, turning it on. Pressing the SHUTTLE button or
turning the shuttle dial switches to shuttle mode.
c Jog/shuttle transport indicators
These show the playback direction in jog or shuttle mode.
b (green): Lights during playback in the reverse direction.
B (green): Lights during playback in the forward direction.
x (red): Lights during still image display.
d Shuttle dial
Turn this for playback in shuttle mode. Turn clockwise for
forward direction playback, and counterclockwise for
reverse direction playback. In shuttle mode, the playback
speed varies in the range ±20 times normal speed,
according to the angular position of the shuttle dial. The
shuttle dial has a detent at the center position, for still
image playback.
Normally, you press the SHUTTLE button before turning
the shuttle dial, but it is also possible to make a setting to
enable shuttle mode directly by turning the shuttle dial (set
extended menu item 101 “SELECTION FOR SEARCH
DIAL ENABLE” to “dial”).
Note
When extended menu item 101 “SELECTION FOR
SEARCH DIAL ENABLE” is set to “dial,” after using the
shuttle dial, return it to the center position. If the shuttle
dial is not in the center position, it is possible occasionally
for vibration from other operations to activate the dial, and
start playback in shuttle mode.
e Jog dial
Turn this for playback in jog mode. Turn clockwise for
forward direction playback, and counterclockwise for
reverse direction playback. In jog mode, the playback
speed varies in the range ±1 times normal speed, according
to the rotation rate of the jog dial. There are no detents.
Normally, you press the JOG button before turning the jog
dial, but it is also possible to make a setting to enable jog
mode directly by turning the jog dial (set extended menu
item 101 “SELECTION FOR SEARCH DIAL ENABLE”
to “dial”).
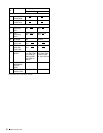
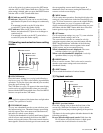
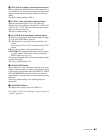
2 Arrow buttons
The four arrow buttons are also used as the MARK1
button, MARK2 button, IN button, and OUT button. The
correspondence with the buttons is as follows.
F button: MARK1 button
f button: MARK2 button
G button: IN button
g button: OUT button
You can use these buttons for thumbnail selection, menu
setting operations, setting IN/OUT points, and so on.
a F/MARK1 button and f/MARK2 button
When the THUMBNAIL button is lit, you can use these
for thumbnail selection.
During playback, the F/MARK1 and f/MARK2 buttons
can be pressed with the SET button held down to record a
shot mark 1 or shot mark 2 as an essence mark.
To delete or change essence marks, use the supplied PDZ-
1 Proxy Browsing Software.
b G/IN button and g/OUT button
When the THUMBNAIL button is lit, you can use these
for thumbnail selection.
SHUTTLE JOG
UT
1 SHUTTLE button
2 JOG button
3 Jog/shuttle transport indicators
5 Jog dial
4 Shuttle dial
MARK1
MARK2
IN OUT
S
EL
1 F/MARK1 button and f/MARK2 button
3 IN indicator and OUT indicator
2
G/IN button and g/OUT button