Safety Precautions
Important Safety Instructions
English
Input Connections
Quick Start and Player Setup
1. Read and Follow Instructions
All safety and operating instructions should
be read before and followed during
product operation.
2. Cleaning
Unplug this product from the wall outlet
before cleaning. Do not use liquid cleaners
or aerosol cleaners. Use a damp cloth for
cleaning.
3. Attachments
Do not use attachments not recommended
by the product manufacturer as they may
cause hazards.
4. Water and Moisture
Do not use this product near water for
example, near a bathtub, wash bowl,
kitchen sink, or laundry tub; in a wet
basement; or near a swimming pool; and
the like.
5. Accessories
Do not place this product on an
unstable cart, stand, tripod, bracket, or
table. The product may fall, causing
serious injury to a child or adult, and
serious damage to the product. Use
only with a cart, stand, tripod, bracket,
or table recommended by the
manufacturer, or sold with the product.
Any mounting of the product should
follow the manufacturer’s instructions,
and should use a mounting accessory
recommended by the manufacturer.
6. Portable Cart Warning
A product and cart combination should be
moved with care. Quick stop, excessive
force or uneven surface may cause the
product and cart combination to overturn.
7. Ventilation
Slots and openings in the cabinet are
provided for ventilation to ensure reliable
operation of the product and to protect it
from overheating. These openings must not
be blocked or covered, such as by placing
the product on a bed, sofa, rug, or other
similar surface. This product should not be
placed in a built-in installation such as a
bookcase or rack unless proper ventilation
is provided or the manufacturer’s
instructions have been adhered to.
Output Connections
Remote Control Operations Remote Control Operations
Remote Control Operations
Playback Support of Various Media Formats
8. Power Sources
This product should be operated only from
the type of power source indicated on the
marking label. If you are not sure of the
type of power supply to your home,
consult your product dealer or local power
company. Do not use any battery other
than the orginal ones provided by
Thomson.
9. Grounding or Polarization
This product may be equipped with a
polarized alternating current line plug (a
plug having one blade wider than the
other). This plug will fit into the power
outlet only one way. This is a safety
feature. If you are unable to insert the
plug fully into the outlet, try reversing the
plug. If the plug should still fail to fit,
contact your electrician to replace your
obsolete outlet. Do not defeat the safety
mechanism of the polarized plug.
10. Power Cord Protection
Power supply cords should be routed so
that they are not likely to be walked on or
pinched by items placed upon or against
them, paying particular attention to cords
at plugs, convenience receptacles, and the
point where they exit from the product.
11. Object and Liquid Entry
Never push objects of any kind into this
product through openings as they may
touch dangerous voltage points or short-
out parts that could result in a fire or
electric shock. Never spill liquid of any kind
on the product.
12. Servicing
Do not attempt to service this product
yourself as opening or removing covers
may expose you to dangerous voltage or
other hazards. Refer all servicing to
qualified service personnel.
13. Heat
The product should be placed away from
heat sources such as radiators, heat
registers, stoves, or other products
(including amplifiers) that produce heat.
Quick Start
1. Toggle the POWER switch to turn on the player. The DVD logo appears on the screen.
2. Push OPEN to open the compartment door. Place the disc in the tray with the printed side up.
Push back the compartment door until a “click” is heard. The player will automatically try to
read and play the disc.
Player Setup
Press SETUP on the remote control and the screen will display the [Setup Menu].
Use to highlight the desired item and press ENTER or to display the relevant submenus. In
the submenus, press ENTER to set, or press or to go back one menu level.
When back in the [Setup Menu], press SETUP to exit the [Setup Menu].
Language
Setup the language of the OSD Menu, Subtitle, Audio, DVD Menu and MPEG4 subtitles. For DivX
playback, you need to select the correct character set between Western European and Central
European in “MPEG4 subtitles” in order to display properly subtitles in some Eastern European
languages.
Video
Setup the TV shape (16:9 or 4:3) and TV system (NTSC, PAL or AUTO).
Audio
Setup the digital out, DRC and down sampling parameters.
Rating
Disable playback of certain DVDs based on their ratings from 1 (most restive) to 8 (least restrictive).
DVDs that are rated above the level you set will not play until the correct password is entered.
If a password has been set, you cannot change the rating without entering the correct password. To
set up the password, highlight the Password part and input a 4-digit password using the 0-9 keys.
Press ENTER to set the password.
This submenu also displays the DivX registration information for DivX®VOD playback. For more on
DivX playback, please refer to the section headed “Playback Support of Various Media Formats”.
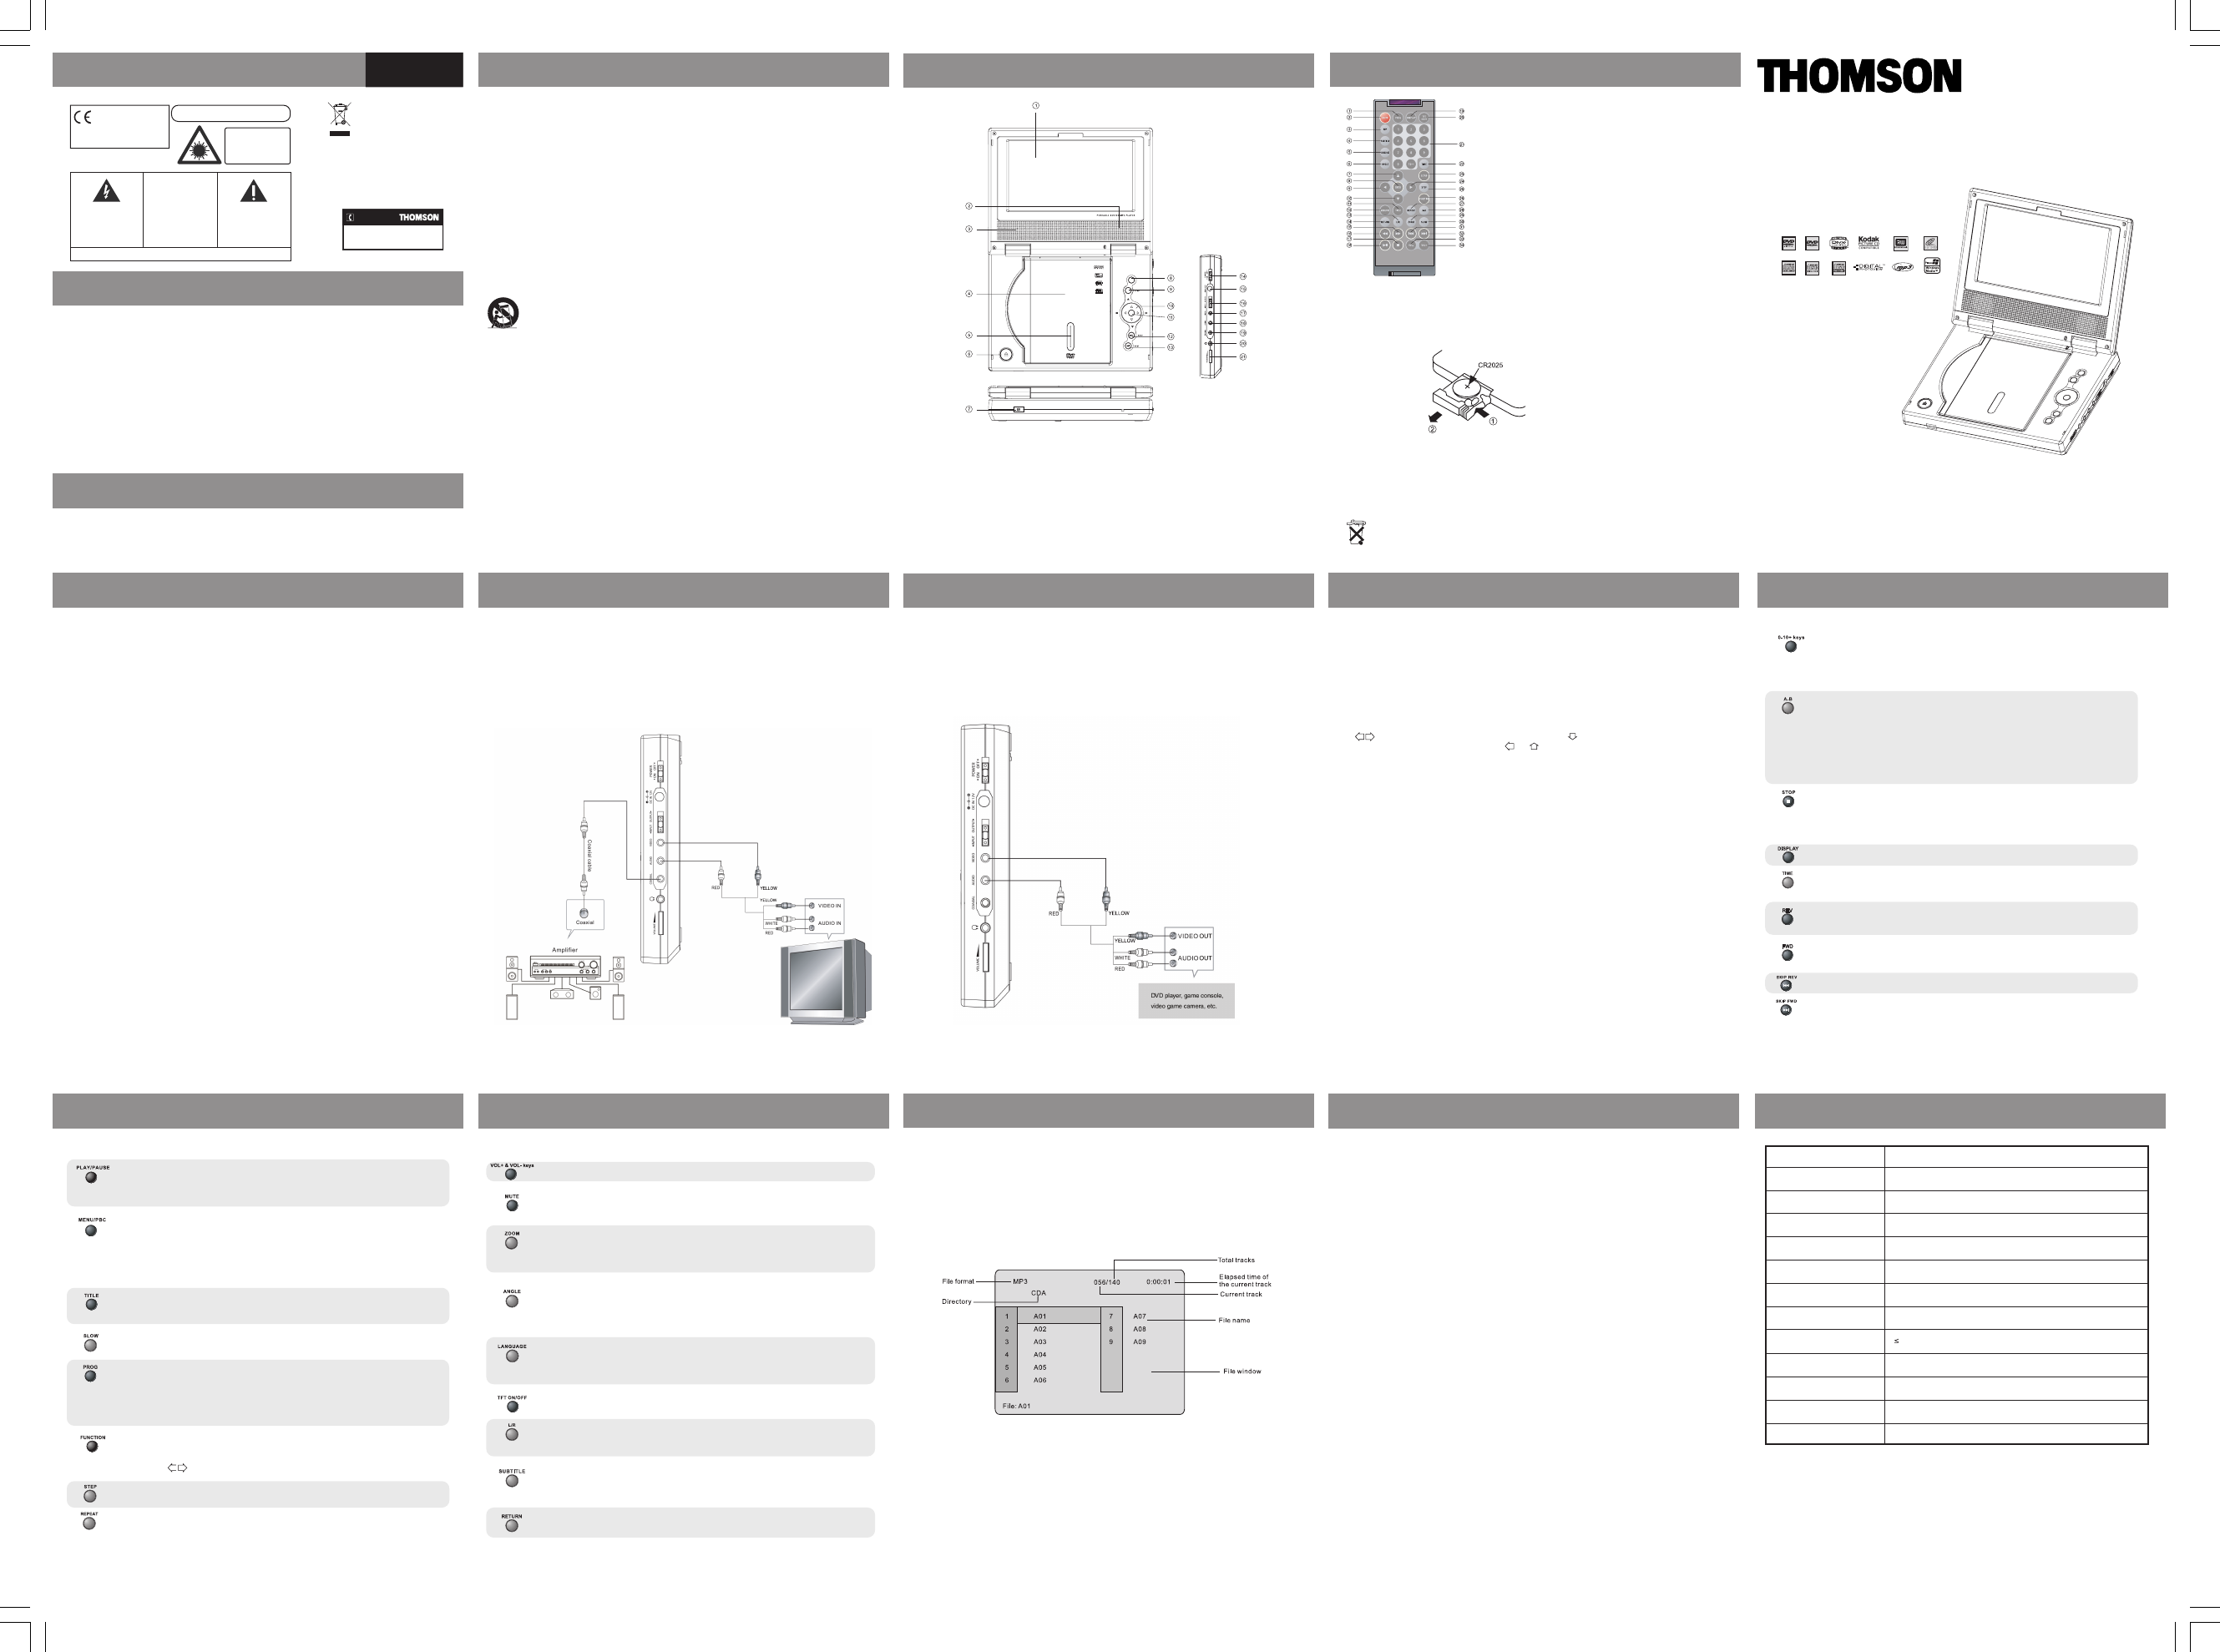
Panel Illustration
(1) LCD DISPLAY
(2) RIGHT SPEAKER
(3) LEFT SPEAKER
(4) DISC COMPARTMENT
(5) DISC WINDOW
(6) OPEN BUTTON
(7) INFRARED SENSOR
(8) PLAY/PAUSE BUTTON
(9) STOP BUTTON
(10) NAVIGATION/REV/FWD BUTTONS
(11) OK BUTTON
(12) SKIP REV BUTTON
(13) SKIP FWD BUTTON
(14) POWER SWITCH
(15) DC 12V INPUT JACK
(16) INPUT/OUTPUT SELECT
(17) VIDEO JACK
(18) AUDIO JACK
(19) COAXIAL OUTPUT JACK
(20) EARPHONE JACK
(21) VOLUME KNOB
PLAY/PAUSE
OK
Keys Function
• These keys are used to input the time, as well as title, chapter and track
numbers.
• When a numeric item is displayed on the screen, press the 0-10+ keys to select
the desired entry, and press ENTER to confirm.
• For VCD, audio CD or MP3 or WMA discs, enter the desired track number and
press ENTER to start playback.
• To repeat a sequence between two points A and B, press A-B at the
beginning of the sequence you want to repeat. The press A-B again at
the end of the sequence. The sequence will be played repeatedly until
you press A-B again to resume normal playback.
Note: 1. For CD playback, points A and B must be within the same track. For DVD
playback, points A and B can be selected from different chapters.
2. This function is disc specific.
• During video or audio playback, press STOP to stop and hold playback.
• In slideshow of pictures, press STOP to return to menu.
• Press PLAY to resume playback from the stop point.
Note: The screen saver will automatically turn on if playback is stopped for 5 mins.
• Press repeatedly to toggle through various playback information on screen.
• During playback, press TIME to call up the [Search Menu].
• Use the number keys to input the desired Time, Track, Title or Chapter and
press ENTER to play.
• During playback, press REV to scan in reverse sequence at X2, X4, X8 and X20
speeds.
• Press PLAY any time to resume normal playback.
• During playback, press FWD to scan forward at X2, X4, X8 and X20 speeds.
• Press PLAY at any time to resume normal playback.
• During playback, press SKIP REV to skip to the previous chapter, track or file.
• During playback, press SKIP FWD to skip to the next chapter, track or file.
DVD Regional Code
Your DVD player has been designed to process regional management information that is stored on
DVD discs. The regional code for your player is 2 (Europe, the Middle East, South Africa, Japan). Only
DVD discs that have regional codes of 2 or ALL (for all regions) can be played by your player.
Playback of MP3, WMA, JPEG and DivX Files
Your player supports playback of MP3, WMA, JPEG and DivX VOD files. When a disc is loaded, the
player will automatically search for supported files and begin playback automatically. In stop mode,
the following screen will appear:
• Use the navigation buttons to move to different files or directories.
• Press ENTER to play the file highlighted by the cursor or start slideshow in case of JPEG files.
Registration for DivX VOD Files
DivX VOD files are downloaded after paying a rental from certain commercial websites. Prior to
downloading a VOD, you need to input the registration number of your DVD player on the purchase
form on the site. The registration number can be located in the [Setup Menu] under the [Rating]
submenu.
Note: If you cannot play a DivX VOD file recorded on a CD-R disc after downloading it, the rental period
allocated during purchase from the website may have expired. It is also possible that the recorded
file is not compatible with your player because of different versions or incorrect download
parameters. The parameters used when copying to CD-R may be another reason for this. Since it is
not possible here to supply all the information, parameters and advice relating to the use of DivX
VOD files, we recommend that you visit specialist websites such as www.divx.com/vod.
The unit is not working.
• Turn off the power, and then turn it
on again.
There is no sound or picture.
• Check the connection to the mains
socket or battery.
• Make sure the power switch is on.
• Make sure the power outlet is
operational.
• Make sure the power cord is not
damaged.
There is no sound or sound quality
is poor.
• Make sure the audio jacks are securely
connected.
• Make sure the audio connector is not
damaged.
• Make sure the volume is turned up.
• Make sure you have set the player’s
audio settings correctly.
• Make sure you have entered the
correct AV input for your TV.
• Make sure the audio is not set to
mute.
There is no picture or picture
quality is poor.
• Make sure that the INPUT/OUTPUT
SELECT is on the proper position.
• Make sure the video jacks are securely
connected.
• Make sure you have entered the
correct AV input for your TV.
• Make sure the video connector is not
damaged.
• Make sure you have set the player’s
video settings correctly.
The remote control does not work or
works only intermittently.
• Check that the battery is inserted or
change it.
• Point the remote control directly at the
player’s IR sensor.
• Remove any obstacles between the
remote and the IR sensor.
It is impossible to read the disc
• Make sure the disc is inserted with the
printed side up.
• Make sure the disc is not warped,
damaged, deformed, stained or
scratched.
• Check that the disc format is supported
by the player.
• Check that the disc’s regional code
matches that of the player. This player’s
regional code is 2.
You have forgotten your rating
password.
• Enter 8888 to clear the memory. Keep
this master password out of the reach of
children.
Keys Function
• In stop mode, press PLAY/PAUSE to start playback.
• During playback, press PLAY/PAUSE to pause playback.
• When paused, press PLAY/PAUSE again to resume playback.
• For pictures, use the PLAY/PAUSE button to start or stop slideshow.
• During DVD or VCD playback, press MENU/PBC to call up the disc menu or
PlayBack Control menu.
• In the [Setup Menu], press MENU/PBC to return to the main menu or the stop
mode.
• Press MENU/PBC at any time to cancel the current menu on display.
Note: This function is subject to the disc.
• During video, press TITLE to display the DVD title menu or play the first title.
Note: This function is subject to the disc.
• During video playback, press SLOW to toggle slow motion playback at various
speeds.
• In stop mode, press PROG to display the [Program Menu].
• Input the track, title or chapter number of the current disc in the desired order.
• Select [Play Program] and press ENTER to start playback in the programmed
sequence.
• Select [Clear All] and press ENTER to clear the program.
• During playback, press PROG to toggle programmed playback on and off.
• Press FUNCTION once to call up the [Screen Calibration Menu].
• Press FUNCTION repeatedly to cycle through settings for Sharpness, Tint, Color,
Contrast, Brightness and Reset.
• Use to adjust the parameter values.
• During video playback, press STEP repeatedly to play frame by frame.
• Press PLAY to resume normal playback.
• During playback, press REPEAT to cycle through various repeat options.
Keys Function
• Press to adjust the volume.
• Press to mute audio output.
• Press again to resume.
• During video playback, press ZOOM repeatedly to magnify the image at various
levels.
• For picture files, press ZOOM to zoom in/out.
• When zoomed in, use the navigation buttons to move from one area to another.
• During DVD playback, press ANGLE to view scenes from different camera angles.
• For picture files, press ANGLE to rotate the picture at 90 degree intervals.
Note: This function is disc specific.
• During DVD playback, press LANGUAGE to select from up to 8 audio languages/
formats.
Note: This function is disc specific.
• Press to toggle the TFT LCD on or off.
• Press to toggle through left channel/first language, right channel/second
language or stereo for VCD playback.
• In slideshow, press to toggle various picture transition modes.
• Press SUBTITLE to select from up to 32 subtitle languages.
Note: This function is disc specific.
• In VCD PlayBack Control Menu, press RETURN to go back to main menu.
(Symbol
provided
by RETAC)
Power Connections
• The type and production number of
your appliance are printed on the
guarantee certificate supplied with
your appliance. Keep this certificate as
well as the invoice. These documents
are required in the event of claiming
your guarantee rights.
• All repairs during the guarantee
period must be carried out by an
authorised engineer for our brand. If
this condition is not met, your rights
will no longer be valid.
Guarantee
• Never open the appliance yourself,
since this may put you at risk or
damage the equipment. THOMSON
does not accept any liability if the
appliance is used in any way other than
in accordance with this manual.
DISCLAIMER OF WARRANTIES: TO THE
MAXIMUM EXTENT PERMITTED BY
APPLICABLE LAW,DECLARATIONS AND
WARRANTIES OF NON-INFRINGEMENT OF
COPYRIGHT OR OTHER INTELLECTUAL
PROPERTY RIGHTS RESULTING FROM THE USE
OF THE PRODUCT IN CONDITIONS OTHER
THAN THOSE SPECIFIED HEREIN ARE HEREBY
DISCLAIMED.
Connecting the Power Adapter
• Connect the power adapter to the DC jack of the unit.
• Connect the other side of the power adapter with the wall plug or car adapter.
• Turn on the power.
Installing the Battery
• Plug in the battery at the rear side of the unit.
• Slide the battery to the right until a “click” is heard.
• The unit is now powered by the battery.
Removing the Battery
• Turn the unit upside down.
• Locate the lock at the bottom.
• Push down the lock and slide the battery to the left to release.
Charging the Battery
• Connect the power adapter to the battery.
• Turn on the power to start charging.
• The indicator is red when charging and will turn green when the battery is fully charged.
• While the battery installed on the unit is being charged, do not use the unit at the same time
as this will interrupt the charging.
This player can output sound and picture to external devices. To do so, toggle the INPUT/OUTPUT
SELECT on the side of the unit to the OUTPUT position. Follow the diagram below to set up the
required connections.
The coaxial connection is only needed if you would like to output digital audio signal to an external
decoder. When coaxial connection is used, make sure to set the player’s digital audio output to
RAW or PCM mode in the [Setup Menu].
Model DTH614
TV System NTSC/PAL
Supported Disc Formats DVD, SVCD, VCD, CD, HDCD, CD-R, CD-RW, DVD-R, DVD-RW
Supported File Formats MPEG, MP3, WMA, JPEG, Kodak Picture CD, DivX VOD
DVD Regional Code 2
AV Input/Output Composite x 1
Digital Audio Output Coaxial x 1
Power Requirement DC in 12V (power adapter bundled)
Power Consumption 10V
Operating Temperature 5°C to 35°C (41°F to 95°F)
Operating Humidity 5% to 90% (no condensation)
Size 205(W) x158(D) x40(H) mms
Weight 0.7 kg
Accessories
Check that all the following accessories come with your unit in the package:
1. Remote control x 1
2. Audio/Video cable x 1
3. Battery x 1
4. Power adapter (with one power cord and one car adapter) x 1
Troubleshooting Specifications
This unit can be used as a display for other devices, such as DVD player and game console, etc. To do
so, toggle the INPUT/OUTPUT SELECT on the side of the unit to the INPUT position. Follow the
diagram below to set up the required connections.
SEE MARKING ON BOTTOM / BACK OF PRODUCT
THE EXCLAMATION POINT WITHIN
THE TRIANGLE IS A WARNING SIGN
ALERTING YOU OF IMPORTANT
INSTRUCTIONS ACCOMPANYING THE
PRODUCT.
THE LIGHTNING FLASH AND
ARROWHEAD WITHIN THE TRIANGLE
IS AWARNING SIGN ALERTING YOU
OF A DANGEROUS VOLTAGE INSIDE
THE PRODUCT.
CAUTION
RISK OF ELECTRIC SHOCK - DO
NOT OPEN
CAUTION: TO REDUCE THE RISK OF
ELECTRIC SHOCK, DO NOT REMOVE THE
COVER (OR BACK).NO USER-SERVICEABLE
PARTS INSIDE. REFER SERVICING TO QUALIFIED
SERVICE PERSONNEL.
CLASS I
LASER PRODUCT
In accordance with the rating
plate of the unit, this unit
complies with current standards
concerning electrical safety and
electromagnetic compatibility.
EN CAUTION - LASER RADIATION WHEN OPEN.
DO NOT STARE INTO BEAM.
This THOMSON product is designed and
manufactured with high quality materials and
components which can be recycled and reuse
.
This symbol means that electrical and electronic
equipment,at their end-of-life, should be disposed
separately from your house hold waste.
Please, dispose of this equipment at your local community was
e
collection/recycling centre.
In the European Union there are separate collection systems fo
used electrical and electronic product.
Please, help us to conserve the environment we live in!
HELPLINE
You can contact THOMSON by dialling: 0871 712 131
(for United Kingdom, £0.10/mn inc VAT)
www.thomson-europe.com
DVD Copy Protection
This product incorporates copyright protection technology that is protected by U.S. patents and
other intellectual property rights. Use of this copyright protection technology must be authorized
by Macrovision Corporation, and is intended for home and other limited consumer uses only unless
otherwise authorized by Macrovision. Reverse engineering or disassembly is prohibited.
Please read this user manual carefully to ensure proper use of this product. Keep this manual
for future reference.
DTH614
User Manual
Remote Control
(1) PROGRAM
(2) MUTE
(3) N/P
(4) SUBTITLE
(5) LANGUAGE
(6) ANGLE
(7) UP
(8) ENTER
(9) LEFT
(10) DOWN
(11) TITLE
(12) MENU/PBC
(13) L/R
(14) RETURN
(15) FWD
(16) REV
(17) STOP
(18) PLAY/PAUSE
(19) DISPLAY
(20) TFT ON/OFF
(21) NUMBER KEYS
(22) TIME
(23) SETUP
(24) RIGHT
(25) STEP
(26) FUNCTION
(27) REPEAT
(28) A-B
(29) ZOOM
(30) SLOW
(31) SKIP REV
(32) SKIP FWD
(33) VOLUME -
(34) VOLUME +
Using the Remote Control
Point the remote control at the infrared sensor of the player for proper control. The maximum operating
range of the remote control is approximately 21’ and 60º in front of the sensor.
Note: Directing the remote sensor toward any light source, such as direct sunlight, may cause the unit to
malfunction. Do not spill water or put wet items on the remote control. Never disassemble remote
control.
Caution
INCORRECT USE OF BATTERIES MAY CAUSE THEM TO LEAK, CORRODE OR EXPLODE.
• Be sure to place the battery in the correct direction.
• It is dangerous to charge/heat/open or short-circuit the batteries.
• Do not leave dead or expired battery in the battery loader.
• If you are not using the remote control for a long period of time, remove the battery. When the
operating range becomes reduced, replace the battery with a new one.
• If leakage from the battery occurs, wipe the battery liquid in the battery loader and replace the
battery.
HOW TO REPLACE THE BATTERY
Step 1: Push the button toward left.
Step 2: Pull the battery loader out.
Please respect the environment and prevailing regulations. Before you dispose of batteries or
accumulators, ask your dealer whether they are subject to special recycling and if they will accept
them for disposal.
EN
56154700
9/5/05, 10:191


