


PN 613-001150 Rev B Page 3
PN 613-001150 Rev B Page 3
PN 613-001150 Rev B Page 2PN 613-001150 Rev B Page 2
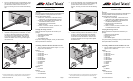
2. Slide your media converter into the bracket and align
the its mounting holes with those on the DINRAIL
bracket as shown in the figure for your media
converter. Secure the media converter to the bracket
using the two M3 mounting screws provided.
Figure 1 - Attaching the DINRAIL Bracket to an
AT-MC10x, AT-MC1004, AT-MC1008/GB, AT-MC1008/SP,
AT-GS2002/SP, AT-FS232, AT-FS201, or AT-FS202
Media Converter
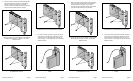
Figure 2 - Attaching the DINRAIL Bracket to an
AT-MC605 Media Converter
L
I
N
K
T
S
T
M
/L
O
N
4
A
CT
M
/L
O
N
P
W
R
C
L
A
S
S
1
L
A
S
E
R
P
R
O
D
U
C
T
AT-MC104XL
SING
LE MO
D
E /M
ULTI M
O
DE
F
I
BER
F
A
ST ETHE
R
NE
T M
ED
IA CO
N
VERT
ER
L
N
K
S
I
N
G
L
E
M
O
D
E
M
U
L
T
I
M
O
D
E
A
C
T
L
I
N
K
TX R
X
100Base-FX
TX R
X
100Base-FX
1517
V
D
S
L
L
IN
E
1
0
B
a
s
e
-
T
/
1
0
0
B
a
s
e
-
T
X
P
H
O
N
E
LNK/ACT
1
0
0
M
P
W
R
L
I
N
K
RAT
E
N
O
L
IMIT
FAS
T
S
C
B
R
6
d
B
R
A
T
E
L
IM
IT
IN
T
L
PROV
9
d
B
AT
-M
C
6
0
5
V
D
S
L
E
X
T
E
N
D
E
D
E
T
H
E
R
N
E
T
V
D
S
L
C
O
N
F
IG
PROV
S
C
B
R
1523
Figure 3 - Attaching the DINRAIL Bracket to an
AT-PC232/POE or AT-PC2002/POE Media Converter
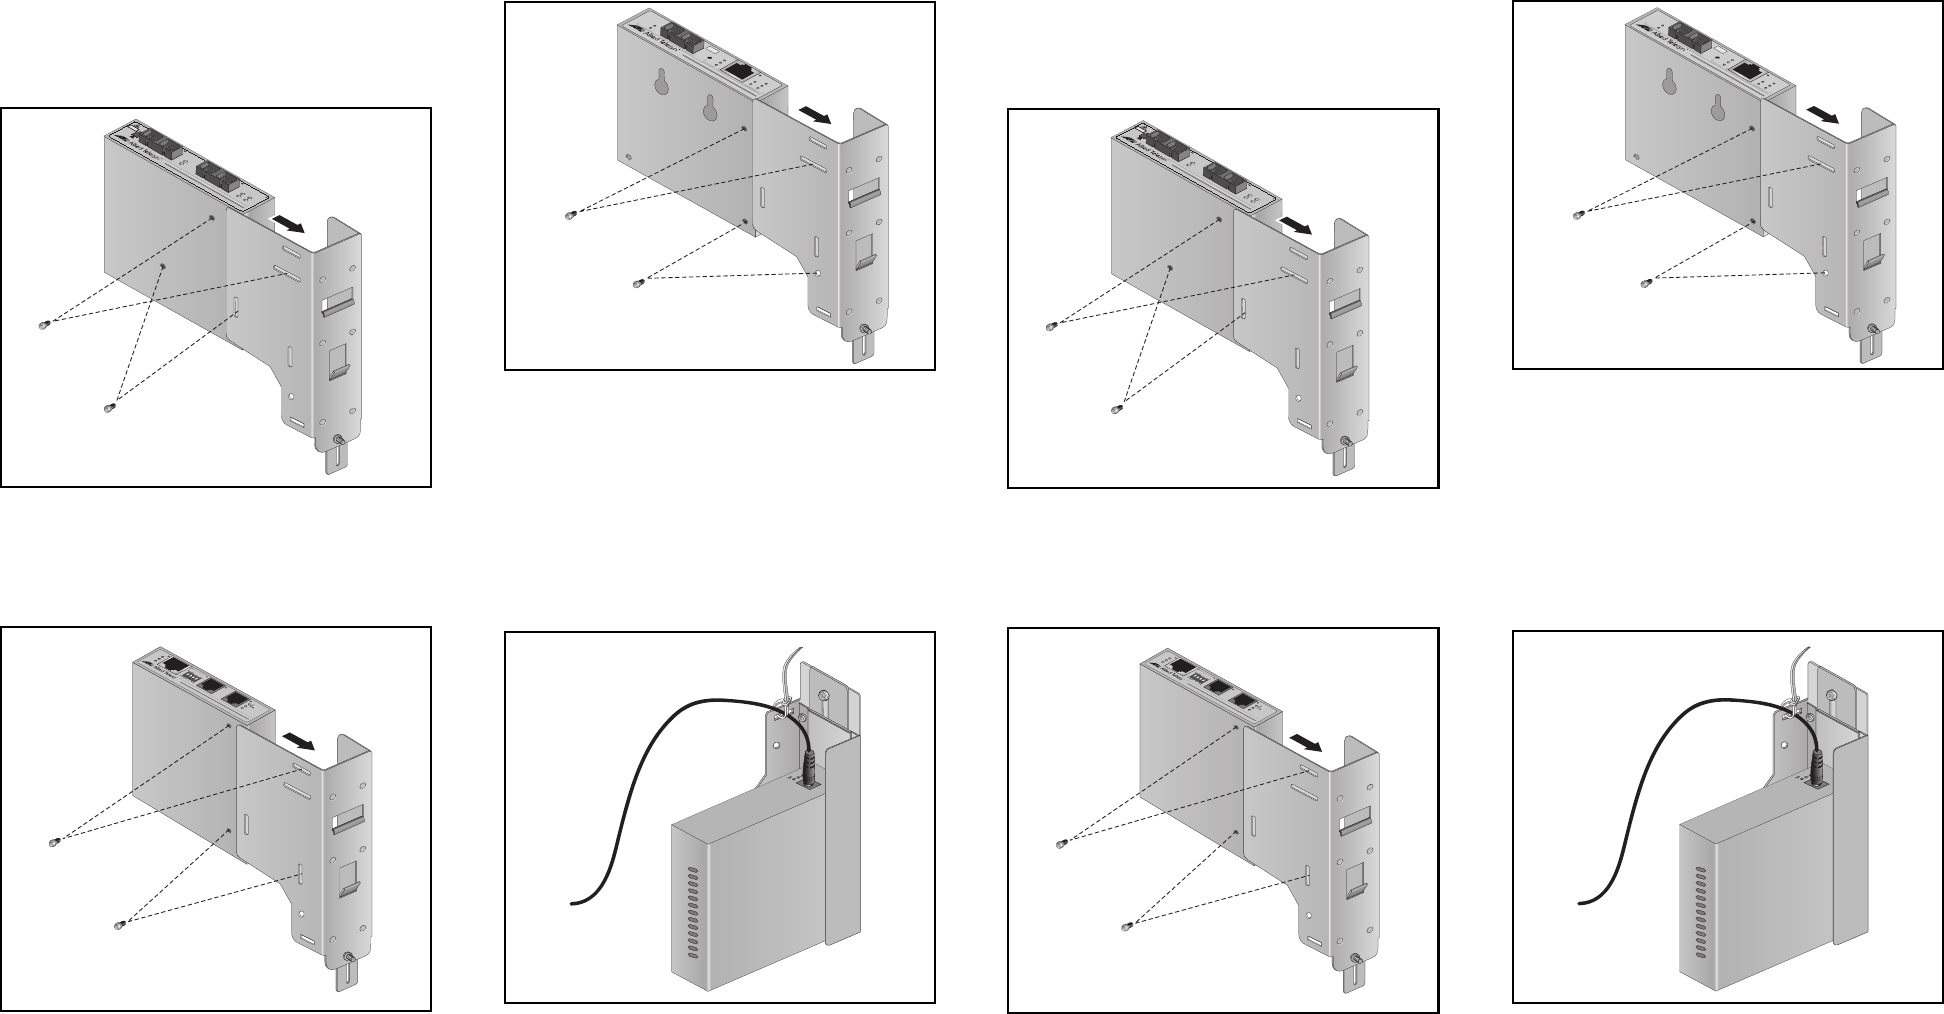
3. For all of the media converters except the AT-PC232/
POE and the AT-PC2002/POE, install the DC power
cord and secure it to the bracket with a tie-wrap, as
shown in Figure 4, “Securing the DC power cord to the
DINRAIL bracket”.
Figure 4 - Securing the DC power cord to the DINRAIL
bracket
AUTO MDI/MDI-X
L
N
K
F
D
/
C
O
L
P
W
R
AU
T
O
N
E
G
1
0
0
M
L
N
K
F
D
/
C
O
L
PO
R
T 2
100Base-FX
TX RX
PORT 1
1
0
B
a
s
e
-
T
/
1
0
0
B
a
s
e
-
T
X
MOD
E
M
L
S
M
L
L
T
AT-FS2 32
BRIDGING CONVERTER
IEEE 802.3/802.3U
MULT
I M
O
D
E
CL
A
SS 1
L
ED
P
RO
D
U
CT
1522
12VDC
1521
Figure 3 - Attaching the DINRAIL Bracket to an
AT-PC232/POE or AT-PC2002/POE Media Converter
3. For all of the media converters except the AT-PC232/
POE and the AT-PC2002/POE, install the DC power
cord and secure it to the bracket with a tie-wrap, as
shown in Figure 4, “Securing the DC power cord to the
DINRAIL bracket”.
Figure 4 - Securing the DC power cord to the DINRAIL
bracket
AUTO MDI/MDI-X
L
N
K
F
D
/
C
O
L
P
W
R
AUT
O
N
E
G
1
0
0
M
L
N
K
F
D
/
C
O
L
PORT 2
100Base-FX
TX RX
POR
T 1
1
0
B
a
s
e
-
T
/
1
0
0
B
a
s
e
-
T
X
MOD
E
M
L
S
M
L
L
T
AT-FS2 32
BRIDGING CONVERTER IEEE 802.3/802.3U
MULTI M
O
D
E
C
LA
SS
1
LED
P
ROD
U
CT
1522
12VDC
1521
2. Slide your media converter into the bracket and align
the its mounting holes with those on the DINRAIL
bracket as shown in the figure for your media
converter. Secure the media converter to the bracket
using the two M3 mounting screws provided.
Figure 1 - Attaching the DINRAIL Bracket to an
AT-MC10x, AT-MC1004, AT-MC1008/GB, AT-MC1008/SP,
AT-GS2002/SP, AT-FS232, AT-FS201, or AT-FS202
Media Converter
Figure 2 - Attaching the DINRAIL Bracket to an
AT-MC605 Media Converter
L
IN
K
T
S
T
M
/L
O
N
4
A
CT
M
/
L
O
N
P
W
R
C
L
A
S
S
1
L
A
S
E
R
P
R
O
D
U
C
T
AT-MC104XL
S
IN
G
LE
M
O
DE
/M
UL
T
I M
O
DE
FI
BE
R
F
A
S
T ET
H
E
R
N
ET
M
ED
IA
C
O
N
V
ER
T
E
R
L
N
K
S
I
N
G
L
E
M
O
D
E
M
U
L
T
I
M
O
D
E
A
C
T
L
I
N
K
T
XR
X
100Base-FX
TX RX
100Base-FX
1517
V
D
S
L
L
IN
E
1
0
B
a
s
e
-
T
/
1
0
0
B
a
s
e
-
T
X
P
H
O
N
E
LNK/ACT
1
0
0
M
P
W
R
L
I
N
K
RAT
E
N
O
L
IMIT
FAS
T
S
C
B
R
6
d
B
R
AT
E
L
IM
IT
IN
T
L
P
ROV
9
d
B
AT
-M
C
6
0
5
V
D
S
L
E
X
T
E
N
D
E
D
E
T
H
E
R
N
E
T
V
D
S
L
C
O
N
F
IG
PROV
S
C
B
R
1523