


For full warranty information, refer to the AMX Instruction Manual(s) associated with your Product(s).
2/08
©2008 AMX. All rights reserved. AMX and the AMX logo are registered trademarks of AMX.
AMX reserves the right to alter specifications without notice at any time.
3000 RESEARCH DRIVE, RICHARDSON, TX 75082 • 800.222.0193 • fax 469.624.7153 • technical support 800.932.6993 • www.amx.com
93-0147-04 REV: A
Note: While in each of the modes, press and hold the Center NAV button to return to
the default for that mode.
SRS (Bass Boost, Focus, 3D and WOW) Settings
Use the UP Nav button to cycle through the SRS Settings: BASS Boost, Focus, 3D,
WOW (in that order).
Use the Down NAV button to cycle backwards to the previous SRS setting.
• Press and hold the Center NAV button to disengage/clear the SRS settings
(none of the SRS modes will be engaged).
• Press the Center NAV button to save SRS Mode & exit from Tone Control
set-up.
Only one SRS mode can be engaged per room/zone. Each room/zone, however,
can have a different SRS mode.
The Volume LED's are used to provide feedback as to which SRS setting is active:
•No LED = SRS Off
• LED1 = BASS boost
• LED 1&2 =Focus
• LED 1,2&3 =3D
• LED 1,2,3&4 =WOW
Moving from one SRS position to another disengages the original setting i.e. moving
from WOW to BASS BOOST, disengages WOW.
Zone Control
• To turn a single Zone ON, press any Source button (or press the Power
Button).
Note: If the Power button is pressed, the zone will turn ON and will remember
which source was previously ON.
• To turn a single Zone OFF, press the Power button.
• To turn a specific Source ON in all Zones, press and hold any Source button
(the selected source will turn on and play in all zones).
• To turn a specific Source OFF in all Zones, press and hold the active Source
button.
• To Turn All Zones OFF (System OFF), Press the "OFF" button. All zones will
be turned off, and no sources will play.
Note: One minute after an ALL OFF has been performed, the Controller and all
Sources will be powered down
Note: Pressing Source Buttons switches between sources and turns the
Source On, but does not toggle between ON and OFF.
Source Control
The source control functionality outlined below represents "suggested" functions. All
source control buttons (Up, Down, Left, Right, Center and Center HOLD) can be
customized via the Controller Menu for all sources except for the Internal Tuner,
which cannot be customized.
Internal Tuner and Audio Server
CD and DVD
Satellite and Other
Custom XM
Direct Numeric Access
Tuners
Enter the station identification and press ENTER.
• Strings of 3 to 4 numbers are recognized.
• If a " • " (dot) is part of the string, then an FM station is assumed, otherwise an
AM station is assumed.
Example: 1050 + ENTER= 1050AM, 104 • 5 + ENTER = 104.5FM
CD Player / Changer
To select a specific Disc & Track, the format is DDD • TTT + ENTER
(DDD=Disc, TTT=Track).
Example: 11.11 + ENTER = Disc 11, Track 11
To select a specific track on the current disk, enter TTT + ENTER (TTT=Track).
Example: 3 + ENTER = current disk, Track 3
Satellite Radio/Video
Enter the station number and press ENTER. Strings of 2 - 4 numbers are recognized.
Configuration Mode
The configuration mode allows you to set various device features (IR Transmit Mode,
Timeout Adjustment, Download Mode, Debug Mode, Battery Type, LED Awake
Brightness, and LED Sleep Brightness.
To enter Configuration Mode:
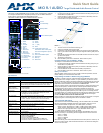
1. Press and hold button #38 and the "." (dot) or button #26 (see FIG. 1). Both
buttons must be pressed within 0.1 seconds of each other and held down for 2
seconds. The device indicates you are now in configuration mode.
2. Press button #3 (FAV) when you are finished.
Note: Your settings will not be lost in the event your batteries die or are removed.
IR Transmit Mode
Note: Metreau MET-6N keypads support 38KHz only. The MIO R-1 AUDIO must be
set to 38KHz if used with MET-6N keypads.
Pressing button 1 toggles the IR transmission mode between 38KHz (default) and
455KHz. The display indicates the current mode.
Timeout Adjustment
Press button 2 to change the sleep timeout from the default. Each time "2" is
pressed, the sleep timeout raises incrementally. The pre-determined sleep timeouts
are:3 seconds, 6 seconds, 9 seconds, and 12 seconds. The display indicates the
selected sleep timeout.
Download Mode
Pressing button 3 toggles the Download mode OFF and ON. The Download mode
must be ON before you can download a file to the MIO R-1 AUDIO device. While the
Download mode is ON the device will not go to sleep. A power cycle will return the
device to Download OFF.
Debug Mode
Pressing button 4 toggles development mode between ON and OFF. The display
indicates the selected mode. In development mode, the display shows the IR code
assigned to buttons when pressed.
This mode is useful to the programmer when determining what IR codes are
associated to each mode.
Battery Type
Pressing button 6 toggles the battery type between Normal and Recharge. The
display indicates the selected type. The type of battery in the MIO R-1 AUDIO
dictates the battery type you need to set.
LED Awake Brightness
Pressing button 7 toggles the Power LED brightness mode from LOW to MED and
then HIGH. The display indicates the selected mode.
LED Sleep Mode Brightness
Pressing button 8 toggles the Sleep brightness mode from OFF to LOW and then
MED. The Sleep brightness is the state the MIO R-1 AUDIO assumes while in the
charging cradle.
Additional Documentation
Refer to the MIO R-1 AUDIO Remote Operation/Reference Guide for additional
information on MIO R-1 AUDIO functionality, including: Privacy Mode, Presets, Zone
Grouping, Favorites, Alarm, and Keypad Lockout.
NAV Button Internal Tuner AUDIO SERVER
NAV Up
SEEK UP NEXT
NAV Down
SEEK DOWN PREVIOUS
NAV Left
Prev PRESET Prev PAGE
NAV Right
Next PRESET Next PAGE
NAV Center (press)
AM/FM SELECT
NAV Center (press/hold)
Stereo/Mono User Defined 1
NAV Button CD DVD
NAV Up
Next TRACK UP
NAV Down
Prev TRACK DOWN
NAV Left
Prev DISC LEFT
NAV Right
Next DISC Right
NAV Center (press)
User Defined1 Select
NAV Center (press/hold)
User Defined2 Menu
NAV Button External Satellite Other
NAV Up
Next Channel User Def UP
NAV Down
Prev Channel User Def DOWN
NAV Left
Guide Down User Def LEFT
NAV Right
Guide UP User Def RIGHT
NAV Center (press)
Select User Def SELECT
NAV Center (press/hold)
Guide User Def HOLD SELECT
NAV Button CUSTOM XM
NAV Up
UP
NAV Down
DOWN
NAV Left
LEFT
NAV Right
RIGHT
NAV Center (press)
CENTER
NAV Center (press/hold)
CEN hold