


3
www.atlona.com
Toll free: 1-877-536-3976
Local: 1-408-962-0515
INSTALLATION
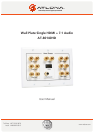
You can mount this wall plate using a standard dual electrical box.
Caution: To avoid possible damage to home theater system components when connecting speaker wires to
the + and – terminals. Do not let any strands from the positive and negative wires touch each other.
1. Route the speaker wires and HDMI cable through the opening in the back of the electrical box.
2. Turn 14 screw terminal sleeves on the back of the wall plate counterclockwise to expose terminal holes.
3. For each terminal insert the corresponding positive (+) speaker wire into the terminal hole on the screw ter-
minal with the red stripe, then turn the sleeve clockwise to secure the wires.
4. For each terminal insert the corresponding negative (-) speaker wire into the terminal hole on the screw
terminal with the black stripe, then turn the sleeve clockwise to secure the wires.
5. Remove the Face plate from the wall plate, you will find four screws hidden there. Place the wall plate
against the opening of the electrical box, then thread the four supplied screws through the screw holes in the
wall plate and the electrical box, then tighten the screws and reattach the face plate.
6. You may connect your speakers or HDMI Cable to the front of the wall plate.
For Speakers use banana jacks, or you may connect them by using the binding posts. The usage of Gold Plated
banana plugs is recommended (not included).
(To use banana plugs insert the positive and negative plugs into the corresponding positive and negative jacks
on the front of the wall plate).
(To connect the speaker wire to the front using the binding posts, see steps 2-4).