


-6-
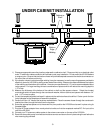
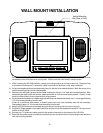
WALL MOUNT INSTALLATION
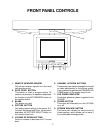
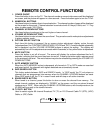
AUDIO OX
AUTO PROSENSOR AV/TV
PICTURE
TM
CHANNELVOLUME P0WER
Vertical Mounting
Slot (Rear of Unit)
Do not attempt to install the VE-500A vertically, unless you are sure that the electric circuits in the chosen area
have been turned off at the fuse or circuit panel. Failure to do this could result in electric shock.
1) When installing the VE-500A vertically, choose a mounting location at or close to eye level. Close proximity
to an electrical outlet and a TV antenna or cable connection will facilitate a neat, easy installation.
2) Cut out the template provided and temporarily tape it to the wall at the desired location. Mark the center of the
vertical mounting slot and remove the template.
3) Determine if a wall stud is present at the chosen location by drilling a 1/16” hole at the marked location. After
penetrating the depth of the wall surface, observe whether or not a structural stud is present. Caution, if near
electrical outlet, there is likely to be electrical wiring present.
4) If a structural stud is present, a suitable length drywall screw can be screwed directly into it. Leave approximately
1/4” of the screw protruding from the wall.
If there is no structural stud present, a drywall anchor from your local hardware store will be necessary.
Remember to leave 1/4” of its screw head protruding from the wall.
5) Hang the VE-500A onto the screw head using the vertical mounting slot at the rear of the unit.
6) Plug the AC Power adapter into a nearby electrical outlet and into the receptacle marked DC 12v input on the
bottom of the VE-500A.
8) Connect your TV antenna or cable system to the antenna connector on the bottom of the VE-500A.
9) Route the wires safely away from heat and moisture sources and secure them in place using the self adhesive
wire mounting clip provided.