


5
4
Switching On and Off
• Press the ON/OFF button to turn the unit on.
• Press the ON/OFF button a second time to turn the unit off.
NOTE: The unit will automatically turn off after 10 minutes.
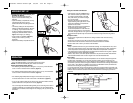
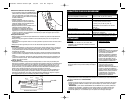
Setting Threshold for Color Change:
• For detecting small temperature changes of 1º F (0.5º C), move the slider
to the 1º mark on the back of the detector. (figure 3)
• For detecting medium temperature changes of 5º F (3º C), move the slider
to the 5º mark on the back of the Detector. (figure 4)
• For detecting large temperature changes of more than 10º F (5.5º C),
move the slider to the 10º mark on the back of the Detector. (figure 5)
• If you do not want the LED spot to change color, move the slider to the top
position where the color spots are X-ed out. (figure 6)
You can change the threshold setting while you are scanning. If the color is
changing erratically, try increasing the threshold. If you see a temperature
difference on the screen, but the light is not changing color, try reducing the
threshold.
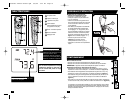
OPERATION
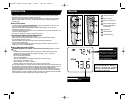
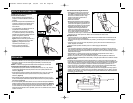
Changing the Temperature Display and
Installing the Battery
Note: The Thermal Leak Detector
requires one 9V alkaline battery, not
included.
• Open the battery compartment cover by
pressing the tabs of the cover in
towards the center and pulling the cover
out.
• The factory setting for the temperature
display is Fahrenheit (switch on left side
“F” setting). If you would like the LCD
screen to display the temperature in
Centigrade, slide the switch shown in
figure 1 to the right (“C” setting).
• Insert a fresh 9 volt battery (figure 2)
making sure to match (+) and (-)
terminals.
• Replace the battery compartment cover.
F
C
1
C
F
2
ASSEMBLY/SET-UP
Using the Thermal Leak Detector
• Hold the unit as shown in figure 7 and
aim near the location you want to scan
for a draft or thermal leak. This initial
aim point will be your reference target.
• Turn on the power.
• Keep the unit aimed at the reference
target until the green light shines on the
target and a Reference Temperature
appears on the screen.
• Slowly scan the Thermal Leak Detector
across the area of interest. If the
scanned temperature is hotter than the
reference temperature by more than the
threshold, the light will turn from green to red. If the scanned temperature is colder than
the reference temperature by more than the threshold, the light will turn from green to
blue.
Examples of Use:
• Scan around a light fixture to determine if ceiling insulation was removed during
installation.
• Scan along window and door sills to see where to add weather-stripping.
• Scan where a wall and the floor meet to find drafts that should be caulked.
• Scan an attic door to see if you need to add insulation.
NOTES:
• Shiny or polished surfaces can give inaccurate readings. To compensate for this, cover
the surface with masking tape or flat colored paint. When the tape or paint reaches the
same temperature as the target underneath, measure the temperature of the item.
• The thermometer cannot measure through transparent surfaces such as glass or plastic.
It will measure the surface temperature instead.
• Steam, dust, smoke, and other optical obstructions can prevent accurate measurement.
Hold the thermometer back and at an angle for an accurate measurement.
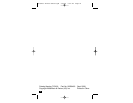
Field of View
The Thermal Leak Detector measures temperature over an area that may be larger than
the LED spot, especially if you are far away from the surface you are measuring. The
diameter of the measured area is 1/6 the distance from the Detector. In other words, if you
are 6 inches (152 mm) from the target, the Detector will measure the average temperature
over a circle 1 inch (25mm) in diameter. As shown in the illustration below, the farther the
distance from the target, the larger the measured area.
If you are just looking for hot and cold areas, it's OK if the scanned area is larger than your
target. However, if you want to accurately measure the temperature of an object, move the
Detector close so that the scanned area is about half the size of the object you want to
measure.
3
4
5
6
SCAN
REP
7
24 inches
(610mm)
18 inches
(457mm)
12 inches
(305mm)
6 inches
(152mm)
1
i
nch 2 inches 3 inches 4inche
s
(
2
5mm) (
5
1mm) (76mm) (102
m
m)
90539493 TLD100 manual.qxd 9/8/08 7:42 AM Page 4