


-11-
REMOTE CONTROL
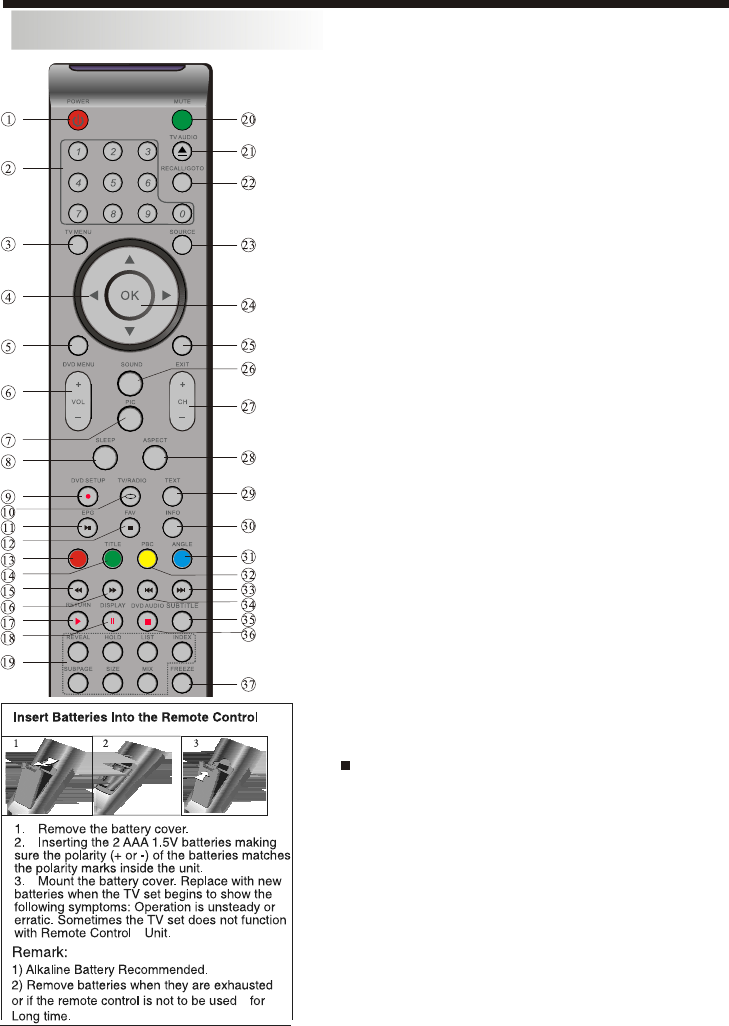
Remote Control - TV section
1:POWER:Press to turn the unit on or off.
2:NUMERIC KEY:Press for direct access to channels.
3:TV MENU:Press to display TV Main Menu.
4:CURSOR:Press to scroll through the Menu.
6:VOL+/- :Press to adjust the sound level.
7:PIC:Press to switch between picture modes.
8:SLEEP:Press to set Sleep Timer.
9.REC:Press to record the TV program you
are watching in DTV Mode
10:TV/RADIO:Press to switch between TV and Radio modes.
11:EPG:Press to display the 7 Day Electronic Program Guide
For information on the show you are watching.
12:FAV:Press to access your favourite channels list in TV or
DTV mode
15:REWIND:Press to rewind play in USB Mode and Timeshift
Mode.
16: FAST FORWARD:Press to Fast Forward play in USB mode
or Timeshift Mode.
17:PLAY:Press the Play Button in USB Mode or Time Shift
Mode to begin or continue Playback.
18:PAUSE:Press the Pause Button to pause play in Time
Shift or USB Mode or pause recording in Record Mode.
19:TELETEXT KEYS:Refer to page 12.
20:MUTE:Press to disable or enable the sound output.
21:TV/AUDIO:To select the available audio language of TV
programs .
22:RECALL/GOTO:Press to return to the previously viewed
channel.
23:SOURCE:Press to display the Input Source List.
24:OK:Press to confirm Menu selections.
25:EXIT:To exit the main menu, press the Exit Button or to
cancel setting selections.
26:SOUND:Press to switch between the sound modes.
27:CH+/CH-:Press to scroll through your Channel List.
28:ASPECT:Press to change the picture aspect ratio.
29:TEXT:Press to enter or exit TELETEXT mode.
30:INFO:To display the program information of the show you
are watching, press the Info Button.
33:SKIP FORWARD:Press to skip the next file or track in
USB Mode.
34: SKIP BACKWARD:Press to skip the previous file or
Track in USB Mode
35:SUBTITLE:To turn on Subtitles press the Subtitle Button
in DTV mode.
36. :
37:FREEZE:Press to freeze the picture you are watching.
Press to stop playing in USB mode, or press to stop
Time Shift.
A-B
NOTE: For the DVD section, please refer to page 20.