


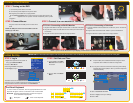

Connect the Devices
STEP 1 Turning on the DVR
1. Connect the power cable to the DVR
2. Connect the power adapter to the power cable.
3a. Plug the power cable into a surge protector
b. The QS408 and QS464 have a power switch on the rear panel which must
be flipped to the “On” positon. All other models will power up when
plugged in.
STEP 2 Connect Mouse
Plug the mouse into the USB port on the rear of the
DVR.
NOTE: the USB port on the front of the DVR is used for
backing up video files.
STEP 3 Connect to a VGA Monitor or Television
3a 3b3a 3b
OPTION A: Connecting a VGA PC Monitor
1. Plug the VGA cable into the port marked “VGA” on the back of the DVR.
2
. Plug the other end of the VGA cable into the similar port on the back of
the monitor.
3. Plug the monitor’s power cable into the surge protector.
OPTION B: Connecting a Television
1. Connect the BNC-to-RCA cable to the “Video Out” port on the back of
the DVR.
2. Plug the other end into the RCA “Video In” port on the television.
3. Plug the television’s power cable into a surge protector.
NOTE: If you do not see the cursor on your display, roll the mouse scroll wheel forward or backward until it appears.
Initial Set Up
1. Right-click anywhere on the screen to
bring up the Shortcut Menu.
2. Click on Main Menu.
3.
The Log In Screen will appear
4.
Click Apply to log in.
STEP 4 Log In STEP 5 Set Date and Time
1. Click on Basic in the Main
Menu Bar at the bottom of
the screen.
2.
Click on Time in the Basic
Menu.
BASIC
BASICHDDSEARCH RECORD EXITADVANCE
TIME
BASICPSWDLANG TIME EXITVID/AUD
The Admin account is the default account and does not have a
password. You may create a password and other user accounts
using the Password menu as described in the User Manual.
IMPORTANT! You must follow these steps to enter the current date and time in order to effectively use the video search function described at the end of this guide.
DEVICE ID :
USER NAME :
PASSWORD :
000000
admin
APPLY EXIT
USER LOGIN
(000000)
MAIN MENU
KEY LOCK
CHN SWITCH
DIGITAL ZOOM
VIDEO SEARCH
PTZ
MUTE
MANUAL REC
STOP REC
ROTATION
The Virtual Keyboard
To enter numbers or characters, click the appropriate field and a virtual
keyboard will appear. Click on a character to enter it into the field.
BLUE TAB Switches keyboard between numbers and upper or
lower case letters if appropriate.
a b c d e f g abc
h i j k l m n
o p q r s t u
v w x y z
1 2 3 4 123
5 6 7 8
9 0
A B C D E F G ABC
H I J K L M N
O P Q R S T U
V W X Y Z
a b c d e f g abc
h i j k l m n
o p q r s t u
v w x y z
1 2 3 4 123
5 6 7 8
9 0
A B C D E F G ABC
H I J K L M N
O P Q R S T U
V W X Y Z
a b c d e f g abc
h i j k l m n
o p q r s t u
v w x y z
1 2 3 4 123
5 6 7 8
9 0
A B C D E F G ABC
H I J K L M N
O P Q R S T U
V W X Y Z
3a. Enter the date, time and desired formats using the virtual
keyboard. Click individual numbers to change them.
3b. You may also choose to set the time zone along with enabling
Daylight Savings Time (DST) to allow your DVR to adjust the
time automatically.
4.
Click on Save Date and Time.
5. Click on Apply to save your settings.
6. Click on Exit.
DATE
TIME
ZONE
DATE FORMAT
TIME FORMAT
07/14/2011
07:29:04
DEFAULT
SAVE DATE AND TIME
APPLY EXIT
MM/DD/YY
24HOURS
0
DST
OFF
TIME SETUP
Backspace Enter. Closes keyboard.
3a
3b
4