


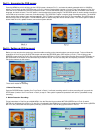


In the detection area RED means inactive, motion in this area will NOT trigger recording, transparent means active, motion in this area will
trigger recording. You can select the All option (RED box in Pic 6.5) to make the entire area sensitive, or select the Custom option (GREEN box
in Pic 6.5) to setup specific active areas using the Direction Keys and ENTER button, or you can select an area using a mouse . Then go to the
SENSITIVITY option (ORANGE box in Pic 6.5) and hit ENTER to change the value from 1 to 8 with 8 being the most sensitive. Next click on the
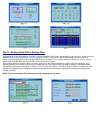
Save icon to save the settings. Next you have to setup the motion recording schedule. Go to the SCHEDULE option on the SYSTEM menu
(ORANGE box in Pic 6.3) which will bring up the SCHEDULE screen (shown as Pic 6.6). Select the Motion option by using the Direction Keys
and ENTER button to put a checkmark in the box (ORANGE box in Pic 6.6) Use the Direction Keys and ENTER button to select the days and
times that you want to camera to record on motion, green means the time is active. Click on the OK button to save the settings.
3. Time Schedule Recording.
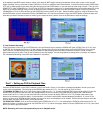
Follow instructions in Part 5 to go to SYSTEM menu. Use the Direction Keys to select the SCHEDULE option (PURPLE box in Pic 6.7) and
hit ENTER, this will display the screen in Pic 6.8. Use the Direction Keys to go to the Always option and hit the ENTER key to put a check
mark in the box, use the Direction Keys and ENTER button to select the days and times that you want the camera to record on motion,
green means the time is active. Click on the OK button to save the settings. You can setup special recording times on holidays, see section
3.3.3 Scheduled Recording in the DVR User’s Manual for instructions.
Part 7 – Setting up DVR to Playback Files
Press the SEARCH button on the DVR (number 6 on the Front Panel in Part 4), if the system is password protected it will ask you to enter
a user name and password. This will bring up the SEARCH box shown as Pic 7.1. You can search by Time or Event.
TO SEARCH BY TIME: Click on the Time search option (RED box in Pic 7.1). This will display the TIME screen shown as Pic 7.2. Use the
Direction Keys to select the date you want, the highlighted days have files available, hit the ENTER key to display the TIME SEARCH
screen shown as Pic 7.3. Here you can select how many cameras you want to display (RED box in Pic 7.3), and put checkmarks in the
boxes for the cameras you want to display. In the illustration, a 4 camera view has been selected displaying cameras 2, 4, 9, and 12.The
area on the time line in GREEN has files available, the top line is hours and the bottom line is minutes. Use the Direction Keys to select the
time you want, and then click the PLAY icon to play the files.
TO SEARCH BY EVENT: Click on the Event search option (GREEN box in Pic 7.1). This will display the EVENTS screen shown as Pic 7.2.
Select the camera or cameras you want to view (RED box in Pic 7.4), and the event type, Motion or Sensor (GREEN box in Pic 7.4), then select
the file you want to play and hit enter.
NOTE: Recording will not be interrupted while you are in Playback mode.