


QSD42908C8 User’s Manual
7
Chapter 2: Installation
Warning: Before you install the DVR, please make sure the power of DVR is switched
off.
Notice: We also STRONGLY recommend that you plug the DVR and cameras into a
Transient Voltage Surge Protector (UL-1449 rating). Look for a clamping voltage of 330
or lower, Joule rating of at least 400, and a response time of 10 nanoseconds or less.
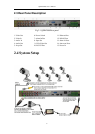
2.1 Checking the DVR and Its Accessories
When you get the product, check that all the items are included in your product
package. The Package should include:
1-QSD42908 DVR 1-8 way power supply for cameras
4-QOCDC60 cameras 8-60 foot cables for cameras
4-QOCDC36 cameras 9-Female RCA to Male BNC connectors
1- USB 2.0 Cable 1-320GB Hard Drive (installed in DVR)
1- USB Mouse 1-Remote Control (with 2 AA Batteries)
1-Product manual 1-RJ45 Ethernet Cable
1-Power supply for DVR 1-Installation CD
2.2 Hard Drive (HDD) Installation
Notice: The QSD42908C8 bundled package includes a 320GB hard drive. So these steps are
only necessary if you want or need to replace the hard drive or install a second drive or larger
hard drive.
Installation instrument
One Phillips screw driver.
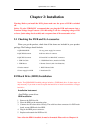
HDD installation
1. Remove the DVR box lid.
2. Place the HDD on the mounting plate.
3. Connect the ATA data cable correctly. The cable has three connectors for DVR main
board, master HDD and slave HDD.
4. Plug in the HDD power connector.
5. Replace and reattach the DVR box lid.
Note: After the HDD is installed, it must be formatted. Please refer to Chapter 6.4.