


- 2 -
UK
4. INSTALLATION
4.1 INSTALLATION INSTRUCTIONS
Have the stove installed by a qualified installer in conformance with national and local (fire safety) regulations.
Be sure that the chimney functions properly.
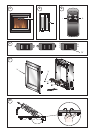
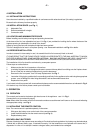
4.2 INSTALLATION SPACE (see Fig. 1)
A: Adjustable Feet
B: Recommended built-in height
C: Connection cable
4.3 LOCATION AND MINIMUM FREE SPACE
Before installing read all safety warnings and operating instructions.
At the base of the fire, four adjustable feet (see ‘A’ in Fig. 1) are provided for levelling the fire where the base of the
fireplace opening is raised above the level of the hearth.
Adjust by turning the feet until the desired height has been reached.
The fire is designed to be inset in a fireplace opening - see ‘Recessed Installation’ and Fig. 2 for details.
4.4 RECESSED INSTALLATION
In order to ensure it’s future safety in use, it is essential that this fire is securely fixed to the wall.
IT IS IMPORTANT THAT THE FIXING DEVICE CHOSEN IS APPROPRIATE TO THE WALL MATERIAL TO WHICH
THE FIRE IS BEING FIXED. SOME MODERN INTERNAL BUILDING MATERIALS ARE VERY LOW DENSITY
BLOCK AND REQUIRE SPECIALIZED FIXING DEVICES TO PROVIDE A SAFE,SECURE INSTALLATION.
The installation of this fire should be carried out by a competent person.
Follow steps as outlined below :
1. Make sure that the fire is located on a flat surface.
2. In existing fireplaces seal all draughts and vents to prevent chimney debris from falling onto the fireplace insert.
Do not install into an existing fireplace that is prone to dampness.
3. Remove the fire front panel - see ‘6.2 Lamp Replacement’ and Fig. 7.
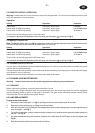
4. Locate the 4 fixing holes, position the fire accordingly, and firmly fix the appliance to the wall using the appropriate
screws - see ‘a’ in Fig. 2 for hole fixing dimensions and recommended recess size.
5. Replace the front panel.
If you intend to build a purpose built structure/hearth please use the recommended dimensions as indicated in Fig. 2
If in doubt of any of the above please consult your local builder.
5. OPERATION
5.0 OPERATION
The controls are located at the bottom right hand corner of the appliance - see ‘z’ in Fig. 1.
Connect the fire to your electricity supply.
Note: When either the remote control or the manual controls are used the neon’s will come on for 3 seconds indicating
the appropriate setting - see Fig. 3.
5.1 INITIALIZING THE REMOTE CONTROL
Note: The remote control is packed separately in the carton.
1. Slide open the battery cover on the back of the remote transmitter.
2. Install the AAA batteries into the remote control (see Fig. 4).
3. Replace battery cover.
DISCARD LEAKY BATTERIES
Dispose of batteries in the proper manner according to Provincial and local regulations. Any battery may leak electrolyte
if mixed with a different battery type, if inserted incorrectly, if all the batteries are not replaced at the same time, if
disposed of in a fire or if an attempt is made to charge a battery not intended to be recharged.