


Specifications
Installation
Dynil Sound Barrier
Appearance:
Black Flexivinyl Barrier
Color: Charcoal Gray
STC: 28
Mass: 1lb per square foot
Thickness: 0.09 inches
Temperature Range (Resistance):
40 ºF to +220 ºF (-40 ºC to +105 ºC )
Standards:
Meets UL94-V0
Chemical Resistance:
Resistant to water and mineral oils
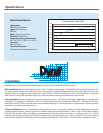
Transmission Loss (dB)
0 dB
5 dB
10 dB
15 dB
20 dB
25 dB
30 dB
35 dB
40 dB
45 dB
0 Hz 500 Hz 1000 Hz 1500 Hz 2000 Hz 2500 Hz 3000 Hz 3500 Hz 4000 Hz 4500 Hz
Dynil Barrier TL (dB)
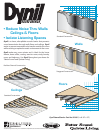
Dynil Barrier is designed to be installed during the construction or remodeling of your home.
Wall Installation: Measure the height of your studs. Cut Dynil to this length. On standard wall construction, attach the
54” wide material across four studs (48” across) allowing the material to drape between the studs. (See illustration on
opposite side) On staggered wall construction, weave Dynil in and out between the studs. (See illustation on opposite
side) Fasten to studs with standard staple gun. Attach drywall according to manufacturer’s instructions.
Floor Installation: Measure length of room perpendicular to joists. Cut Dynil to this length. Apply before underlayment
installation. The maximum roll length is 25 ft. For floors longer than 25 ft, overlap the material 2". Position the 54” wide
material across 48” of floor joists and fasten with standard staple gun. (See illustration on opposite side) Attach sub-floor
according to manufacturer’s instructions.
Ceiling Installation: Measure the length of ceiling along the rafters. For regular ceilings, cut Dynil slightly larger than the
spacing between rafters. Attach Dynil with a standard staple gun between rafters so that it sags 2" from the mounting
points. Finish drywall ceiling according to manufacturer’s instructions. (See illustration on opposite side) For resilient
channel or drop ceilings, attach Dynil across the rafters with a standard staple gun so that is sags 0.5" from the mounting
points. Finish drywall or install drop panels according to manufacturer’s instructions. (See illustration on opposite side.)
SOUND BARRIER