eatures
Features
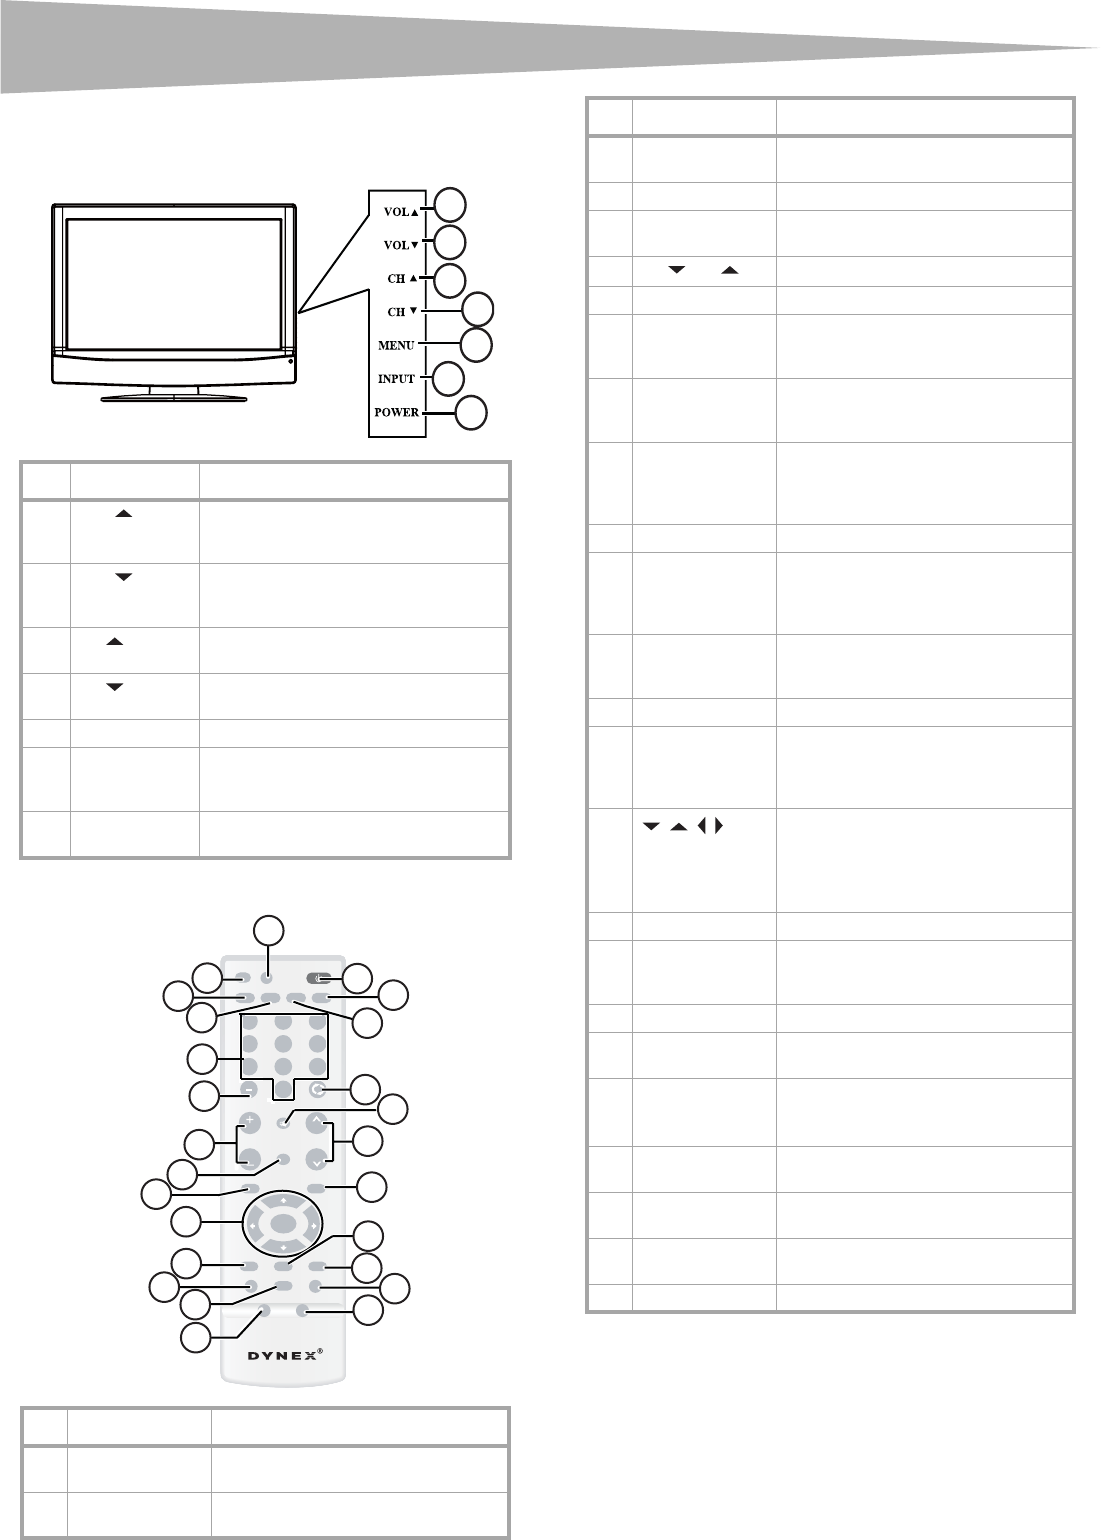
Front
Remote control
# Button Description
1
VOL
Press to increase the volume. In Menu
mode, functions as the right arrow to go
to the next menu or increase a setting.
2
VOL
Press to decrease the volume. In Menu
mode, functions as the left arrow to go to
a previous menu or decrease a setting.
3
CH
Press to go to the next higher channel. In
Menu mode, functions as the up arrow.
4
CH
Press to go to the next lower channel. In
Menu mode, functions as the down arrow.
5 MENU Press to show the on-screen menu.
6 INPUT Press to cycle through the available input
sources. In Menu mode, functions as the
ENTER key.
7 POWER Press to turn on your TV or put it into
Standby mode.
# Button Description
1 POWER Press to turn on your TV or put it into
Standby mode.
2 TV Press to select ATSC (digital), or NTSC
(analog) TV source.
1
2
3
4
5
6
7
INPUT
VIDEO COMP PC
MUTE
FAVORITE
MENU
P-LOCK MTS/SAP CCD
ZOOM
PICTURE AUDIO
SLEEP
FREEZE
EXIT
TV
DISPLAY
POWER
123
456
789
0
ENTER
RECALL
VOL
VOL
CH
CH
25
1
2
3
24
23
22
20
21
4
5
19
6
7
9
16
10
15
11
14
12
17
18
13
8
ZRC-100
3 PC Press to toggle between the VGA and
HDMI modes.
4 RECALL Press to watch the previous channel.
5 MUTE Press to mute the sound. Press again to
restore the sound.
6
CH
or
Press to change TV channels.
7 EXIT Press to close the on-screen menu.
8 MTS/SAP Press to select one of the preset audio
modes. You can select MONO, STEREO,
or SAP.
9 CCD Press to turn closed captions on and off.
For more information, see “Viewing
closed captions” on page 8.
10 FREEZE Press to freeze the video image. Press
again to unfreeze the image. Do not
freeze the video image for long periods
of time. You may damage the TV screen.
11 AUDIO Press to select the sound mode.
12 PICTURE Press to select the brightness or
contrast adjustment. Lets you adjust the
brightness and contrast without opening
the on screen menu.
13 SLEEP Press to set the sleep timer. For more
information, see “Setting the sleep
timer” on page 8.
14 ZOOM Press to select the display aspect ratio.
15 P. L O C K Press to activate or deactivate Parental
Controls. See “Setting parental controls”
on page 8 for information on setting up
Parental Controls.
16
ENTER
Press the arrows to move down, up, left,
or right in the on-screen menu.
Press the ENTER button to confirm
changes or to toggle options on and off
in the on-screen menu.
17 MENU Press to open the on-screen menu.
18 FAVORITE Press to toggle the Favorite/Normal
mode. See “Setting up the channel list”
on page 7 for more information.
19 VOL + or – Press to adjust the volume up or down.
20 – Use with the 0-9 number buttons and
ENTER key to select digital channels.
21 [Number buttons] Press to enter channel numbers.
In the on-screen menu, press to enter
your parental control’s password.
22 COMP Press to select Component source
mode.
23 VIDEO Press to toggle between S-Video and
Composite source modes.
24 INPUT Press to select the video input signal
source.
25 DISPLAY Press to display status information.
# Button Description
