


- 6 -
EN
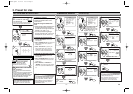
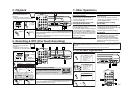
9. Recording Features
•Insert a tape with its record tab into the VCR.
F.FWD
8
8
ONE TIME PROGRAM
PROGRAM NUMBER 4
DATE 0 5 / 0 3 MON
START TIME 0 7 :3 0 PM
END TIME 0 8 : 3 0 PM
CHANNEL 1 6
REC SPEED – –
STOP
PLAY
9
9
ONE TIME PROGRAM
PROGRAM NUMBER 4
DATE 0 5 / 0 3 MON
START TIME 0 7 :3 0 PM
END TIME 0 8 : 3 0 PM
CHANNEL 1 6
REC SPEED SP B SP
SLP
F.FWD
2
2
PROGRAM NUMBER 4
DATE – – / – –
START TIME – – :– – – –
END TIME – – : – – – –
CHANNEL – –
REC SPEED – –
STOP
PLAY
F.FWD
3
3
PROGRAM NUMBER 4
B ONCE
DAILY
WEEKLY
STOP
PLAY
F.FWD
4
4 Select the desired month
Select the desired day
ONE TIME PROGRAM
PROGRAM NUMBER 4
DATE 0 5 / 0 3 MON
START TIME – – :– – – –
END TIME – – : – – – –
CHANNEL – –
REC SPEED – –
F.FWD
F.FWD
STOP
PLAY
1
1
-MENU-
B TIMER PROGRAMMING
AUTO REPEAT [OFF]
CHANNEL SET UP
CLOCK SET
LANGUAGE SELECT
AUDIO OUT
TV STEREO [ON]
SAP
MENU
Select an empty program
number
Select “ONCE”, “DAILY”
(Mon-Fri), or “WEEKLY”
F.FWD
STOP
5
5 Select the desired start
time (hour)
Select the
minute
ONE TIME PROGRAM
PROGRAM NUMBER 4
DATE 0 5 / 0 3 MON
START TIME 0 7 :3 0 – –
END TIME – – : – – – –
CHANNEL – –
REC SPEED – –
F.FWD
F.FWD
STOP
6
6
ONE TIME PROGRAM
PROGRAM NUMBER 4
DATE 0 5 / 0 3 MON
START TIME 0 7 :3 0 PM
END TIME – – : – – – –
CHANNEL – –
REC SPEED – –
AM
BPM
STOP
PLAY
F.FWD
Select “AM” or “PM”
7
7
Repeat the procedure in steps
5 and 6 to set the end time.
Select the desired channel
Select the desired recording speed
10
10
Turn off the VCR
for recording
• TIMER indicator on the VCR lights up.
C.RESET
EXIT
POWER
Warning: Unauthorized recordings of copyrighted video tapes
may be an infringement of copyright laws.
ANT
IN
OUT
AUDIO
VIDEO
OUT IN
OUT
L
R
IN
ANT
IN
OUT
AUDIO
VIDEO
OUT IN
OUT
L
R
IN
ANT
IN
OUT
AUDIO
VIDEO
OUT IN
OUT
L
R
IN
VIDEO
ANT
IN
OUT
AUDIO
OUT IN
OUT
L
R
IN
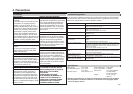
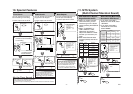
Connect
1
2
Connect
1) Insert a pre-recorded tape into the playing VCR.
2) Insert a tape with its record tab into the recording VCR.
3) Press
the SPEED button on the remote control of the recording VCR
to select the desired recording speed (SP/SLP).
4) Select the “L1” or “L2”position on the recording VCR.
• To use the input jacks on the back of the VCR, select "L1" position by
pressing
[0], [0], [1] on the remote control or the CHANNEL buttons.
• To use the input jacks on the front of the VCR, select "L2" position by
pressing
[0], [0], [2] on the remote control or the CHANNEL buttons.
5) Press
the REC/OTR button on the recording VCR.
6) Begin playback of the tape in the playing VCR.
7) To stop recording, press the
STOP/EJECT button on the recording
VCR, then stop playback of the tape in the playing VCR.
1) Turn the power on by pressing
the POWER button.
2) Select main menu by pressing
the MENU button.
3) Select "TIMER PROGRAM-
MING" by pressing the PLAY or
STOP button.Then, press the
F.FWD button.
4) Select the program number
which you want to check by
pressing the PLAY or STOP but-
ton. The details of the program
you selected will appear on the
TV screen.
• Go to the digit you want to
change by pressing the F.FWD
or REW button.Then, enter cor-
rect numbers by pressing the
PLAY or STOP button.
• You may cancel the entire pro-
gram by pressing the REW but-
ton while the program number
flashes.
5) Press the C.RESET/EXIT button
to exit.
6) Press the POWER button to
return to timer stand-by mode.
To Check, Correct, or Cancel a
Timer Program
Hint
Hint
• To go back one step, press the REW button
(during the steps [3] to [9].)
• If there is a power failure or the VCR has been unplugged for more than 30 sec-
onds, the clock setting and all timer settings will be lost.
• If the tape runs out before the end time, the VCR will switch to the Stop mode
immediately, eject the tape and the VCR power will be turned off.The TIMER
indicator will flash.
• If a tape is not in the VCR or does not have the record tab, the TIMER indicator
flashes and timer recording cannot be performed. Please insert a recordable tape.
• When all the Timer Recording are completed, the TIMER indicator flashes.
To play or eject the recorded tape, press the POWER button first, and then
press the PLAY or EJECT button.
Press the STOP/EJECT button on the VCR.
To cancel a Timer Recording that is in progress
Hint
Hint
• For best results during dubbing, use the VCR’s front panel controls whenever possible.The
remote control might affect the playing VCR’s operation.
• Always use video-quality shielded cables with RCA-type connectors.Standard audio cables are
not recommended.
• You can use a video disc player, satellite receiver, or other audio/video component with A/V out-
puts in place of the playing VCR.
• “L1” or “L2” is found before the lowest memorized channel. (Example: CH02)
Timer Recording Hint for Timer Recording
Copying a Video Tape
•
If you have connected the VCR to a cable
box or satellite box as the Connection A
on page 1, select the VCR to channel 3 or
4 (the RF output channel of the VCR).
Then, select the desired channel at the
cable box or satellite box.Leave the cable
box or satellite box on for timer recording.
or
or
or
PLAY
• You can program one
year in advance.
or
PLAY
or
or
or
STOP
or
PLAY
STOP
or
PLAY
(Back of Playing VCR)
(Back of Recording VCR*)
Audio/Video Cables
(not supplied)
RF Cable
(supplied)
(Back of TV)
*Front input jacks are also available