


IR 452 • Setup and Operation
Setup and Operation
IR 452 • Setup and Operation
2-2 2-3
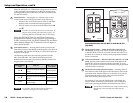
Enabling control of the MLC 104
The MLC 104 can be controlled by the IR 452 via the
DVCM 50 in conjunction with the IR Link or IRL 20. To set up
the MLC 104 for control by the IR 452, do the following:
1. Program the buttons on the MLC 104 and the DVCM 50
front panels with the desired commands. (Refer to the
product user's manuals for programming instructions.)
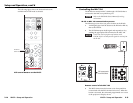
2. Connect the DVCM 50 rear panel host port to the MLC 104
rear panel host port. (Refer to the DVCM 50 User's Manual
for instructions and diagrams.)
3. Connect the IR Link to the DVCM 50 rear panel. (Refer to
the DVCM 50 User's Manual for instructions.)
4. Mount the MLC 104, the DVCM 50, and the IR Link or
IRL 20 on a wall or furniture as desired. (Refer to the
mounting instructions in the product user's manuals.)
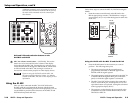
Changing button labels
You can use the Windows-based confi guration software to
program the buttons on the MLC 52 and DVCM 50 to be used
for functions other than the pre-labeled ones. For example, you
might want to use the two MLC 52 buttons that are pre-labeled
Vol and Vol for additional input selections or for Auto
Image, instead of volume control.
To program the MLC 104 buttons, use the Global
Confi gurator 2 (GC2) software. Visit the Extron Web
site at www.extron.com for information on ordering this
software.
If you reprogram an MLC or DVCM button for a function
different from what its label indicates, you should also relabel
that button to refl ect its new function. When you relabel
an MLC or DVCM button, you will also need to relabel its
equivalent IR 452 button to match it.
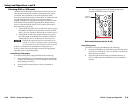
With the IR 452, you receive a set of adhesive-backed labels,
which you can use to relabel IR 452 buttons as needed. The
fi gure on the next page shows the button labels that are
provided.
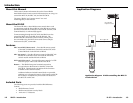
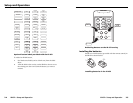
Operational Overview
The IR 452 can control the MLC 52 or the DVCM 50. It can also
control the MLC 104 via the DVCM 50.
Button confi guration on the control modules cannot
be performed from the IR 452. The commands must be
programmed on the MLC 52 or DVCM 50 using the
Windows-based confi guration software or IR Learning.
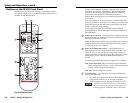
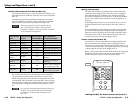
Each button on the IR 452 front panel, when pressed, sends
an IR signal to the IR Link or IRL 20 signal repeater. The
IR Link or IRL 20 relays the signal to the MLC 52 or the
DVCM 50. The IR signal activates the equivalent button on
the MLC 52 or DVCM 50, causing the button to perform the
function that was programmed to it (e.g., turning the projector
on and off, selecting an input, or turning the projector volume
up and down).
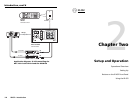
If an MLC 104 is connected to the DVCM 50, the signal sent
from the IR 452 goes to the DVCM, which issues the appropriate
SIS
™
command to the MLC 104. The SIS command activates the
appropriate button on the MLC 104, which communicates the
command to the display device via RS-232.
Setting Up
Before you can use the IR 452 remote to control the MLC 52, the
DVCM 50, or the MLC 104, you must do the following:
1
Program the buttons on the MLC 52 or the MLC 104
and/or the DVCM 50 with the commands you want them
to issue. Refer to the appropriate product user's manual
for programming procedures.
2
Make any needed changes to the button labels on the MLC
controller and/or the DVCM, if you have programmed
any buttons to have functions different from their
pre-installed labels.
3
Wire and install the MLC 52 or the MLC 104; the
DVCM 50, if applicable; and the IR Link or the IRL 20,
following the directions in the appropriate product user's
manual.
4
Affi x the provided button labels to the IR 452 overlay
as needed to match the buttons on the MLC and/or the
DVCM. (See Changing button labels, later in this chapter.)
5
Install the two provided AAA batteries in the IR 452. (See
Installing the batteries, later in this chapter.)