


25EN 25EN
Recording
Playback Editing
Introduction
Connections Basic Setup Function Setup VCR Functions
Others Español
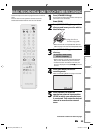
TIMER RECORDING
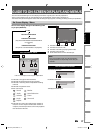
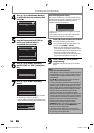
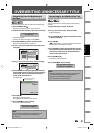
1
Press [TIMER].
2
Use [K / L] to select “New Program”,
then press [OK].
Timer Programming
1/1
MON JAN/01 11:00AM
Date Start End E1/E2
New Program
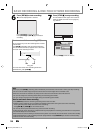
3
Use [K / L] to enter the date, then
press [B].
Timer Programming
1/1
MON JAN/01 11:00AM
Date Start End E1/E2
New Program
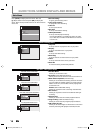
Date
JAN/02
E1/E2
E1
REC To Mode
DVD SP
SP 2 : 00
Start
- - : - -
End
- - : - -
Daily
MON-SAT
JAN/01
JAN/31
MON-FRI
SAT
FRI
SUN
p
p
p
p
p
p
p
p
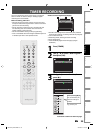
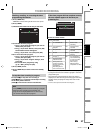
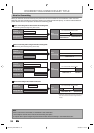
Guide to Timer Programming Display
Timer Programming
1/1
MON JAN/01 11:00AMSP (1:00)
JAN/ 2/07 12:00 AM E1 SP
Date Start End E1/E2
JAN/02 12:00AM 1:00AM E1
New Program
1
5
3
4
2
1 Title of a timer program (Contains date, time, selected
external input position, recording mode of the program)
2 Current date and time
3 Recording mode, and length of the recording
4 Timer program list
5 Total number of pages and current page (2 pages
maximum)
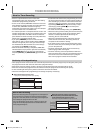
When pressing [L] at
the current date, the
date will change as
follows.
e.g.) January 1st
You can program the unit to record up to 12 programs
within a month in advance. Daily or weekly program
recordings are also available.
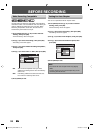
Before recording, make sure
• Connect the external tuner to either E1 or E2 and set it
to output audio/video signals when it comes to the time
you want to start recording.
• Do not change the external tuner’s channel while you
are recording. You cannot watch one channel and
record another at the same time.
• Set the clock before setting a timer programming.
• Insert a recordable disc with enough recordable space or
a cassette tape with a erase-protection tab.
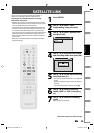
STANDBY-ON
TIMER SET
ABC DEF.@/:
JKL MNOGHI
TUV WXYZ
SPACETIMER CLEAR
SETUPDISC MENU
RETURNTITLE
TRACKING
VCR DVD
AUDIOREC
REC MODE D.DUBBING
CM SKIP
SEARCH RAPID PLAY
PQRS
SOURCE
123
456
78
0
OK
+--
o
p
B
B
iji
C
F
gh
s
9
DISPLAY OPEN/CLOSE
A
I
NB552
ABC DEF.@/:
JKL MNOGHI
TUV WXYZ
SPACE
PQRS
123
456
78
0
9
p
o
OK
B
TIMER
s
TIMER SET
SETUP
Instructions continue on the next page.
OPEN/CLOSE
A
B
E9E2ZUD_BZV420MW8.indd 25E9E2ZUD_BZV420MW8.indd 25 2007/09/04 17:05:392007/09/04 17:05:39