


Control Denitions: Front, Side, & Back Views
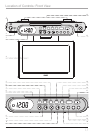
1 Power Button Press the Power Button to turn the unit on and off.
2 Infrared Receiver The Infrared Receiver receives signals from the remote.
3 LCD Display The LCD displays clock and radio information.
4 LCD TV Screen The LCD TV Screen displays a TV signal as well as TV information.
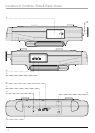
5 EQ Button Press the EQ Button to switch between the 4 preset equalizer settings. (Classic, Jazz, Pop, and Rock)
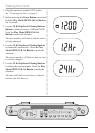
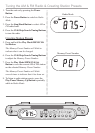
6 Memory/Clock Adjust Button In Radio Mode, press the Memory Button to save a radio station to the unit’s memory. See
“Tuning the AM & FM Radio & Creating Station Presets” on page 9. In Power Off Mode, press the Clock Adjust Button to set
the unit’s clock. See “Setting the Clock” on page 6.
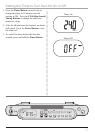
7 Timer Button Press the Timer Button to set the timer. See “Setting the Timer to Turn the Unit On or Off” on page 11.
8 DVD Tray Load DVD, CD, CD-R/RW and JPEG-CD discs into the tray.
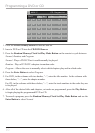
9 CLK/Skip/Search/Tuning Buttons Press the CLK/Skip/Search/Tuning Buttons to tune the radio, set the clock time, and set the
timer time.
10 Stop/Band Button In DVD Mode, press the Stop/Band Button to stop the disc. In Radio Mode, press the Stop/Band Button to
switch between AM and FM radio modes.
11 Play/Pause/Memory Up Button In DVD Mode, press the Play/Pause/Memory Up Button repeatedly to alternate between
playing and pausing a disc. In Radio Mode, press the Play/Pause/Memory Up Button to cycle up through radio station presets.
See “Tuning the AM & FM Radio & Creating Station Presets” on page 9.
12 Mount Connections The Mount Connections serve as screw receptacles when attaching the unit to a cabinet. Refer to the
accompanying Mounting Template for mounting instructions.
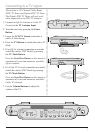
13 Volume Buttons Press the Volume Buttons to adjust the volume of the unit.
14 AV In Button Press the AV In Button to switch to Aux Mode. Switch to this mode when using the Audio and/or Video Inputs.
15 Tuner Button Press the Tuner Button to switch to Radio Mode. Switch to this mode when listening to the AM or FM radio.
16 DVD Button Press the DVD Button to switch to DVD Mode. Switch to this mode when playing a DVD, CD or JPEG-CD disc.
17 Open/Close Button Press the Open/Close Button to open the DVD tray. Press once more to close the DVD tray.
18 TV Channel Buttons Press the TV Channel Buttons to change the channel when in TV Mode.
19 TV Button Press the TV Button to switch to TV Mode. Switch to this mode when watching TV on the LCD TV Screen.
20 TV Mode Button Press the TV Mode Button to switch between NTSC (Standard TV) and ATSC (Digital TV) Mode.
21 Backup Battery Compartment The Backup Battery Compartment uses 2 AAA Batteries to serve as a backup power source
for the clock only. (Batteries not included)
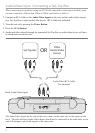
22 Video Input (Side) Use the Video Input to play video, from a set-top box or other video device, on the unit.
The side and back Audio/Video Inputs should not be connected at the same time, or the unit will attempt to play both signals at
the same time.
23 Audio Inputs (Side) Use the Audio Inputs to play audio, from a set-top box, MP3 player or other audio device, on the unit.
The side and back Audio/Video Inputs should not be connected at the same time, or the unit will attempt to play both signals at
the same time.
24 Audio Inputs (Back) Use the Audio Inputs to play audio, from a set-top box, MP3 player or other audio device, on the unit.
The side and back Audio/Video Inputs should not be connected at the same time, or the unit will attempt to play both signals at
the same time.
25 Video Input (Back) Use the Video Input to play video, from a set-top box or other video device, on the unit.
The side and back Audio/Video Inputs should not be connected at the same time, or the unit will attempt to play both signals at
the same time.
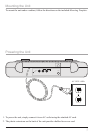
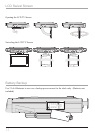
26 FM Wire Antenna The FM Wire Antenna provides reception for the FM Radio.
27 Attached AC Cord Plug in the Attached AC Cord to a standard 120V outlet to provide power to the unit.
28 AC Cord Hooks Use the AC Cord Hooks to wrap and store excess from the AC Cord.
29 TV Antenna Input Use the TV Antenna Input to connect a digital (ATSC) and/or an analog (NTSC) TV signal to the unit.
15