


Customer Support: 1-888-999-4215GPX | TD3220
Quickstart Guide
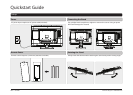
Television Setup
Connecting a Set-Top box
Requires a TV antenna (not
included).
1. Connect a VHF, UHF, or HDTV
antenna to the RF Input on the
television.
2. Press the Source button to switch
to TV mode.
3. Press the Setup button to access
the setup menu.
4. Press the Arrow () buttons to
highlight the CHANNEL icon. Press
the Enter button.
5. Press the Arrow () buttons to
highlight SIGNAL TYPE. Press the
Arrow () buttons to select AIR.
6. Press the Arrow () buttons to
highlight AUTO CHANNEL SEARCH.
Press the Enter button to begin
scanning for available channels.
Connecting a TV Antenna
Requires a cable connection.
1. Connect a cable to the RF Input on
the television.
2. Press the Source button to switch
to TV mode.
3. Press the Setup button to access
the setup menu.
4. Press the Arrow () buttons to
highlight the CHANNEL icon. Press
the Enter button.
5. Press the Arrow () buttons to
highlight SIGNAL TYPE. Press the
Arrow () buttons to select
CABLE.
6. Press the Arrow () buttons to
highlight AUTO CHANNEL SEARCH.
Press the Enter button to begin
scanning for available channels.
Connecting Basic Cable
Requires a Set-Top Box (not included).
If your Set-Top Box has an HDMI Output:
• Connect the HDMI output on the Set-Top Box to the HDMI Input on the
television using an HDMI cable (not included).
If your Set-Top Box has a Composite Video Output:
• Connect the video output on the Set-Top Box to the Composite Video Input
on the television using an A/V RCA cable (not included). Connect the audio
output on the Set-Top Box to the RCA Audio Input on the television.
If your Set-Top Box has a Component Video Output:
• Connect the component video output on the Set-Top Box to the Component
Video Input on the television using a component RCA cable (not included).
Connect the audio output on the Set-Top Box to the RCA Audio Input on the
television.
After connecting your Set-Top Box:
• Press the Source button to switch to YPBPR, AV, or HDMI 1, 2, or 3 to match
the connection used.
The Auto Channel Scan must be run before any channels can be viewed on the television.
1. Press the Source button to switch to TV mode.
2. Press the Setup button to access the setup menu.
3. Press the Arrow () buttons to highlight the CHANNEL icon. Press the Enter button.
4. Press the Arrow () buttons to highlight SIGNAL TYPE. Press the Arrow () buttons to select AIR.
5. Press the Arrow () buttons to highlight AUTO CHANNEL SEARCH. Press the Enter button to begin scanning for available channels.
Auto Scanning for Channels