


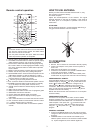

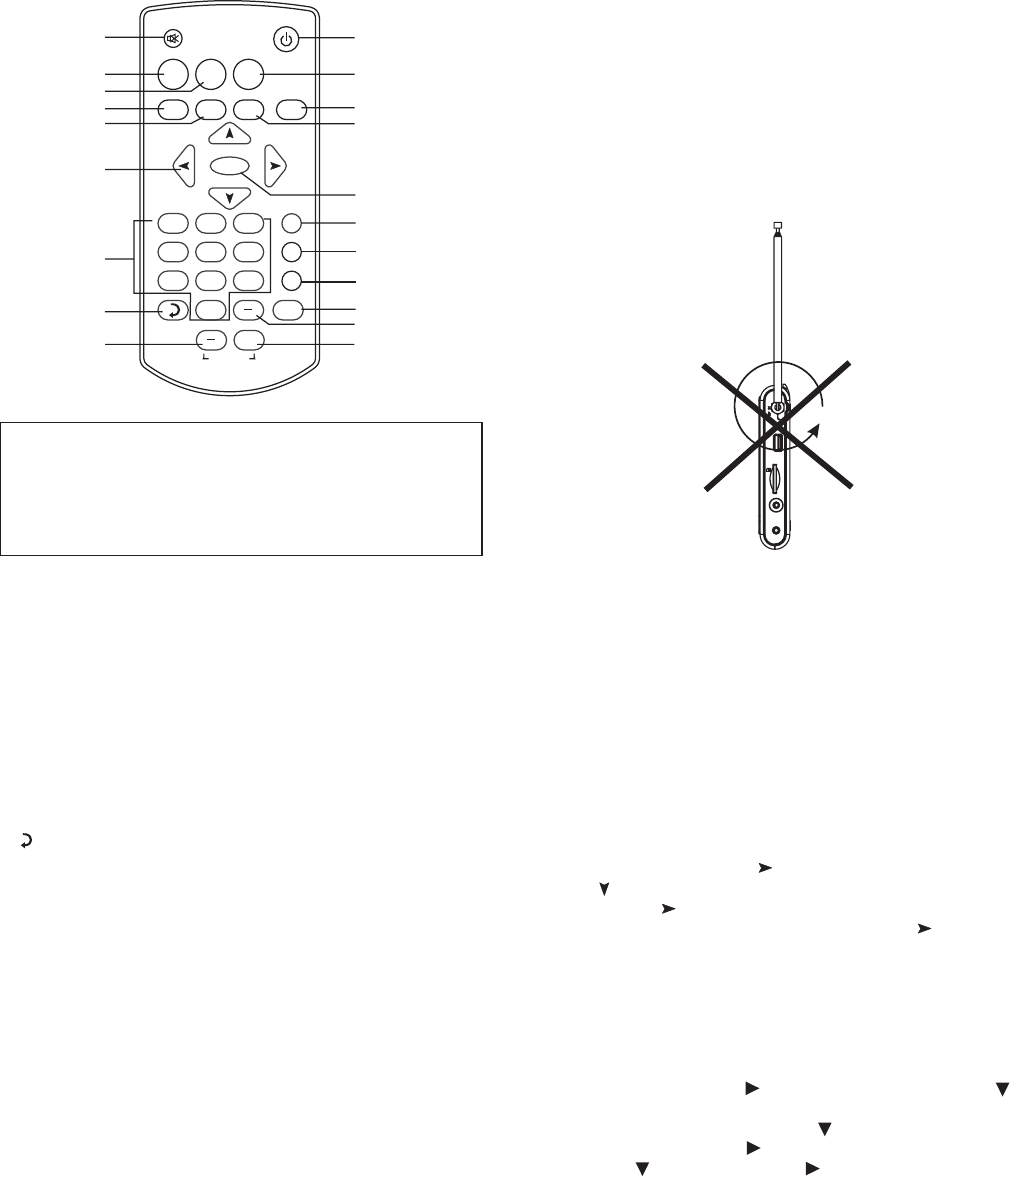
Remote control operation
Note:
a) Point the remote control unit from no more than about
5m from the remote control sensor and within about
60 of the front of the TV monitor.
b) Do not press the button too quick. Press the button
after the previous operation is completed.
2. PICTURE: Press this button to select the picture display
effect between Dynamic, soft, personal or standard.
3. MTS: P
4. MENU: Press this button to access the menu interface.
6. NAVIGATION buttons: Press to select the options under
OSD setting interface or alter the settings in a menu.
8. : Press to go to previously selected channel.
9.
10.POWER: Press this button to set the player to standby
on or off state( If the main power of the set is on).
18. CH-:
19.
20. VOLUME +: Press this button to increase the speaker
volume.
°
1. MUTE:
5. SLEEP:
7. (0~9 ):
VOL-: Press this button to decrease the speaker volume.
11. ZOOM:
12. EXIT: Exit the menu interface.
13. EPG: Press this button to skim over TV programs guide.
14. OK/ENTER: Confirm the selection.
15. TV/AV: Select the desired signal input mode.
16. INFO: Press this button to display current program
information.
17. CH+: Press this button to increase the channel number.
Press this button to decrease the channel number.
- : Used to directly input TV channels.
Used to toggle between normal & muted audio.
Use to auto power off by setting sleep timer.
Enter numeric values and to select the channel or
program directly by entering its number.
Used to select the desired display mode wide or
normal. .
ress to select the audio output language during
DTV mode if there are multi languages available, during
ATV mode, press this button to select audio output like
mono & stereo.
EPG
MENU SLEEP
1
2
3
4
5
6
7
10
11
12
13
14
16
MUTE
POWER
PICTURE MTS
ZOOM
EXIT
ENTER
1
+
2
3
4
5
6
789
15
CH-
CH+
INFO
TV/AV
VOLUME
0
8
9
18
19
20
17
HOW TO USE ANTENNA
Directly connect external movable antenna to RF in, may
also connect roof antenna directly.
For better reception:
Adjust the direction/position of the antenna. The signal
strength depends on the area of reception. If the signal is
too weak, poor or no reception is possible. This is not a
malfunction.
Do not rotate the antenna in counter direction after fixing, it
may get loose & effect the channel reception.
Be sure the TV antenna is connected to the set properly.
Plug the AC adaptor to the power source to power on
the TV set.
Slide power on/off switch to on position.
Press the TV/AV button on the remote or MODE button
on the main unit to select TV Mode.
Press AUTO/OK on the unit. Then select YES & press
AUTO button to program the channels onto the memory.
Press the MENU button on the remote, and then select the
satellite image by using the key. Then press down arrow
button ( ) to select antenna function. Change to Air or
Cable by using button, depending upon the type of
connection. Then scroll to Auto Scan and press button
twice, TV will start auto programing function taking all the
available channels into memory.
NOTE: Auto Scan function has to be done for TV to capture
channels initially.
Turn the TV on and press menu button, scroll to satelite
image by pressing Vol + ( ), and then press channel - ( )
to select antenna function. Press Vol + to choose Air or
cable reception. Then press CH - ( ) to select Auto scan
function and press Vol + ( ) and choose start scan by
using CH - ( ) and press Vol + ( ). The unit will start
program.
Press CH UP/DOWN button once, the channel number
changes. A desired channel can be reached using these
two keys.
NUMERIC button on the remote can facilitate you to
select a specific channel. If the channel number exceeds
10, input first digital unit, then another digital unit;
ATTENTION:
PROGRAMING BY REMOTE:
PROGRAMING FROM UNIT
TV OPERATION
GET STARTED
SEARCH A PROGRAM
3