


7598-1135-08
ENGLISH
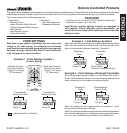
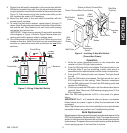
5. Continue to press the DIM button until the desired dim level is
reached. Note: Receiver remembers last DIM setting used. To
recall last DIM setting, push and release the DIM button.
Note: The DIM setting defaults to 50% in the event of a power
failure.
IMPORTANT: Wait 1 to 2 seconds after you press a transmitter
button before you press it again to allow the transmission to be
completed.
Note: If light does not turn on or intermittently turns on and off when
transmitter buttons are pushed, see Troubleshooting Guide.
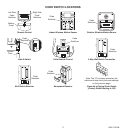
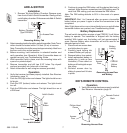
Battery Replacement
The wall switch transmitter requires a type CR2032, 3-volt lithium
battery to operate. The transmitter is shipped with the battery
installed. With typical use, the battery will last approximately 5
years. Remove battery when transmitter will not be used for an
extended period of time.
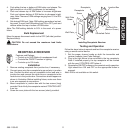
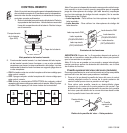
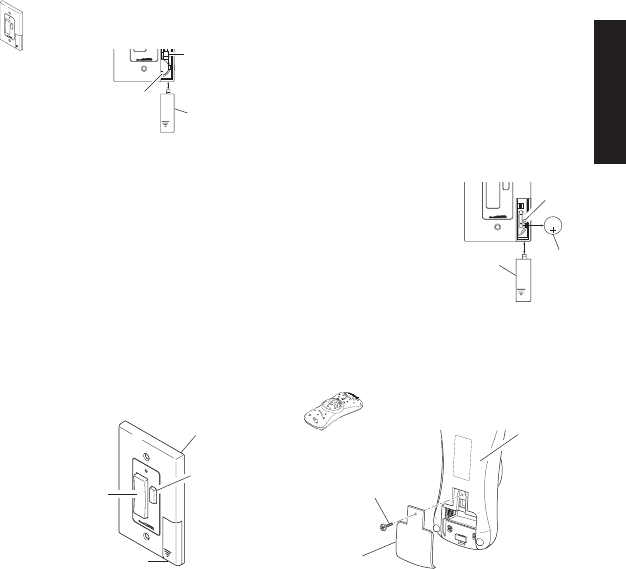
1. Place thumb on access door
and slide down to open.
2. Carefully bend locking tab
outward. Battery will pop up.
3. Remove battery from socket.
4. Install replacement battery in
socket plus (+) side up (see
illustration). Press down on
battery until locking tab snaps
into place.
5. Reinstall access door by
sliding it upward until it locks
in place.
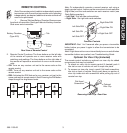
ADD-A-SWITCH
Installation
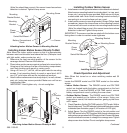
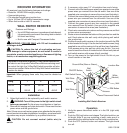
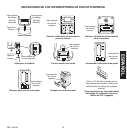
1. Remove Tab from Battery Chamber. Remove cover
from front of Add-A-Switch transmitter. Gently pull tab
out of battery chamber. Slide cover onto Add-A-Switch
transmitter.
DI
M
Add-A-Switch
Add-A-Switch
ON/OFF
Button
DIM
Button
Access Door
DI
M
Removing Battery Tab
1 2 3 4
ON
2032
3
V
L
i
t
h
i
u
m
B
a
t
t
e
r
y
DIM
Battery Chamber
(Type CR2032)
Access Door
Tab
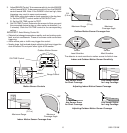
2. Select mounting location for add-a-switch transmitter. Note: Trans-
mitter should be located within 100 feet (30 m) of receiver.
Note: Transmitter should be mounted approximately 4 feet from
the floor and in the vertical position.
3. Before mounting, hold transmitter in selected location and
verify operation (see Operation). Note: If transmitter does not
operate correctly, see Troubleshooting Guide.
4. With transmitter held in place, mark the mounting holes with
a pencil or pointed object.
5. Remove transmitter and drill two 3/16" holes. Tap drywall
anchors (provided) into holes with a hammer.
6. Attach transmitter to wall using two screws (provided).
Operation
1. Verify that receiver has been properly installed. See Receiver
Information, page 10.
2. Push the ON (top) button and release. The light should turn on
full bright.
3. Push the OFF (bottom) button and release. The light should
turn off.
4. Push the DIM button and release. The light should turn on at
a DIM level.
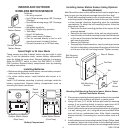
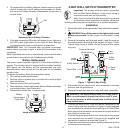
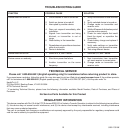
KID’S REMOTE CONTROL
Operation
1. Verify that receiver has been properly installed.
See Receiver Information, page 10.
Removing Access Door
Access
Door
Philips-Head
Screw
Remote Control
Back
1 2 3 4
ON
DIM
2032
3
V
L
i
t
h
i
u
m
B
a
t
t
e
r
y
CR2032
Lithium
Battery
Battery
Locking
Tab
Access
Door
Removing Access Door
and Battery