


HP Part Number 5969-2136 '"&#&( #'
Printed in May 1999
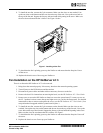
8. To install the new fan, connect the 3-pin connector. Make sure the wires are not crushed. Line
up the two slots on the bottom and the one slot on the top of the unit. Line up the screw hole on
the top of the fan unit. Support the fan tray with one hand while putting in the screw. Make sure
the wires do not obstruct the fan’s airflow. See Figure 1 below.
Figure 1. Installing a New Fan
9. To check that the fan is spinning, power up the NetServer and ensure that the fan spins. Power
off the server.
10. Replace the chassis covers. Power up your NetServer.
Fan Installation on the HP NetServer LC 3
There is no fan on the HP NetServer LC 3 to be removed.
1. Bring down the network properly. If necessary, shut down the network operating system.
2. Turn off power to the HP NetServer and the monitor.
3. Disconnect all power cables and other cables as necessary for access to the fan.
4. Remove the bezel. For instructions on removing the bezel, see the HP NetServer LC 3 User Guide.
5. Remove two covers on the HP NetServer chassis to access the system board. To remove covers on
the LC 3 pedestal version, remove the top and right covers (as you face the front panel). For detailed
instructions on how to remove and replace the covers, see the HP NetServer LC 3 User Guide. (You
can perform the fan upgrade with the system board in place.)
6. To install the new fan, connect the 3-pin connector on the fan unit. Make sure the wires are not
crushed. Line up the two slots on the bottom and the one slot on the top of the fan unit. Line up the
screw hole on the top of the fan unit. Support the fan tray with one hand while putting in the screw.
Make sure the wires do not obstruct the fan’s airflow. See Figure 1.
7. To check that the fan is spinning, power up the NetServer and ensure that the fan spins. Power off
the server.
8. Replace the chassis covers. Power up your NetServer.