


28
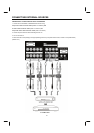
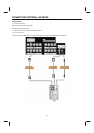
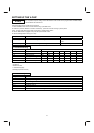
8. VIDEO Source buttons: Set up the input source of Video; Video parts include Video1 (Y1P
B
1P
R
1), Video2 (Y2P
B
2P
R
2),
Video3(AV1 / SV1), Video4 (AV2 / SV2). If both SV and AV had signal input at the same time, the SV has priority output.
9. NTSC Source buttons: Set up the input source of NTSC; NTSC parts include CATV / AIR.
10. DTV Source buttons: Set up the input source of DTV Mode.
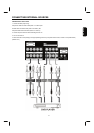
11. Menu button: Turn on OSD (On-Screen Display) menu.
12. Direction buttons:
A. (▲/▼/◄/►/SEL): All the OSD features can be set or adjusted by using these buttons; it will highlight functions or adjust
and set different features. Press it to toward desired direction and press the SEL button to select. (You can notice that
the OSD prompt message to through these keys operation)
B. (▲/▼): In PIP mode, Press "▲" or "▼" keys to select which display window will be changed. Meanwhile, the speaker
icon will be displayed on selected display window. User can change input video source on selected display window by
pressing remote controller source keys.
C. (◄/►): In POP mode, Press "◄" or "►" keys to select which display window will be changed. Meanwhile, the speaker
icon will be displayed on selected display window. User can change input video source on selected display window by
pressing remote controller source keys.
13. Exit button: This button will exit all OSD.
14. Volume (+/-) button: Press to select the desired volume.
15. DTV Menu: Turn on DTV OSD (On-Screen Display) menu in DTV Mode.
16. Channel (+/-) button: Press to select the desired channel.
17. Freeze buttons: Pause the image in DTV Mode.
18. INFO button: Switch between Viewing mode, Channel Banner, and Channel Banner with Extended in DTV Mode.
19. FAV.CH: Switch to favorite channel in DTV Mode.
20. C.C. button: Press to turn on/off TV Closed Caption.
21. P. Mode button: Select picture status, they are Dynamic, Natural, Game and Cinema.
22. MTS button: Press to set sound mode, they are Stereo, SAP and Mono.
23. Aspect button: Press repeatedly to change image to different aspects. Aspects include 4:3 STANDARD, 4:3 EXPANDED, 4:3
ZOOM1, 4: 3 ZOOM2, 16:9 STANDARD, 16:9 ZOOM.
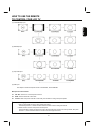
Depending on the input signal format received, the picture format ratio allows you to adjust the images through the following options.
4:3 STANDARD Use this aspect mode to display conventional (4:3) images. Side panels (gray areas) are placed to the left
and right of the image to preserve the original aspect ratio of the source. Note: Use this mode for only 15% of
your total viewing time to prevent uneven aging of the phosphors. Phosphors in the lighted area of the
picture will age more rapidly than the gray areas.
4:3 EXPANDED Use this aspect mode to display conventional (4:3) sources by linearly increasing image expansion from the
center towards the edges of the display area in order to fill it.
4:3 Zoom1/Zoom2 Use these aspect modes to zoom in on conventional (4:3) sources.
16:9 STANDARD Use this aspect mode to display 16:9 sources like HDTV and DVD’s preserving the original 16:9 aspect ratio.
16:9 Zoom Use this aspect to Zoom-in once while in 16:9 aspect.