


23
ENGLISH
NOTE:
Selectable picture format aspect ratios may vary depending on
the input source or broadcast signal.
Picture Size menu also can be displayed by pressing ASPECT
on the remote control.
•
•
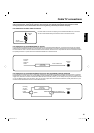
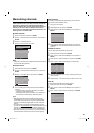
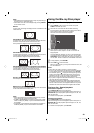
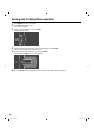
Natural
In some cases, this image will display the size of standard 4:3 with
a black side bar.
Cinema Wide1 (for 4:3 format programs)
To fill the screen, the right and left edges are extended. However,
the center of the picture remains near its former ratio.
The top and bottom edges of the picture may be hidden.
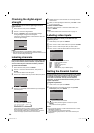
Cinema Wide2 (for letter box programs)
To fill the width of the screen, it is extended horizontally. However,
it is only slightly extended at the top and the bottom.
The top and bottom edges of the picture may be hidden.
Cinema Wide3 (for letter box programs with subtitles)
To fill the width of the screen, it is extended horizontally. However,
it is only slightly extended at the top and the bottom.
The top and bottom edges of the picture may be hidden.
A B C D E F G - - - - - - - - - - - - - - - -
A B C D E F G - - - - - - - - - - - - - - - - - - - - - - - - - -
Full (for 16:9 source programs)
Full will display the picture at the maximum size.
Native (for PC mode only)
Detects the resolution of the signal of the image and it will be shown
on the screen with same amount of pixels.
NOTE:
Some High Definition and/or Digital broadcasts may not allow
you to change the picture format aspect ratio.
In HDMI or COMPONENT mode with a scanning rate of 720p,
1080i or 1080p (only HDMI), only the Cinema Wide2 and Full
are available.
In PC Mode, only the Natural, Full and Native are available. In
PC Mode (WXGA), only the Full and Native are available.
•
•
•
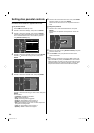
Using the Blu-ray Disc player
Playing a disc - Standard playback
1
Press POWER on the unit or on the remote, then press
TV/BD to select Blu-ray mode.
2
Place the disc in the disc slot with the label side facing
forward. Hold the disc without touching either of its surfaces,
align it with the guides, and place it in position.
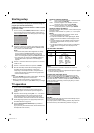
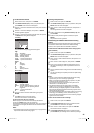
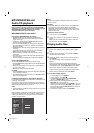
The main menu as shown below will appear.
PANDORA
®
internet radio
Connected
Settings
3
Press C or
D
to select the disc, then press ENTER.
After a period of time, Chapter 1 of Title 1 on the disc will
begin playback.
On many BD/DVDs, Chapter 1 of Title 1 is an advertisement
or preview of upcoming releases. If you wish, you may press
DISC MENU to bring up the main disc menu. From there, you
can use C,
D
,
B
or
A
to select the “PLAY MOVIE” menu item.
4
To stop playback, press STOP 3 .
5
Press EJECT to remove the disc.
When you eject the disc, you may hear mechanism noise, but
it is not malfunction.
NOTE:
Some discs may take a minute or so to start playback.
If an 8 cm disc is placed into the disc slot and picture playback
or menu display does not begin automatically, press PLAY 1.
A “Prohibited” symbol “
” may appear at the upper right of the
screen. This symbol means either the feature you tried is not
available on the disc, or the unit cannot access the feature at
this time. This does not indicate a problem with the unit.
If you place a single-faced disc label backwards (i.e. the wrong
way) then “No Disc” will be displayed.
Some playback operations of BDs may be intentionally fixed
by software producers. Since this unit plays BDs according to
the disc content recorded, some playback features may not be
available. Also refer to the instructions supplied with the BDs.
•
•
•
•
•
Playing a disc - Special playback
Fast Forward Playback
Press SEARCH 9during normal playback.
Fast forward begins at 2x normal playback speed. Each press of
SEARCH 9cycles the playback speed through 2x, 4x, 8x, 16x,
32x, 64x and 128x.
To resume normal playback, press PLAY 1.•
Fast Reverse Playback
Press SEARCH8 during normal playback.
Fast reverse begins at 2x normal playback speed. Each press of
SEARCH8 cycles the playback speed through 2x, 4x, 8x, 16x,
32x, 64x and 128x.
To resume normal playback, press PLAY 1.•
00_54L0621A.indb 2300_54L0621A.indb 23 10.4.27 3:15:23 PM10.4.27 3:15:23 PM