


Manual de Instrucciones
Modelo HDN23200
Cómo usar la
Herramienta (Cont.)
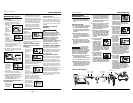
PARA CARGAR Y DESCARGAR LA
HERRAMIENTA
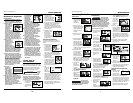
1. Siempre conecte la herramienta a
la fuente de suminsitro de aire
antes de colocarle los sujetadores.
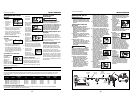
2. Empuje hacia
abajo sobre
el boton del
seguro.
Mueva la
tapa del car-
gador hacia
atrás.
3a. Para clavos,
coloque una
serie de clavos
Campbell
Hausfeld o equi-valentes (Vea la sec-
ción de sujetadores) en el cargador.
Cerciórese de que los extremos pun-
tiagudos de los clavos estén hacia la
parte inferior del cargador.
Cerciórese de que los clavos no estén
sucios ni dañados.
3b.Para grapas, cargue una tira de gra-
pas con las coronas montadas sobre
el riel del cargador.
4. Empuje la tapa
del cargador
hacia delante
hasta que el
botón del
seguro salte
hacia arriba.
5. Siempre descargue el sujetador
antes de remover la herramienta de
servicio. La descarga se hace sigu-
iendo el proceso inverso de la
carga; sin embargo, siempre se tiene
que desconectar la manguera de
aire antes de descargarla.
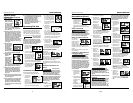
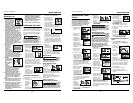
PARA AJUSTAR LA PENETRACION DE
LOS SUJETADORES
1. Regule la pre-
sión de aire en
la herramienta
a 3,45 bar.
2. Conecte las mangueras de aire y
pruebe la penetración clavando
unos sujetadores en un pedazo de
madera. Si éstos no penetran hasta
el nivel deseado, aumente la presión
de aire y pruebe una vez más, con-
tinúe haciéndolo hasta lograr los
resultados deseados. La presión de
la herramienta no debe exceder
6,90 bar ya que ésto reduciría la
durabilidad de la herramienta.
PARA AJUSTAR LA DIRECCION DEL
TUBO DE ESCAPE
El modelo
HDN23200 está
equipado con un
deflector ajustable
de la dirección del
tubo de escape.
Éste le permite al usuario cambiar la
dirección del tubo de escape.
Simplemente mueva el deflector hacia
la dirección deseada.
QUÉ HACER CUANDO LA HERRA-
MIENTA TENGA UN SUJETADOR
ATASCADO
1.
Desconecte la
herramienta de
la fuente de
suministro de
aire.
2. Remueva
todos los suje-
tadores del
depósito (vea
Para Cargar
/Descargar la Herramienta). De lo
contrario, hará que los sujetadores
se expulsen desde la parte delantera
de la herramienta cuando se
remueve el conjunto de la boca.
3. Remueva (3)
tornillos de
cabeza de la
boca de la
herramienta.
Remueva la placa de la boca, el
espaciador y el Elemento de
Contacto de Trabajo para dejar
expuesto el sujetador atascado.
4.
Vuelva a instalar el conjunto de la
boca en el orden inverso del paso Nº3.
5. Asegúrese que el
gatillo funciona y
que el Elemento de
Contacto de
Trabajo se mueve
libremente hacia arriba y hacia
abajo sin atascarse o pegarse.
Servicio Técnico
Si desea hacer alguna pregunta refe-
rente a la reparación u operación de las
herramientas, o para solicitar copias
adicionales de este manual, sírvase lla-
mar a nuestro número especial, 1-800-
543-6400.
Sujetadores y Piezas de
Repuesto
Use solamente sujetadores Campbell
Hausfeld originales calibre 16 (o su
equivalente) - (vea la información sobre
intercambio de sujetadores). El
desempeño de las herramientas, la
seguridad y la duración pueden
disminuir si no se utilizan los
sujetadores adecuados. Cuando ordene
piezas de repuesto o sujetadores,
especifique el número de la pieza.
Para reparar la herramienta
La herramienta debe ser reparada úni-
camente por personal calificado, y
deben usar piezas de repuesto y acceso-
rios originales Campbell Hausfeld, o
piezas y accesorios que funcionen de
manera equivalente.
Para colocarle los sellos
Cada vez que repare una herramienta
deberá limpiarle y lubricarle las partes
internas. Le recomendamos que use
Parker O-lube o un lubricante equiva-
lente en todos los anillos en O. A cada
anillo en O se le debe dar un baño de
lubricante para anillos antes de instalar-
los. Igualmente, deberá ponerle un
poco de aceite a todas las piezas que se
mueven y muñones. Finalmente,
después de haberla ensamblado y antes
de probar la herramienta deberá
ponerle unas cuantas gotas de aceite
sin detergente 30W u otro aceite simi-
lar, en las líneas de aire.
!
ADVERTENCIA
3
General Safety
Information (Continued)
● Avoid long extended periods of
work with the nailer. Stop using the
nailer if you feel pain in hands or
arms.
TOOL USE AND CARE
● Use clamps or another practical way
to secure and support the workpiece
to a stable platform. Holding the
work by hand or against the body is
unstable and is able to lead to loss
of control.
● Do not force the tool. Use the cor-
rect tool for the application. The cor-
rect tool will do the job better and
safer at the rate for which the tool
is designed.
● Do not use the tool if the switch
does not turn the tool on or off. Any
tool that cannot be controlled with
the switch is dangerous and must be
repaired.
Disconnect the
tool from the air
source before making adjustments,
doing tool maintenance, clearing jams,
toughing the safety yoke, leaving the
work area, loading, or unloading the
tool. Such precautionary measures
reduce the risk of personal injury.
● Store the tool when it is idle out of
reach of children and other
untrained persons. A tool is danger-
ous in the hands of untrained users.
● Maintain the tool with care. Keep a
cutting tool sharp and clean. A prop-
erly maintained tool with sharp cut-
ting edges reduces the risk of bind-
ing and is easier to control.
!
WARNING
● Do not remove,
tamper with, or
otherwise cause
the Work Contact
Element (WCE) or
trigger to become
inoperable. Do not operate any tool
which has been modified in a like
fashion. Death or serious personal
injury could result.
● Do not touch the
trigger unless dri-
ving nails. Never
attach air line to
nailer or carry
nailer while touch-
ing the trigger.
The tool could eject a fastener which
will result in death or serious per-
sonal injury.
● Always discon-
nect the tool
from the power
source when
unattended,
performing any
maintenance or
repair, clearing a jam, or moving the
tool to a new location. Always recon-
nect the air line BEFORE loading any
fasteners. Do not load the tool with
fasteners when either the trigger is
depressed or the Work Contact
Element (WCE) is engaged. The nailer
could eject a fastener causing death
or serious personal injury.
● Always fit tool
with a fitting or
hose coupling
on or near the
tool in such a
manner that
all compressed air in the tool is dis-
charged at the time the fitting or
hose coupling is disconnected. Do
not use a check valve or any other fit-
ting which allows air to remain in the
nailer. Death or serious personal
injury could occur.
● Use only those fasteners listed in
the Accessories section of this man-
ual. Fasteners not identified for use
with this tool by the tool manufac-
turer are able to result in a risk of
personal injury or damage to tool
when used in this tool.
● Use only accessories that are identi-
fied by the manufacturer for the
specific tool model. Use of an acces-
sory not intended for use with the
specific tool model increases the
risk of personal injury.
● Hold tool by insulated gripping sur-
faces when performing an operation
where the tool may contact hidden
wiring. Contact with a “live” wire
will also make exposed metal parts
of the tool “live” and shock the
operator.
● Do not use any type
of reactive gases,
including, but not
limited to, oxygen
and combustible
gases, as a power
source. Use filtered, lubricated, reg-
ulated compressed air only. Use of a
reactive gas instead of compressed
air may cause the nailer to explode
which will cause death or serious
personal injury.
● Never use gasoline
or other flammable
liquids to clean the
tool. Never use the
tool in the presence
of flammable liquids or gases.
Vapors could ignite by a spark and
cause an explosion which will result
in death or serious personal injury.
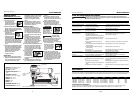
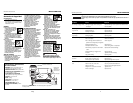
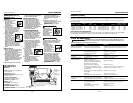
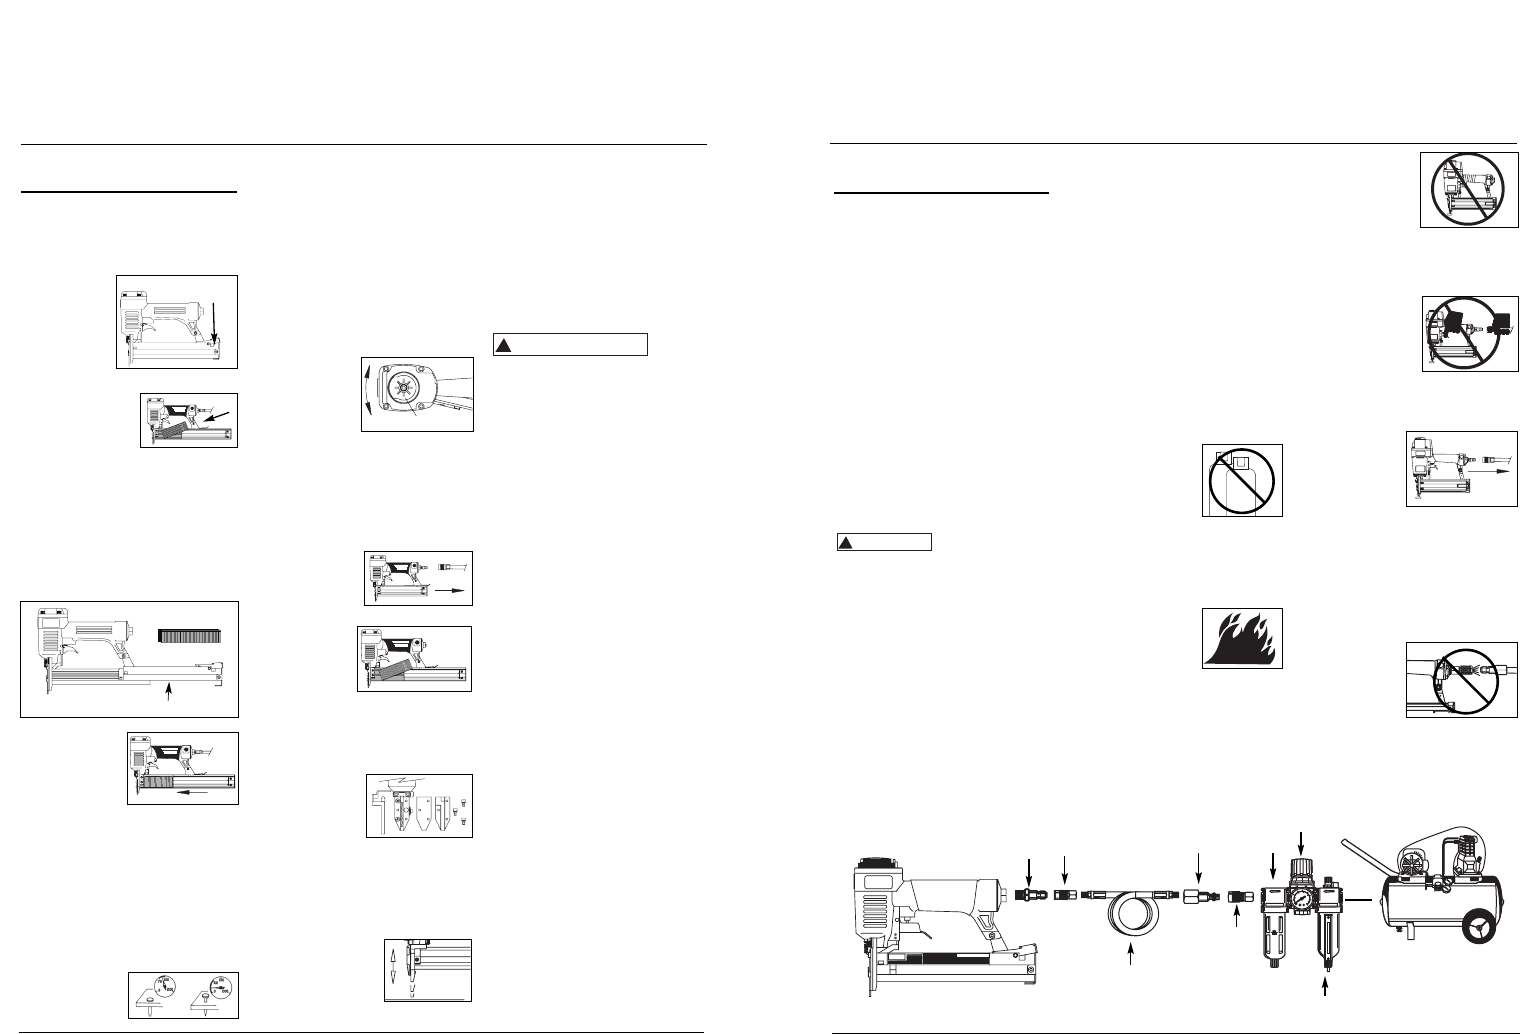
Model HDN23200
Operating Instructions
Recommended Hookup
Quick
Plug
Quick
Coupler
Air
Hose
Quick Plug
(Optional)
Quick
Coupler
(Optional)
Oiler
Regulator
Filter
movemiento
CAMPBELL
CAMPBELL
PROFESSIONAL
PROFESSIONAL
HAUSFELD
HAUSFELD
O
CO
2
6-Sp
Carril del cargador
Rotate
Gire
Botón del
seguro