


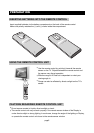
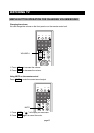
1. CONNECT TO POWER
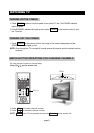
a. Connect the mini plug of the AC power adapter to DC IN jack on the back of the DTV-172A.
b. Connect the power plug of the AC power adapter to the power socket.
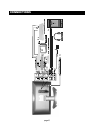
2. SYSTEM CONNECTIONS
a. Using the antenna input: Connect the antenna terminal from an antenna or cable/satellite
receiver to the antenna input terminal on the DTV-172A; use the TV/DVD/AUX/PC button and
the / buttons to set the DTV-172A's signal source to "TV".
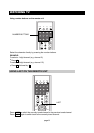
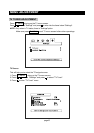
b. Using the AV1 RCA Video/Audio input: Connect compatible AV equipment to the DTV-172A
through the AV1 IN jacks on DTV-172A (Composite Video and Audio input jacks); use the
TV/DVD/AUX/PC button and the / buttons to set the DTV-172A's signal source to "AUX-
Video".
c. Using the AV1 S-Video and RCA Audio input: Connect AV equipment to the DTV-172A
through the AV1 IN jacks on DTV-172A (S-Video and Audio input jacks); use the
TV/DVD/AUX/PC button and the / buttons to set the DTV-172A’s signal source to “AUX-S-
Video”.
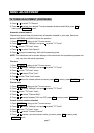
d. Using the AV2 Component input: The AV2 input may be used for Progressive scan (this
connection is also known as “Y/Pb/Pr”) or HDTV inputs; use the TV/DVD/AUX/PC button and
the / buttons to set the DTV-172A's signal source to "AUX-Component".
e. Using the VGA connector: Connect a PC computer to the DTV-172A through the VGA socket
on DTV-172A. The Mini-plugged next to the VGA input is for audio associated with this type of
signal. Audio cables for this purpose are supplied with the DTV-172A. Use the TV/DVD/AUX/PC
button and the / buttons to set the DTV-172A’s signal source to “PC”. DTV-172A monitor’s
native resolution for computer use is 1024x768.
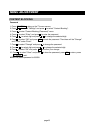
f. Using the AV out, RCA Video/Audio output: Connect the DTV-172A to another TV Monitor
through the AV OUT jacks on DTV-172A (Composite Video and Audio output jacks); now you
can use the TV Monitor as an external monitor. Signals from the Antenna, AV1 will be available
at this point.
CONNECTIONS
page11