18
Connecting the DPC-7.4
—Continued
This section explains how to connect the DPC-7.4 to a stereo
hi-fi amp or receiver for better sound quality than that of most
TVs. This is ideal for playing your audio CDs and MP3/
WMA discs in the DPC-7.4. DVD-Videos and Video CDs
will sound better too. You can also enjoy Dolby Pro Logic, so
long as your receiver supports it.
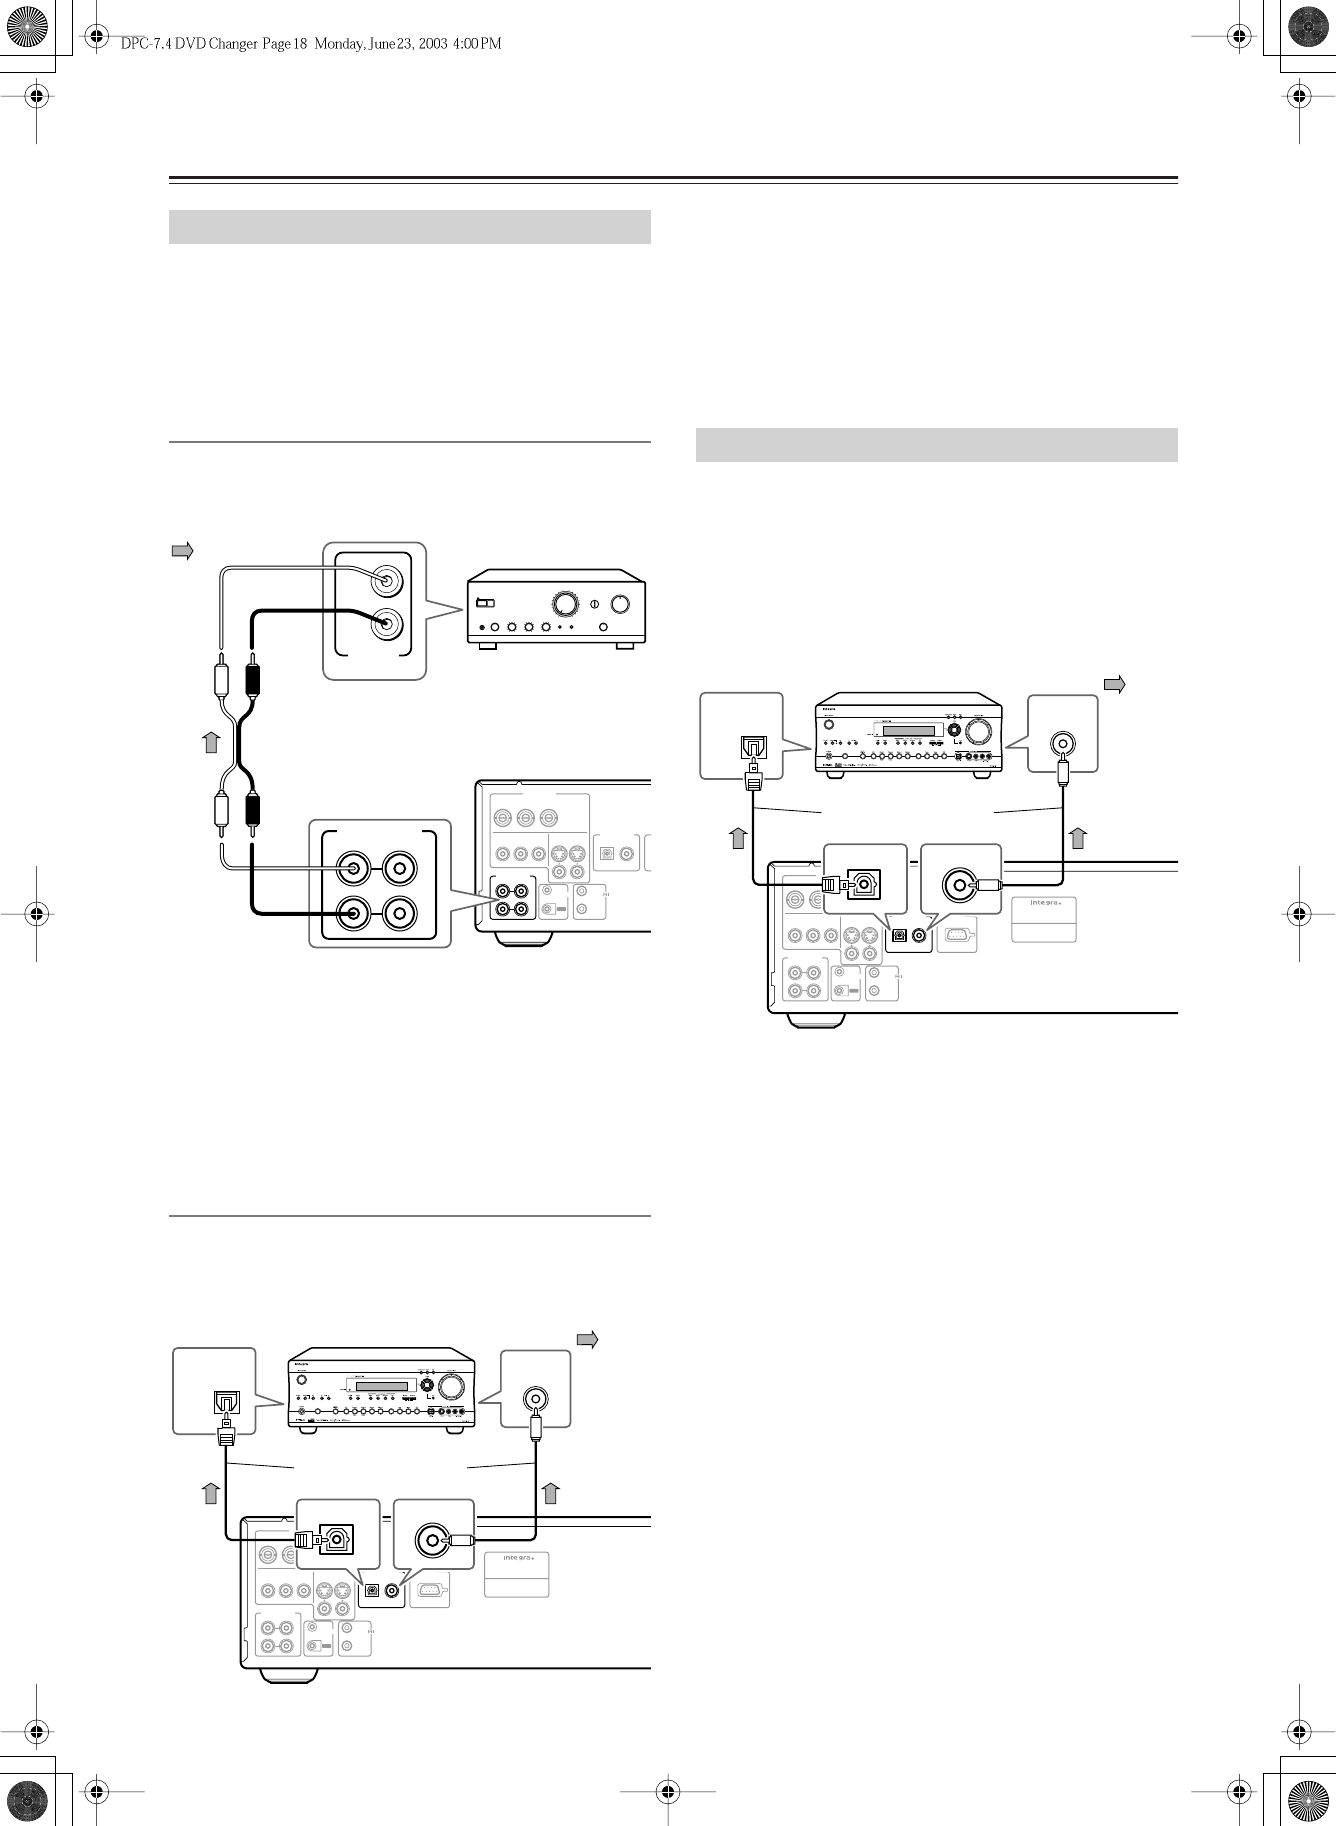
Analog Connection
Use an RCA/phono audio cable to connect the DPC-7.4’s
ANALOG AUDIO OUTPUTs to a pair of analog audio
inputs on your hi-fi amp or receiver, as shown.
Notes:
• When you use the analog audio outputs, don’t play DTS
CDs or don’t select DTS soundtracks on DVD-Videos.
Doing so will produce unpleasant digital noise, which may
damage your equipment.
• The DPC-7.4 has two composite video output connectors
and two pairs of stereo analog audio output connectors.
They output the same video and audio signals respectively.
Digital Connection
Use an optical (or coaxial) digital audio cable to connect the
DPC-7.4’s OPTICAL (or COAXIAL) DIGITAL AUDIO
OUTPUT to an optical (or coaxial) input on your hi-fi amp or
receiver, as shown.
Notes:
• Be sure to set the Digital Out–>Dolby Digital setting to
“Dolby Digital>PCM” (see page 42). Otherwise an
unpleasant digital noise may be heard, which may damage
your equipment.
•Never connect the DPC-7.4 to the AC-3RF input on a
Dolby Digital receiver. The AC-3RF format is not sup-
ported by the DPC-7.4.
To enjoy Dolby Digital or DTS surround sound, you need to
connect one of the DPC-7.4 digital audio outputs to the dig-
ital input on a Dolby Digital or DTS decoder or an AV
receiver with built-in decoders.
This hookup example will also allow you to enjoy Dolby Pro
Logic, so long as your decoder or AV receiver supports it.
Notes:
• In addition to a digital connection, we recommend also
connecting using the stereo analog connection.
To record the audio from a CD-R disc etc. to a cassette or
CDR recorder that’s connected to the AV receiver, and
when your AV receiver has Zone2, you must connect the
DPC-7.4’s analog audio outputs to the AV receiver.
• Make sure that the Digital Out > Dolby Digital setting to
“Dolby Digital” (see page 42). Otherwise you won’t get
surround sound.
• Also refer to the connection information supplied with
your AV receiver or decoder.
• When playing Dolby Digital or DTS source material, be
sure to select Dolby Digital or DTS decoding, respectively,
on your AV receiver or decoder. See the relevant manuals.
•You can experience Dolby Digital only with DVDs that
bear the Dolby Digital logo. Likewise, you can experience
DTS only with DVDs or CDs that bear the DTS logo.
• When a DVD disc is loaded into the DVD player, the disc
would default to Dolby digital format. For DTS playback
you would need to select DTS in the table of contents of
the movie. Usually in “Language” or in “Audio Setup”.
Connecting Your Hi-Fi Amp
S
VIDEO
VIDEO
REMOTE
CONTROL
L
R
DIGITAL
OPTICAL COAXIAL
ANALOG
COMPONENT
2
COMPONENT
1
OUT
IN
P
B
YP
R
P
B
YP
R
IR
VIDEO
OUTPUT
AUDIO
OUTPUT
AUDIO
OUTPUT
L
R
ANALOG
INPUT
RCA/phono cable
(white)
(white)
(red)
(red)
Signal flow
L
R
ANALOG
AUDIO
OUTPUT
MODEL NO.
DPC
-
7. 4
DVD
CHANGER
S
VIDEO
VIDEO
REMOTE
CONTROL
L
R
DIGITAL
OPTICAL COAXIAL
ANALOG
COMPONENT
2
COMPONENT
1
OUT
IN
P
B
YP
R
P
B
YP
R
IR
VIDEO
OUTPUT
RS
232
AUDIO
OUTPUT
AUDIO
OUTPUT
OPTICAL
1
OPTICAL
COAXIAL
COAXIAL
Connect one or the other
Signal flow
Connecting for Dolby Digital or DTS
MODEL NO.
DPC
-
7. 4
DVD
CHANGER
S
VIDEO
VIDEO
REMOTE
CONTROL
L
R
DIGITAL
OPTICAL COAXIAL
ANALOG
COMPONENT
2
COMPONENT
1
OUT
IN
P
B
YP
R
P
B
YP
R
IR
VIDEO
OUTPUT
RS
232
AUDIO
OUTPUT
AUDIO
OUTPUT
AV component with
Dolby Digital/DTS decoder
OPTICAL
1
OPTICAL
COAXIAL
COAXIAL
Connect one or the other
Signal flow


