5
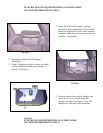
8. Route video and audio cables to rear passenger side
VCP location. See Figure 7.
II. PREPARATION OF COMPONENTS FOR INSTALLATION
9. Remove and discard (2) two screws which secure
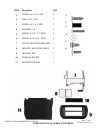
mounting bracket (item 7 pg. 2) to housing. Insert
CD changer (if equipped ) into mounting bracket and
secure in original manner using (6) six O.E. screws.
See Fig. 8.
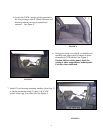
10. Remove and discard (4) four screws from VCP. Loosely
install (4) four #8 X 3/4” screws (item 1 pg. 2) in those
locations. See Figure 9.
III. INSTALLATION OF HOUSING
IF VECHICLE IS NOT EQUIPPED WITH A FACTORY 10 DISC CD CHANGER,
PROCEED TO STEP 13.
11. Install CD player and bracket over O.E. studs and
secure using original hardware. See Fig. 10.
12. Connect wiring to CD player.
FIGURE
10
FIGURE 8
FIGURE 9
FIGURE 7


