


2
INTRODUCTION
Thank you for choosing a Jensen. We’ve tried to make the instructions in this owner’s
manual clear and easy to follow. If you take a few minutes to look through it, you’ll learn how to use
all of the features of your new Jensen antenna for maximum enjoyment.
Contents
Precautions………………………………………………………………………………………….….1
Preparation…………………………………………………………………………………………..….1
Installation………………………………………………………………………………………...…1- 4
Operation………………………………………………………………………………………….……5
Specifications…………………………………………………………………………………………..5
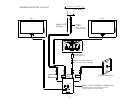
System Layout………………………………………………………………………………………….6
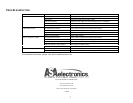
Troubleshooting………………………………………………………………………………………...7
PRECAUTIONS
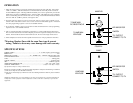
• Proper Power Supply
This product is designed to operate with a 12 volt DC, negative ground power system
• Use Authorized Service Centers
Do not attempt to disassemble or adjust this precision product. Contact a professional for service
• Do not install couplers or splitters between the wall plate and antenna
Installation of any item on this cable lead may cause a short. This cable provides power to the
Antenna preamp.
• Power Supply should disconnected during installation
Connect all coax cable connections before connecting +12VDC wire to the wall plate. The switch
should be in the OFF position when connecting/disconnecting cables.
• All coaxial cable used should be RG-6U for optimal performance
• Painting the Antenna is not recommended and may affect performance
• Do not use solvents to clean antenna. Use only mild soap and water.
PREPARATION
Please read all instructions before beginning the installation.
Tools and Supplies
• Drill or Battery Driver with a #2 Phillips Bit
• ½” Drill Bit
• Caulking Gun
• Tube of Approved Exterior Roof Caulk
• RG-6U Coaxial Cable
• 16AWG Power & Ground Wire
ANTENNA INSTALLATION
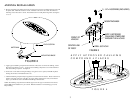
1. Remove all packaging contents from shipping box.
2. Locate the Antenna Housing
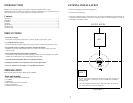
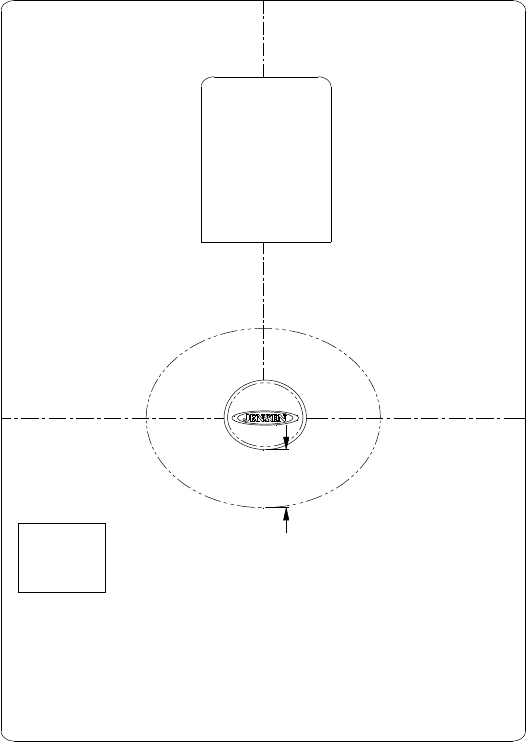
3. Determine a suitable location to mount the antenna. This location should allow for approximately 24”
of clearance around the antenna. Avoid close proximity to other roof mounted objects (AC, Vents, &
Roof Edges). See Figure 1 below.
2 4 "
N OTE: AN TEN NA S HOULD BE M OU NTED AS CLOSE TO
THE CENTER OF THE ROO F AS POSSIBLE FO R BEST
REC EPTION.
THE AN TEN NA SH OU LD NOT BE LO CATED W ITHIN 24"
O F AN Y OBJEC T OR RO OF EDG E.
A C
V E N T
R O O F V IE W
F IG U R E 1