


— 18 —
You can use your VCR as the playback or recording VCR. You can
use a camcorder as the playback VCR and your VCR as the
recording VCR. Refer also to the other components’ instruction
manuals for connection and its operations.
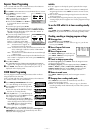
A
Make connections
Example 1: When another VCR is VHS VCR
● If another VCR is monaural, connect this VCR’s AUDIO L IN (or
OUT) connector to the audio output (or input) connector on
another VCR.
Example 2: When another VCR is S-VHS VCR equipped with S-
VIDEO input connector and when using this VCR as the playback
VCR
Example 3: When another VCR is S-VHS VCR and when using
this VCR as the recording VCR
B
Load cassettes
Insert the playback cassette into the playback VCR and the
cassette to be recorded on into the recording VCR.
C
Select input mode on recording VCR
Select the correct external input on the recording VCR.
On this VCR (when using this VCR as the recording VCR);
Select “L-1” — when connecting the other VCR to the audio/video
input connectors on the rear panel.
Select “F-1” — when connecting the other VCR to the audio/video
input connectors on the front panel.
Press AUX or CH+/– on the Remote. Or push the JOG dial, then
turn it to the left or right.
D
Select video input connector on recording VCR
When using this VCR as the recording VCR, select the appropriate
mode depending on the connector being used (
੬
pg. 16).
When using S-VIDEO IN connector on the rear panel, set “REAR
AUX INPUT” to “S-VIDEO”.
When using VIDEO IN connector on the rear panel, set “REAR
AUX INPUT” to “VIDEO”.
E
Select edit mode
Set the edit mode to “ON” for the VCRs if such a mode is
equipped.
● On this VCR, set “PICTURE CONTROL” to “EDIT” (
੬
pg. 15).
F
Start playback
Press PLAY (
4
) on the playback VCR.
G
Start recording
Press REC (
7
) on the recording VCR.
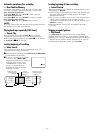
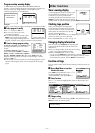
Editing
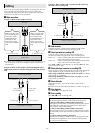
To audio/video input
This VCR
Another VCR
To AUDIO/VIDEO IN
To AUDIO/VIDEO OUT
To audio/video output
When using this VCR
as the recording VCR,
connect this VCR’s
AUDIO/VIDEO IN
connectors to the
audio/video output
connectors on another
VCR.
When using this VCR
as the playback VCR,
connect this VCR’s
AUDIO/VIDEO OUT
connectors to the
audio/video input
connectors on another
VCR.
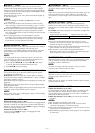
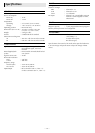
To S-video input
This VCR (for playback)
Another VCR (for recording)
S-video cable
(supplied)
To AUDIO OUT
To S-VIDEO OUT
Audio cable
(not supplied)
To audio input
Various connection for editing tapes
The following three methods can be used for editing tapes.
● VHS to S-VHS editing (VIDEO-VIDEO connection):
Although the picture quality is inherently limited by the original
VHS quality, the edited tape has better picture quality than
those made by VHS-to-VHS editing.
● S-VHS to VHS editing (VIDEO-VIDEO connection):
Since the original source is recorded in S-VHS mode, the edited
tape has better picture quality than those made by VHS-to-VHS
editing.
● S-VHS to S-VHS (S-VIDEO connection):
Original picture quality of S-VHS made can be duplicated with
minimal picture degradation. This is the best editing method
you can use on S-VHS VCRs.
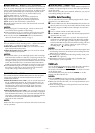
To S-video output
This VCR (for recording)
Another VCR (for playback)
S-video cable
(supplied)
To AUDIO input
To S-VIDEO input
Audio cable
(not supplied)
To audio output