Page 7 May 7, 2004 1:51 pm
— 7 —
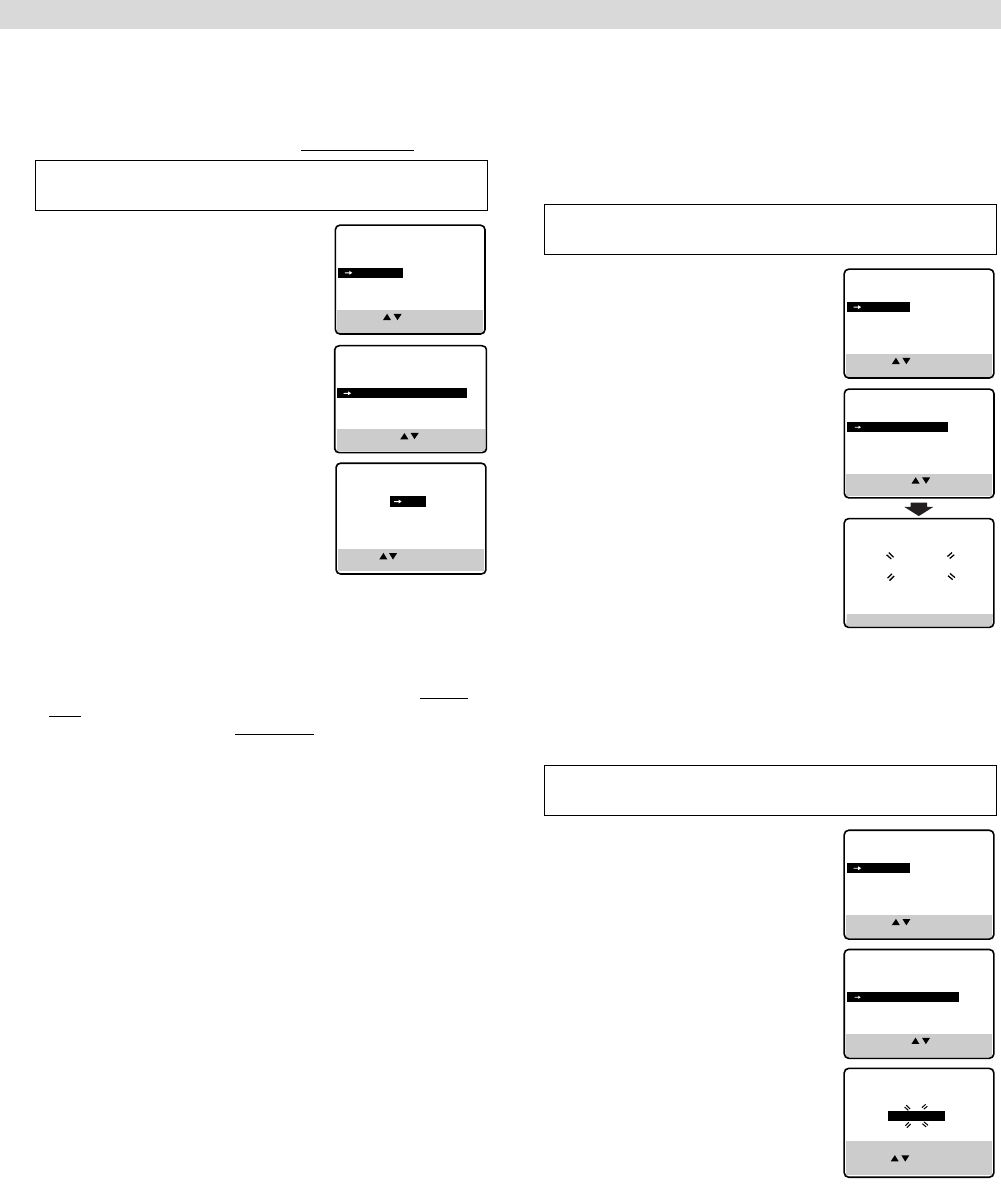
Display On/Off Setting
You can reduce the power consumption while the VCR is turned
off (in standby mode) or during timer recording standby mode. To
use this function, set the “DISPLAY ON/OFF SET” to “OFF”. Turn
off the VCR by pressing the 1 button on the VCR only
.
A
Access Main Menu screen, then
Initial Set screen
Press MENU on the Remote. Press
rt
to
move the highlight bar (arrow) to “INITIAL
SET”, then press OK or
e
.
B
Access Display On/Off Set screen
Press
rt
to move the highlight bar
(arrow) to “DISPLAY ON/OFF SET”, then
press OK or
e
.
C
Select Display On/Off
Press
rt
to move the highlight bar
(arrow) to “ON” or “OFF”, then press OK
or
e
.
During standby mode,
ON - The clock display on the display
panel turns dimmer (default setting).
OFF - The clock display on the display panel disappears.
D
Press MENU to return to normal screen.
NOTES:
● If the “DISPLAY ON/OFF SET” is set to “OFF” and you are in the
timer recording standby mode, (
੬
pg. 11), press 1 on the
VCR to make the clock display disappear. (Only “#” is
displayed). Press 1 again on the VCR
to make the clock
display reappear. The above operation does not work if you set
“AUTO TIMER” to “ON” (
੬
pg. 13).
● The “display off” mode does not work if you turn off the VCR by
pressing the 1 button on the remote control.
Tuner Setting
Setting channels automatically
— Auto Channel Set
Perform Auto Channel Set only if channels have not been set
correctly by the Plug&Play setting.
A
Access Main Menu screen, then Tuner
Set screen
Press MENU on the Remote. Press
rt
to
move the highlight bar (arrow) to “TUNER
SET”, then press OK or
e
.
B
Perform Auto Channel Set
Press
rt
to move the highlight bar
(arrow) to “AUTO CHANNEL SET”, then
press OK or
e
. The VCR selects the correct
band (TV or CATV) automatically during
Auto Channel Set.
● When Auto Channel Set is complete,
“SCAN COMPLETED” appears on
screen.
● If the scan was unsuccessful, “SCAN
COMPLETED–NO SIGNAL–” appears
on screen. Check the connections and
start again.
Press MENU to return to normal screen.
Setting channels manually
— Manual Channel Set
You can add the channels you want or delete the channels you do
not want manually.
A
Access Main Menu screen, then Tuner
Set screen
Press MENU on the Remote. Press
rt
to
move the highlight bar (arrow) to “TUNER
SET”, then press OK or
e
.
B
Access Manual Channel Set screen
Press
rt
to move the highlight bar
(arrow) to “MANUAL CHANNEL SET”,
then press OK or
e
.
C
Add or skip desired channels
To add channels
A Press the Number keys on the Remote
to input a channel number you want to
add.
B Press OK or
e
to set to “ADD”.
C Repeat A to B to add other channels.
Press MENU to return to normal screen.
To skip channels
A Press
rt
or the Number keys to select a channel number you
want to skip.
B Press OK or
e
to set to “SKIP”.
C Repeat A and B to skip other channels. Press MENU to return
to normal screen.
Turn on the VCR and TV, and select the VCR channel (or AV
mode).
MAIN MENU
FUNCTION SET
TUNER SET
INITIAL SET
PRESS ( , ), THEN (OK)
PRESS (MENU) TO END
SELECT WITH ( , ) AND (OK)
PRESS (MENU) TO END
INITIAL SET
CLOCK SET
LANGUAGE ENGLISH
DISPLAY ON/OFF SET
DISPLAY ON/OFF SET
ON
OFF
PRESS ( , ), THEN (OK)
PRESS (MENU) TO END
Turn on the VCR and TV, and select the VCR channel (or AV
mode).
Turn on the VCR and TV, and select the VCR channel (or AV
mode).
MAIN MENU
FUNCTION SET
TUNER SET
INITIAL SET
PRESS ( , ), THEN (OK)
PRESS (MENU) TO END
AUTO CHANNEL SET
SCANNING...
PRESS (MENU) TO END
TUNER SET
BAND CATV
AUTO CHANNEL SET
MANUAL CHANNEL SET
SELECT WITH ( , ) AND (OK)
PRESS (MENU) TO END
❚
❚
❚
❚
❚
– –––––––––––––
MAIN MENU
FUNCTION SET
TUNER SET
INITIAL SET
PRESS ( , ), THEN (OK)
PRESS (MENU) TO END
TUNER SET
BAND CATV
AUTO CHANNEL SET
MANUAL CHANNEL SET
SELECT WITH ( , ) AND (OK)
PRESS (MENU) TO END
MANUAL CHANNEL SET
(CATV)
CH 45 ADD
PRESS NUMBER KEY (0–9)
OR ( , ), THEN (OK)
PRESS (MENU) TO END
– Initial Settings –
HR-J7020UM_EN.fm Page 7 Friday, May 7, 2004 1:52 PM


