Page 10 April 17, 2001 9:00 am
— 10 —
Timer Recording
Up to 8 timer recording programs can be made using Express
timer programing method as far as a year in advance. Remember,
the clock must be set before you can program the timer.
NOTES:
● If all the 8 programs have already been set, “PROGRAM FULL”
appears on the TV screen.
● After timer recording is completed, the VCR turns off
automatically.
● You can program the timer recording while a regular recording
is in progress; the menu screens will not be recorded.
● To timer-record cable channels, be sure to keep the cable box
turned on with the correct channel selected.
● In case of a power failure after programming, the VCR’s memory
backup keeps your selections (if the lithium battery is not
exhausted).
● If the tape reaches its end during timer recording, the recording
stops and “
#“, “
⅜
” and “ $” on the display panel blink. Press
# to disengage timer, then press STOP/EJECT (0) on the
VCR to eject the cassette or press POWER 1 then press REW
(3) to rewind the tape.
Express Timer Programing
Load a cassette with the record safety tab intact. The VCR turns
on, and the counter is reset, automatically.
A
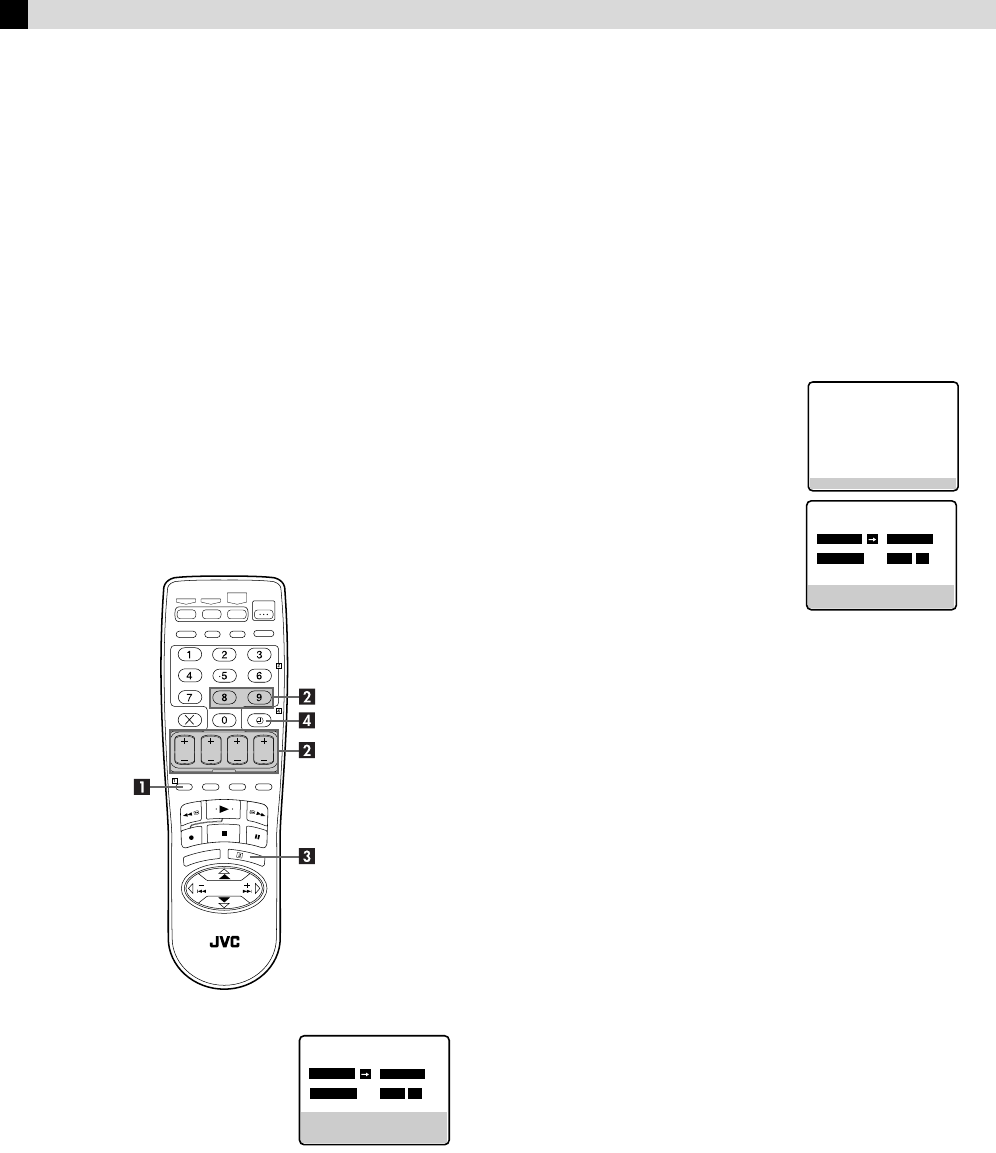
Press PROG on the Remote to access the Program screen.
B
Press START+/–, STOP+/–, DATE+/–
or PR+/– repeatedly to enter the start
time, stop time, date or channel.
● Press and hold START+/– or
STOP+/– to increase the time in
30-minute intervals.
● To set the tape speed, press SP/EP
(
p
).
● To timer-record daily (Monday–Friday) or weekly serials,
press DAILY (M-F) (Number key “8”) or WEEKLY (Number
key “9”). Pressing the button again makes the “DAILY” or
“WEEKLY” display disappear.
C
Press OK or PROG.
● If “PROGRAM NOT COMPLETED PROGRAM OVERLAP”
appears, see “Program overlap warning display” (
੬
pg. 11).
D
Press #. The VCR turns off automatically and “
#
” is displayed
on the display panel.
To use the VCR while it is in timer
recording standby mode
Press #, then press 1. After you use the VCR, press # again to
put the VCR into timer recording standby mode.
Checking, canceling or changing
program settings
A
Disengage timer
Press #, then press 1.
● When “AUTO TIMER” (
੬
pg. 12) is set to “ON”, you do not
have to press #.
B
Access Program Check screen
Press " (CHECK).
C
Access Program screen
Press " (CHECK) again. Each time you
press " (CHECK), the next
program’s
Program screen appears.
D
Cancel or change program setting
To cancel a program, press & (CANCEL) when the Program
screen you do not want is shown.
To change a program, press the appropriate button: START+/–,
STOP+/–, DATE+/–, PR+/–, DAILY (M-F) (Number key “8”),
WEEKLY (Number key “9”) and/or SP/EP (
p
) when the Program
screen on which you want to make changes is shown.
E
Return to normal screen
Press " (CHECK) repeatedly until no Program screen is shown.
F
Reengage timer recording standby mode
Press #. The VCR turns off automatically and “#” is displayed on
the display panel.
● When “AUTO TIMER” (
੬
pg. 12) is set to “ON”, the timer
recording standby mode automatically resumes when you turn
off the VCR.
PROGRAM 1
START STOP
– –:– –AM – –:– –AM
DATE CH
– –/– –/– – – – – SP
PRESS (+/–, SP/EP, 8=DAILY
9=WEEKLY), THEN (0K)
PRESS (PROG.) TO END
PRESS (CHECK) TO NEXT
PR START STOP CH DATE
1 8:00P 10:00 12 12/24
2 10:00A 10:45 40 12/25
3 11:30P 1:00 125 12/25
4
5
6
7
8
PROGRAM 1
START STOP
8:00 PM 10:00 PM
DATE CH
12/24/02 12 SP
PRESS (CANCEL) TO CANCEL
PRESS (CHECK) TO NEXT
– Timer Recording –
+5-80(1IP3DJH7XHVGD\$SULO$0


