


EN
43
7
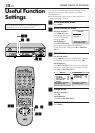
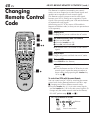
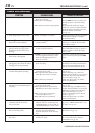
Enable remote pause function
On the front panel:
Press CH5∞ to move
the highlight bar (arrow)
to “AV COMPU-LINK”,
then press OK to set it to
“OFF”.
On the Remote:
Press SHUTTLE PLUS
%fi to move the
highlight bar (arrow) to
“AV COMPU-LINK”,
then press OK or
SHUTTLE PLUS
#
to set
it to “OFF”.
● The REMOTE PAUSE/
AV COMPU-LINK
connector works as the AV Compulink
connector when “AV COMPU-LINK” is set to
“ON” ؆ ; ੬ pg. 38 and 41), and works as the
Remote Pause connector when “AV COMPU-
LINK” is set to “OFF”.
8
Return to normal screen
Press MENU.
9
Start playback
Press PLAY ( 3 ) on the camcorder.
NOTE:
If the camcorder is equipped with a superimpose/OSD
disable feature then set it to “OFF” before starting
playback.
0
Start recording
On the front panel:
Press REC ( ¶ ).
On the Remote:
Press REC ( ¶ ) and PLAY ( 3 ) at the same time.
● If you are using a Master Edit Control-equipped
JVC camcorder, recording starts automatically
on this VCR. (Refer to camcorder’s instruction
manual.)
NOTE:
Be sure to select “AUTO” for “PICTURE CONTROL” (or
“NORM” when “AUTO PICTURE” is set to “OFF”) after you
finish dubbing the tapes (
੬
pg. 38 and 39).
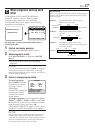
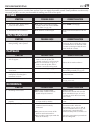
PREVIOUS PAGE
BLUE BACK ON
2ND AUDIO RECORD OFF
AUDIO MONITOR HI-FI
=
AV COMPU-LINK OFF
SELECT WITH (5,∞) AND (OK)
PRESS (MENU) TO END
FUNCTION
=
PICTURE CONTROL ON
PICTURE CONTROL AUTO
AUTO TIMER OFF
SUPERIMPOSE ON
AUTO SP
=EP TIMER OFF
VIDEO STABILIZER OFF
NEXT PAGE
SELECT WITH (5,∞) AND (OK)
PRESS (MENU) TO END
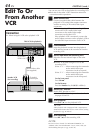
You can use a camcorder as the playback VCR and your
VCR as the recording VCR
1
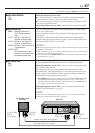
Make connections
Connect an audio/video cable between the
camcorder’s audio/video output connectors and
your VCR’s video audio/video input connectors.
● When the JVC camcorder is equipped with the
Master Edit Control, you can control the VCR
from the camcorder. Connect the mini-plug
cable (not supplied with this VCR) as illustrated
to the left.
● When using a camcorder with a monaural
output, connect the audio output connector on
the camcorder to the left audio input connector
on this VCR.
2
Load a cassette
Insert the cassette to be recorded on into this
VCR (for recording).
3
Select input mode on this VCR
Select “L-1” — when connecting the camcorder
to the audio/video input
connectors on the rear panel.
Select “F-1” — when connecting the camcorder
to the audio/video input
connectors on the front panel.
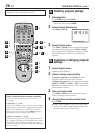
On the front panel:
Press CH5∞.
On the Remote:
Press the Number key "0 (AUX)" or CH +/–.
4
Access Main Menu screen on this VCR
Press MENU.
5
Access Function Set screen
On the front panel:
Press CH5∞ to move the highlight bar (arrow) to
“FUNCTION SET”, then press OK.
On the Remote:
Press SHUTTLE PLUS %fi to move the highlight
bar (arrow) to “FUNCTION SET”, then press OK
or SHUTTLE PLUS
#
.
6
Select “EDIT” for Picture Control
Follow the procedure described on pages 37 and
38.
If your camcorder is a JVC Master Edit Control-
equipped type — go to step 7.
If your camcorder is NOT a JVC Master Edit
Control-equipped type — go to step 8.