


Back-Up Hi-Definition Images
(Easy and correct way of copying to a DVD)
1. Get ready a recommended disc
Please use the recommended discs stated below.
Using discs other than those recommended may cause problem when copying to the DVD
and when playing back the DVD.
Recommended discs
DVD-R DVD-RW
DVD-R DL
(single-sided double layer)
Brand JVC
TDK
Verbatim
SONY
JVC JVC
Verbatim
Caution
Only DVD-R and DVD-RW discs can be used.
Recording and playback may not function properly if the recording side is scratched or dirty.
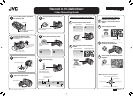
2. Set up each device before copying
2
1
4
3
1
Connect the USB cable provided with DVD Burner (CU-VD40/CU-VD20)
2
Turn on the DVD Burner
After turning on the power, wait for approximately 20 seconds before proceeding to
step
3
.
The burner may not function properly within this 20 seconds.
3
Turn on the camera (GZ-HD3)
4
Insert a new recommended disc into the DVD Burner
Next, operate the camera (GZ-HD3). Proceed to step
3
.
•
•
3. Copy all images to the DVD
Perform operations on the camera.
(Camera’s LCD screen display)
1
Confi rm that the display on the right
appears on the LCD screen of the
camera (GZ-HD3)
2
Select “NORMAL BACK-UP”
1 Select
(move up and down)
2 Confirm
(press down)
3
Select “ALL”
1 Select
(move up and down)
2 Confirm
(press down)
4
Select “EXECUTE AND FINALIZE”
1 Select
(move up and down)
2 Confirm
(press down)
IMPORTANT
Playback is not possible if the disc is not
fi nalized.
Wait for the “copy in progress” screen on the
right and the “hourglass” mark to disappear,
then turn off the power and disconnect the USB
cable.
•
•
“Copy in progress” screen
5
Exit
Confirm
(press down)
Copying completed!
Note
There are other ways of copying which includes copying only the desired fi les.
For details, refer to the instruction manual of the camera (GZ-HD3).
•
For customers using DVD Burner
(sold separately)
Camera (GZ-HD3)
USB cable
DVD Burner
(CU-VD40/CU-VD20)