


D3200 EasyStart
4
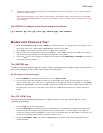
The [TRACK] & [SCRUB] keys
1. Press the TRACK key, located to the right of the display, and then select the “Vtrk1-32” tab in the display.
This screen displays the currently selected virtual track for each channel. You can name your tracks by clicking
the “Rename” button in the display. There is also a handy time-saving preset name list available! Click the
“Rename” button, and then press the “
”popup next to the name. Here you can scroll through the list and
select one of the preset names > Click “Cancel”.
2. Next, select the “MasterTrk” tab. There are eight virtual stereo master tracks available to mix (bounce) down
to. These are used to bounce tracks and mixdown finished songs for CD burning.
3. Now select the “EditTrk” tab, then click the “
” popup button in the upper left corner of the display next to
“CopyTrk”, to view the list of editing functions > Leave “CopyTrk” selected and press “OK”.
4. Press the SCRUB key located to the left of the DIAL. Here you can view a track’s waveform and use the DIAL
to “scrub” or control the playback of the selected track. Use the “ZOOM” cursors in the display to change the
waveform view. Click the “
”popup next to Trk # located in the upper left of the display and select TRACK 1
(the lead vocal), click “OK” then use the DIAL to scrub the vocal.
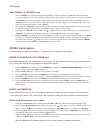
D3200 Automation
The D3200 has two types of automation – Scene and Event (Dynamic) Automation.
SCENE AUTOMATION [The SCENE key]
With Scene automation, 100 “snapshots” of track fader, EQ, pan and effect on/off settings can be stored in
every song, and recalled during playback at registered locations.
1. Press the MIXER key, located next to the METER key > Click the “FADER/PAN AUTOMATION” button in the
display, and then select the “Mixer View” tab.
2. Press the LOC 1/IN key to return to the beginning of the song.
3. Press the STORE key then press the SCENE key to store the present settings to the first scene.
4. Press PLAY to forward into the song a few seconds then STOP and change some of the fader and pan settings.
5. Press the STORE key then press the SCENE key to store the new settings as the second scene.
6. Press the LOC1/IN key to return to the beginning of the song and press PLAY. Watch the Mixer View, to
monitor the first stored Scene’s Pan and Fader settings as they change to the second stored Scene’s Pan and
Fader settings.
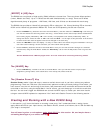
EVENT AUTOMATION
Event automation allows real time recording and playback of fader and pan settings, as well as channel
on/off, effect/aux send on/off, master fader and expression (using the optional EXP2 expression pedal).
Recording Automation on a track:
1. Select the “Automation” tab, and then press the LOC 1/IN key to return to the beginning of the song.
2. Record-enable Master Fader automation by clicking on the “
”(play) button next to the “Master Fader” in the
display > Set it to “ ”(Rec), and then click the Automation “ON [PLAY]” button to switch it to “ON [Rec]”
3. Press the [
] PLAY key on the transport to start playback of the song, move the MASTER fader all the way up
and down several times, and then press the [] STOP key.
4. Press the LOC 1/IN key to return to the beginning of the song, and then playback the song to hear the result
> Select the “Mixer View” tab to view the mixer. It’s that easy!
See the D3200 Owner’s Manual pages 52-53 for more on Scene and Event automation