


Owner’s Manual 11
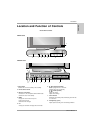
Installation
ENGLISH
- HDMI
TM
, the HDMI logo and High-Definition Multimedia Interface
are trademarks or registered trademarks of HDMI Licensing.
- This set can receive the High-Definition Multimedia Interface
(HDMI) or Input of Digital Visual Interface(DVI).
- This set supports HDCP (High-bandwidth Digital Contents
Protection) Protocol for the set (480p, 720p, 1080i) modes.
- When you connect to HDMI/DVI Source devices (DVD
Player, STB or PC) that support AUTO HDMI/DVI Plug &
Play, this sets the HDMI/DVI source devices automatically.
(640 x 480p) (or
42PX4R
series : 1280 x 720p).
Afer reading HDMI/DVI source devices, using Display Data
Channel (DDC) Protocol, Extended Display Identification Data
(EDID) stored in the set is used.
If HDMI/DVI Source devices do not support AUTO HDMI/DVI,
the resolution is set manually.
- To get the best picture quality, adjust the DVD Player or Set
Top Box output resolution to (640 x 480p) (or
42PX4R
series
: 1280 x 720p).
- To get the best picture quality, adjust the PC graphics card
to (640 x 480) (or
42PX4R
series : 1024 x 768), 60Hz.
- When Source Devices have DVI Output Connector, you must
connect audio with separated cable.(Refer to <How to connect>)
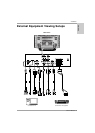
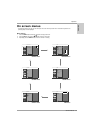
How to connect
1. When Source Devices (DVD Player or Set Top Box) support HDMI.
- If Source Devices have HDMI Output Connector, Source
Devices connect to the set with HDMI Cable .(not supplied
with the product).
- If Source Devices support Auto HDMI, automatically, Source
Devices divert output resolution in (640 x 480p) (or
42PX4R
series : 1280 x 720p). But if not, resolution divert Manually
Setting for reference Manual of Source Devices.
- To get the best picture quality, adjust the DVD Player or Set
Top Box output resolution to (640 x 480p) (or
42PX4R
series
: 1280 x 720p).
- Because HDMI sends Digital Video and Audio with one cable,
there is no need for Audio Cable when using HDMI Cable.
2. When Source Devices (DVD Player or Set Top Box) supports DVI.
- If Source Devices have DVI Output Connector, Source
Devices connect to the set with HDMI to DVI Cable (not sup-
plied with the product).
- If Source Devices support Auto DVI, automatically, Source
Devices divert output resolution in (640 x 480p) (or
42PX4R
series : 1280 x 720p). But if not, resolution divert Manually
Setting for reference Manual of Source Devices.
- To get the best picture quality, adjust the DVD Player or Set
Top Box output resolution to (640 x 480p) (or
42PX4R
series
: 1280 x 720p).
- In this case, Audio use other cable. When Source Devices
have Analog Audio Output Connector, RGB/DVI Audio Input
of the set connect to Audio Cable (not supplied with the prod-
uct). And then you can listen to normal Audio.
3. When PC supports DVI.
- If PC has a DVI Output Connector, Source Devices connect to
the set with HDMI to DVI Cable (not supplied with the product).
- To get the best picture quality, adjust the PC graphics card to
(640 x 480) (or
42PX4R
series : 1024 x 768), 60Hz.
- Use the the set’s HDMI/DVI (VIDEO) for video connections,
depending on your PC connector.
- If the graphics card on the PC does not output analog RGB
and DVI simultaneously, connect only one of either RGB Input
or HDMI/DVI Input to display the PC on the set.
- If the graphics card on the PC does output analog RGB and DVI
simultaneously, the set to either RGB Input or HDMI/DVI Input;
(the other mode is set to Plug and Play automatically by the set.)
- Then, make the corresponding audio connections. If using a
sound card, adjust the PC sound as required.
- In this case, Audio use other cable. When PC (or sound card
of PC) have Analog Audio Output Connector, RGB/DVI Audio
Input of the set connect to Analog Audio Cable (not supplied
with the product). And then you can listen to normal Audio.
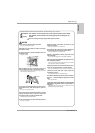
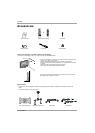
Reference
Cable sample (not supplied with the product)
How to use
1. Connect the HDMI/DVI Source Devices(DVD Player or Set
Top Box or PC) and the set.
2. Turn on the display by pressing the POWER button on the set
and HDMI/DVI Source Devices remote control.
3. Select HDMI/DVI Input source in Main Input option of PIP/DW menu.
4. Check the image on your set. There may be noise associated
with the resolution, vertical pattern, contrast or brightness in
HDMI/DVI Source Devices. If noise is present, change the
HDMI/DVI Source Devices to another resolution, change the
refresh rate or adjust the brightness and contrast on the menu
until the picture is clear. If the refresh rate of the PC graphics
card can not changed, change the PC graphics card or con-
sult the manufacturer of the PC graphics card.
Notes:
- Depending on the graphics card, DOS mode may not work if
you use a HDMI to DVI Cable.
- Avoid keeping a fixed image on the set screen for a long peri-
od of time. The fixed image may become permanently imprint-
ed on the screen. Use the Orbiter screen saver when possible.
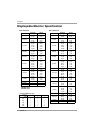
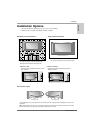
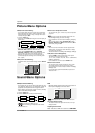
- When Source Devices connected HDMI/DVI Input, output PC
Resolution(VGA, SVGA, XGA), Position, Size may not fit to
Screen. As shown the lower picture, press the MENU button
to adjust the screen Position of the set and contact an PC
graphics card service center.
- When Source Devices connected HDMI/DVI Input output the
set Resolution(480p, 720p, 1080i), the set Display fit EIA/CEA-
861-B Specification to Screen. If not, refer to the Manual of
HDMI/DVI Source Devices or contact your service center.
- In case of HDMI/DVI Source Devices are not connected,
Cable or poor cable connection, "No Signal" OSD display in
HDMI/DVI Input. And In case of Video Resolution not sup-
ported when output is HDMI/DVI Source Devices, "No Signal"
OSD display. Refer to the Manual of HDMI/DVI Source
Devices or contact your service center.
HDMI to DVI Cable
Analog Audio Cable
(RCA type)
Analog Audio Cable
(Stereo to RCA type)
HDMI Cable