


45
206-4200
IP Environment
Prev.
Move
Network Setup
Offset Setup
Pro:Centric
IP Environment
Prev.
Move
Network Setup
Offset Setup
Pro:Centric
IP Environment
Prev.
Move
Network Setup
Offset Setup
Pro:Centric
IP Environment
Prev.
Move
Network Setup
Offset Setup
Pro:Centric
IP Environment
Prev.
Move
Network Setup
Offset Setup
Pro:Centric
IP Environment
Prev.
Move
Network Setup
Offset Setup
Pro:Centric
Audio PTS Offset
Video PTS Offset
PCR Offset
0
0
0
Mode
IP Address
Subnet Mask
Gateway
DNS1
DNS2
MAC Address :
e8:5b:5b:63:97:3e
0
Apply
0 0 0
0 0 0 0
0 0 0 0
0 0 0 0
0 0 0 0
DHCP
►
►
►
►
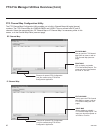
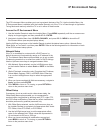
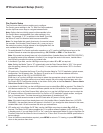
IP Environment Setup
The IP Environment Menu enables you to set up network features of the TV. Like the Installer Menu, the
IP Environment Menu is editable (with the Installer Remote) only if the TV is in Pass-through or Application
Tuning Mode and read-only when the TV is not in either of these modes.
Access the IP Environment Menu
1. Use the Installer Remote to enter the Installer Menu: Press MENU repeatedly until the on-screen menu
display no longer toggles, and then press 9-8-7-6 + ENTER.
2. Navigate to Installer Menu item 119 DATA CHANNEL, and press 2-5-3 + MENU to launch the IP
Environment Menu (see sample displays below).
Use the Up/Down arrow keys on the Installer Remote to select the desired menu option—Network Setup,
Offset Setup, or Pro:Centric—and then press ENTER. Refer to the following sections for information on each
of the IP Environment setup options.
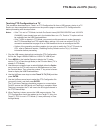
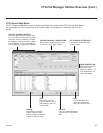
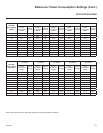
Network Setup
If the TV is connected to a network with a DHCP server, by
default the server will automatically assign an IP address to the
TV. The Network Setup Menu options enable you to set up static
IP/network connections or to revert from static to DHCP settings.
Use the Up/Down arrow keys to navigate between elds.
1. With Network Setup selected, use the Left/Right arrow keys
on the Installer Remote to select Static or DHCP in the Mode
eld.
2. (Static IP/network connections only) Complete the IP Address,
Subnet Mask, Gateway, DNS1, and DNS2 elds. Either key
in or use the Left/Right arrow keys to select the appropriate
values.
3. When you have completed all elds as necessary, navigate to
Apply, and then press ENTER.
4. Press MENU to return to TV viewing, or press RETURN to
return to the previous menu level.
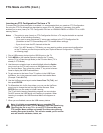
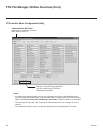
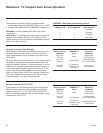
Offset Setup
If necessary, due to an audio and/or video stream delay, the
Offset Setup Menu options enable you to compensate for
synchronization irregularities by allowing audio PTS, video PTS,
and PCR offset modications. Note that any offset modications
should be performed by qualied personnel only.
1. With Offset Setup selected, use the Up/Down arrow keys on
the Installer Remote to navigate to the appropriate eld: Audio
PTS Offset, Video PTS Offset, or PCR Offset.
2. Use the Left/Right arrow keys to set the appropriate offset
value for the selected eld. Offset values are represented in
10 ms intervals to 500 ms or -500 ms.
3. When you have completed all modications as required,
press MENU to return to TV viewing, or press RETURN to
return to the previous menu level.