18 Front Panel
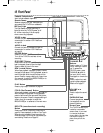
AUDIO
VIDEO
REC
POWER
REW PLAY F.FWD
REC/OTR
VOLUME
CHANNEL
EARPHONE
STOP
EJECT
Screen Cover
The TV/VCR screen is pro-
tected by a removable
screen cover. If you want
to remove the screen
cover, slide in the two tabs
that hold the cover in
place, then pull off the
cover.
Cassette Compartment
Insert a video cassette tape here.
POWER Button
Press to turn the TV/VCR on or off.
Turn off the TV/VCR to activate a timer
recording.
CHANNEL ▲/▼
Buttons
Press to select a TV chan-
nel for viewing or record-
ing. To access the
TV/VCR’s menu, press
CHANNEL ▲ while in
line input (AUX) mode.
Press again to remove the
menu.
Press to adjust the track-
ing during tape playback.
Details are on page 37.
STOP/EJECT Button
Press once to stop the tape. When play-
back is stopped, press to eject the tape.
Press to select an item in the menu.
PLAY Button
Press to play a tape. Details are on page 22.
REC/OTR (record/one-touch recording)
Button
Press once to start a recording. Details are on
page 24. Press repeatedly to start a One-Touch
Recording (an immediate timed recording, 30
minutes to eight hours long) of the channel you
are watching. Details are on page 25.
REW (rewind) Button
When tape playback is stopped, press to rewind
the tape at high speed. During playback, press to
rewind the tape while the picture stays on the
screen. Press to change a setting of a menu item
(for example, to adjust the BRIGHTNESS) or to
return to a previous menu.
F.FWD (Fast Forward) Button
When tape playback is stopped, press to fast for-
ward the tape at high speed. During playback,
press to fast forward the tape while the picture
stays on the screen. Press to change a setting of
a menu item (for example, to adjust the
BRIGHTNESS) or to advance to the next menu.
REC(ord) Light
This light flashes during a recording. It
lights up when the TV/VCR power is off
for a timer recording. It blinks rapidly
when a recording is paused.
Remote Sensor
Receives a signal from your remote so you
can operate the TV/VCR from a distance.
VOLUME o/p
Buttons
Press to adjust the sound
level.
EARPHONE Jack
Connect earphones
(not supplied) here for
personal listening.
AUDIO In Jack
Connect this jack to the audio out jack of
a camcorder or another VCR. Details are
on page 30.
VIDEO In Jack
Connect this jack to the video out jack of
a camcorder or another VCR. Details are
on page 30.
MC09D5MG 4/12/02 12:20 PM Page 18


